
The user interface is implemented as collection of view ojects (e.g., a date widget, or editable text) -- a view is a class and a widget (e.g., a button) which is drawn on some part of the screen and is responsible for event handling such as when the user interacts with the UI (e.e., clicks on a button, enters the date). User's can construct sophisticated UIs by bundling views together using layouts (or ViewGroups) which can be considered as invisible containers. These containers can hold child containers. Each container defines its views (or other ViewGroups) and their layout properties.
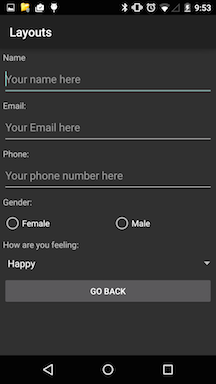
Take a look at the simple UI below -- it's not very exciting but demonstrates a number of common layouts and views. It consists of a simple linear vertical layout of widgers including TextViews, EditTexts, a couple of RadioButtons, a Spinner (currently indicating Happy) and a button with the text go back. We will discuss how to create a common set of layouts using XML.
The Andriod UI framework is flexible and easily extended. As you would imagine from all the apps you have used on smartphones the UI is a hugely important area to an app. It is also a huge topic that we will not have time to cover in any great depth -- we will take a slice through it. The book covers the UI in great detail so if you wantt to know more start there.
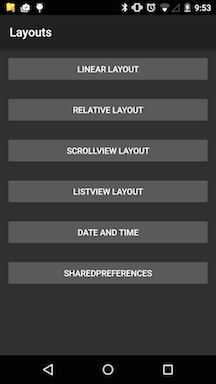
Try out the layout sample project, which includes a number of activities with their associated layouts- we will use it to illustrate a number or important UIs, how to handle user input (e.g., email address or the time). If you install the layouts app you will see its main screen represents a simple linear layout of a bunch of buttons. The first four button render different layouts, specifically: linear layout, relative layout, scrollview and listview. Following this there is a data and time screen and then a button that says SharedPreferences. Date and time use special widgets that the user can interact with to set, yes, the date and time. SharedPreferences is an object that can be used to store small amounts of user data so that when the app is killed and restarted the user's data is restored. Over the course of this lecture we will discuss how to design each of these views and discuss user data more.
You can build UIs using XML and/or using the the graphical layout tool. The graphical representation is shown below. My preference is to use XML once I have done some basic layout with the tool. On the left of the figure you can see a list of wdigets that you can select, drag, drop and arrange on the screen. Note, that the XML/graphical views can be toggled as shown in the figure. The figure shows the type of layout and highlights the first button -- on the right side you can see the properties of the button, for example, the button id @+id/btn_linear_layout, the width and height are match_parent and match_content respectively.
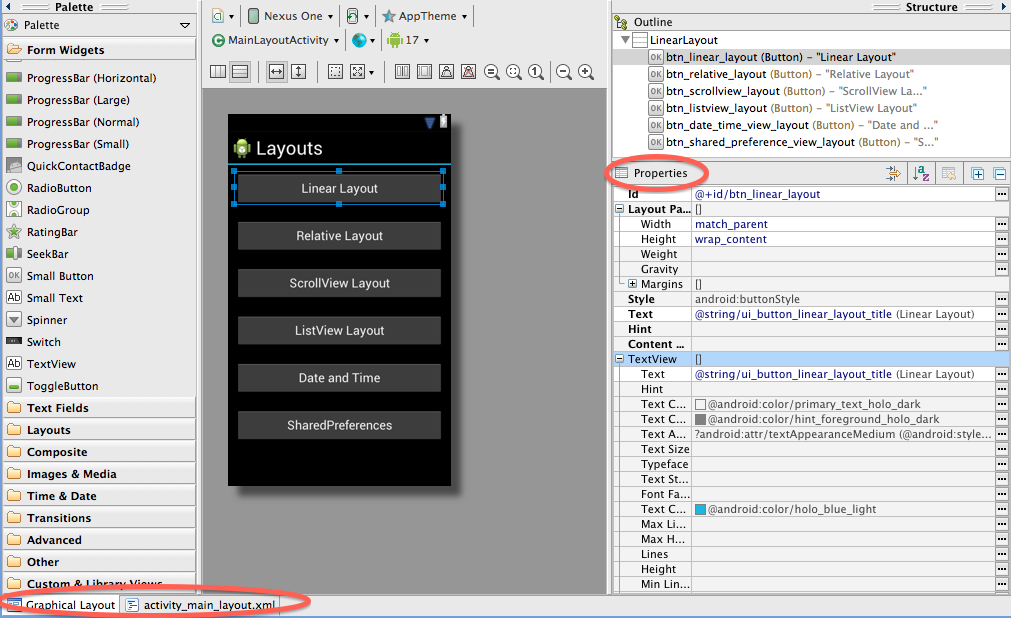
Let's look at the xml view of the same screen -- we only show the first two buttons in this linear layout because they are almost identical. You can look at the complete layout in the file activity_main_layout.xml in the project's layout folder.
In fact you can define your UI with XML or the graphical tool and programmatically in your code in you wish. I recommend specifying your UI not in your program but using the xml presentation. Why? Because it is a good idea to seperate the specification of UI from your code. It is more extensible (for example, having different layouts for different devices) rather than littering your program with lots of unnecessary UI code. By keeping things seperate you can completely change your UI without changing your code -- that's cool.
It is worth noting in the xml below that the UI elements for example Button closely resemble the name of the class and the methods; for example, Button is the class and the onLinearLayoutClicked is the call back set up to handle user interaction with this button. Other elements are properties of the object. We will discus those shortly.
The file below is the activity_main_layout.xml that is associated with the MainActivityLayout activity. This is a simple linear layout with a root or parent element and a vertical layout -- that is, LinearLayout object. In the layout below this represents a container for all the buttons -- so this is a viewgroup with a number of views/widgets (child elements).
<LinearLayout xmlns:android="http://schemas.android.com/apk/res/android"
    xmlns:tools="http://schemas.android.com/tools"
    android:layout_width="fill_parent"
    android:layout_height="fill_parent"
    android:orientation="vertical"
    tools:context=".MainLayoutActivity" >

    <Button
        android:id="@+id/btn_linear_layout"
        android:layout_width="match_parent"
        android:layout_height="wrap_content"
        android:layout_margin="10dp"
        android:onClick="onLinearLayoutClicked"
        android:text="@string/ui_button_linear_layout_title" />

    <Button
        android:id="@+id/btn_relative_layout"
        android:layout_width="match_parent"
        android:layout_height="wrap_content"
        android:layout_margin="10dp"
        android:onClick="onRelativeLayoutClicked"
        android:text="@string/ui_button_relative_layout_title" />

</LinearLayout>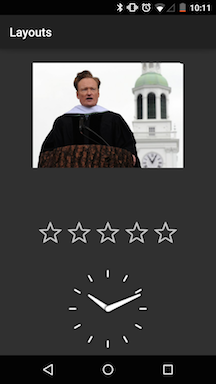
 <?xml version="1.0" encoding="utf-8"?>
<RelativeLayout xmlns:android="http://schemas.android.com/apk/res/android"
    android:layout_width="match_parent"
    android:layout_height="match_parent"
    android:paddingLeft="16dp"
    android:paddingRight="16dp" >

    <AnalogClock
        android:id="@+id/analogClock1"
        android:layout_width="wrap_content"
        android:layout_height="wrap_content"
        android:layout_alignParentBottom="true"
        android:layout_centerHorizontal="true" />

    <ImageView
        android:id="@+id/imageViewOfGirl"
        android:layout_width="wrap_content"
        android:layout_height="wrap_content"
        android:layout_alignParentTop="true"
        android:layout_centerHorizontal="true"
        android:layout_marginTop="24dp"
        android:adjustViewBounds="true"
        android:clickable="true"
        android:contentDescription="@string/ui_picture"
        android:maxHeight="250dp"
        android:maxWidth="250dp"
        android:minHeight="50dp"
        android:minWidth="50dp"
        android:onClick="onClickConan"
        android:scaleType="fitXY"
        android:src="@drawable/conan" />

    <RatingBar
        android:id="@+id/ratingBar1"
        android:layout_width="wrap_content"
        android:layout_height="wrap_content"
        android:layout_above="@+id/analogClock1"
        android:layout_centerHorizontal="true"
        android:layout_marginBottom="18dp" />

</RelativeLayout>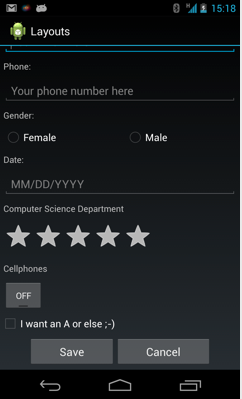
<ScrollView xmlns:android="http://schemas.android.com/apk/res/android"
    android:id="@+id/mainLayout"
    android:layout_width="match_parent"
    android:layout_height="match_parent"
    android:descendantFocusability="beforeDescendants"
    android:focusableInTouchMode="false" >

    <LinearLayout
        android:layout_width="fill_parent"
        android:layout_height="wrap_content"
        android:orientation="vertical" >

        <TextView
            android:layout_width="wrap_content"
            android:layout_height="wrap_content"
            android:layout_margin="5dp"
            android:text="@string/ui_profile_name_title" >
        </TextView>

        <EditText
            android:id="@+id/editName"
            android:layout_width="match_parent"
            android:layout_height="wrap_content"
            android:layout_margin="5dp"
            android:hint="@string/ui_profile_name_hint"
            android:inputType="textCapWords"
            android:singleLine="true" >
        </EditText>

        <TextView
            android:layout_width="wrap_content"
            android:layout_height="wrap_content"
            android:layout_margin="5dp"
            android:text="@string/ui_profile_email_title" >
        </TextView>

        <EditText
            android:id="@+id/editEmail"
            android:layout_width="match_parent"
            android:layout_height="wrap_content"
            android:layout_margin="5dp"
            android:hint="@string/ui_profile_email_hint"
            android:inputType="textEmailAddress"
            android:singleLine="true" >

            <requestFocus />
        </EditText>

        <TextView
            android:layout_width="wrap_content"
            android:layout_height="wrap_content"
            android:layout_margin="5dp"
            android:text="@string/ui_profile_phone_title" >
        </TextView>

        <EditText
            android:id="@+id/editPhone"
            android:layout_width="match_parent"
            android:layout_height="wrap_content"
            android:layout_margin="5dp"
            android:hint="@string/ui_profile_phone_hint"
            android:inputType="phone"
            android:singleLine="true" >
        </EditText>

        <TextView
            android:layout_width="wrap_content"
            android:layout_height="wrap_content"
            android:layout_margin="5dp"
            android:text="@string/ui_profile_gender_title" >
        </TextView>

        <RadioGroup
            android:id="@+id/radioGender"
            android:layout_width="match_parent"
            android:layout_height="wrap_content"
            android:layout_margin="5dp"
            android:orientation="horizontal" >

            <RadioButton
                android:id="@+id/radioGenderF"
                android:layout_width="wrap_content"
                android:layout_height="wrap_content"
                android:layout_weight="1"
                android:text="@string/ui_profile_gender_female" />

            <RadioButton
                android:id="@+id/radioGenderM"
                android:layout_width="wrap_content"
                android:layout_height="wrap_content"
                android:layout_weight="1"
                android:text="@string/ui_profile_gender_male" />
        </RadioGroup>

        <TextView
            android:layout_width="wrap_content"
            android:layout_height="wrap_content"
            android:layout_margin="5dp"
            android:text="@string/ui_profile_date_title" >
        </TextView>

        <EditText
            android:id="@+id/editText1"
            android:layout_width="match_parent"
            android:layout_height="wrap_content"
            android:layout_margin="5dp"
            android:hint="@string/ui_profile_date_hint"
            android:inputType="date" >
        </EditText>

        <TextView
            android:layout_width="wrap_content"
            android:layout_height="wrap_content"
            android:layout_margin="5dp"
            android:text="@string/ui_profile_department_title" >
        </TextView>

        <RatingBar
            android:id="@+id/ratingBar1"
            android:layout_width="wrap_content"
            android:layout_height="wrap_content"
            android:layout_margin="5dp" />

        <TextView
            android:layout_width="wrap_content"
            android:layout_height="wrap_content"
            android:layout_margin="5dp"
           android:text="@string/ui_profile_device_title" >
        </TextView>

        <ToggleButton
            android:id="@+id/toggleButton1"
            android:layout_width="wrap_content"
            android:layout_height="wrap_content"
            android:layout_margin="5dp"/>

        <CheckBox
            android:id="@+id/checkBox1"
            android:layout_width="wrap_content"
            android:layout_height="wrap_content"
            android:text="@string/ui_profile_demand_title" />

        <LinearLayout
            android:layout_width="match_parent"
            android:layout_height="wrap_content"
            android:layout_margin="5dp" >

            <Button
                android:id="@+id/btnSave"
                android:layout_width="wrap_content"
                android:layout_height="wrap_content"
                android:layout_marginLeft="40dp"
                android:layout_weight="1"
                android:onClick="onSaveClicked"
                android:text="@string/ui_button_save_title" >
            </Button>

            <Button
                android:id="@+id/btnCancel"
                android:layout_width="wrap_content"
                android:layout_height="wrap_content"
                android:layout_marginRight="40dp"
                android:layout_weight="1"
                android:onClick="onCancelClicked"
                android:text="@string/ui_button_cancel_title" >
            </Button>
        </LinearLayout>
    </LinearLayout>

</ScrollView> <?xml version="1.0" encoding="utf-8"?>
<LinearLayout xmlns:android="http://schemas.android.com/apk/res/android"
xmlns:tools="http://schemas.android.com/tools"
android:layout_width="match_parent"
android:layout_height="match_parent"
android:orientation="horizontal" >
</LinearLayout>You don't always have to build your UI from low level views and widgets. App designers can use higher level pre-made UI components to build there UIs. We will discuss these later -- examples of these components include ActioBar, Dialogs and Status Notification. We will use all of these components in this course.