# Lecture 4 - User Interface (UI)
Android is all about creating beautiful interfaces that are intuitive to use.
## What this lecture will teach you
- Understanding how to create a number of common UI layouts
- Using XML and the design tool for specifying layouts
- Styles and themes
- Phone dimensions
- Operations and attributes of views
## Checkout the demo project
Download the demo the [layout.zip](../code/layouts.zip) app specifically designed to go with these notes.
How to run the code: You need to unzip the code in your download folder or desktop and then use the **File->import->Existing Android code in workspace**. Then the project should just run.
OK. Let's get started. Where else but with terminology and UI classes.
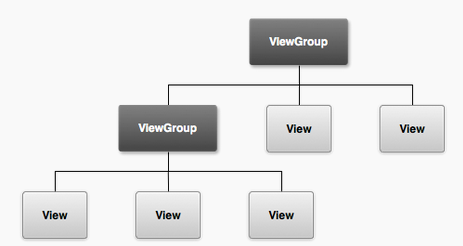
## Terminology: views, widgets, view groups, layouts, containers
The user interface is implemented as collection of view objects (e.g., a date widget, or editable text) -- a view is a class and a widget (e.g., a button) which is drawn on some part of the screen and is responsible for event handling such as when the user interacts with the UI (e.e., clicks on a button, enters the date). User's can construct sophisticated UIs by bundling views together using layouts (or ViewGroups) which can be considered as invisible containers. These containers can hold child containers. Each container defines its views (or other ViewGroups) and their layout properties.
Take a look at the simple UI below -- it's not very exciting but demonstrates a number of common layouts and views. It consists of a simple linear vertical layout of widgets including TextViews, EditTexts, a couple of RadioButtons, a Spinner (currently indicating Happy) and a button with the text *go back*. We will discuss how to create a common set of layouts using XML.

The Android UI framework is flexible and easily extended. As you would imagine from all the apps you have used on smartphones the UI is a hugely important area to an app. It is also a huge topic that we will not have time to cover in any great depth -- we will take a slice through it. The book covers the UI in great detail so if you want to know more start there.
## Sample project: Layout
**Download, import, view and run the demo [layout.zip](../code/layouts.zip) but first just install and run the layout.apk.** We will use the layout sample code in this lecture to understand a number of things: different UI layouts, click input, toast, saving user data and more. Make sure you don't blindly load and run the code -- you'll learn almost zero from that. Rather, connect the dots. Check through the various activity, layout and resource files.
**Try the demo** Start the app and check it out.
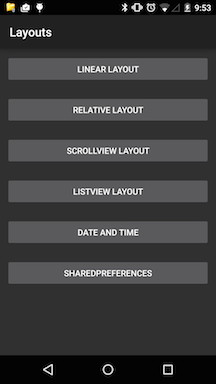
Try out the layout sample project, which includes a number of activities with their associated layouts- we will use it to illustrate a number or important UIs, how to handle user input (e.g., email address or the time). If you install the layouts app you will see its main screen represents a simple linear layout of a bunch of buttons. The first four button render different layouts, specifically: linear layout, relative layout, scrollview and listview. Following this there is a data and time screen and then a button that says SharedPreferences. Date and time use special widgets that the user can interact with to set, yes, the date and time. SharedPreferences is an object that can be used to store small amounts of user data so that when the app is killed and restarted the user's data is restored. Over the course of this lecture we will discuss how to design each of these views and discuss user data more.
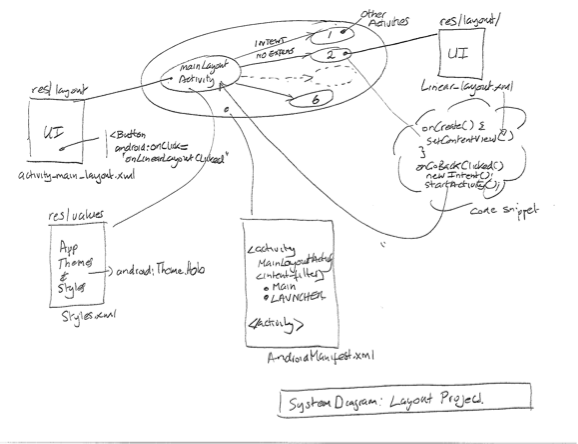
## Systems diagram
I think it is good to see the app in pictorial fashion, as shown below. The diagram is a blue print for the app. It comprises the MainLayoutActivity and the other 6 activities -- one for each of the buttons (e.g., Linear Layout). Example layouts for the UIs are shown as well as the intents that fire activities, snippets of code, and importantly the AndroidManifest which *wires* together all components and resources to make the app work. Keep this digram in mind as you go through these notes and refer back to it here and there. It should be helpful.
I'd recommend the following steps to unlocking how a project works:
* import the project and run it on your phone.
* play with the various features of the app
* study the systems diagram of the application components
* study the code
This is a nice top down approach that lends itself to understanding the app.
## Writing XML layouts and/or using the design tool
You can build UIs using XML and/or using the design tool. The graphical representation is shown below. My preference is to use XML once I have done some basic layout with the tool. On the left of the figure you can see a list of widgets that you can select, drag, drop and arrange on the screen. **Note, that the XML/graphical views can be toggled as shown in the figure**. The figure shows the type of layout and highlights the first button -- on the right side you can see the properties of the button, for example, the button id `@+id/btn_linear_layout`, the width and height are `match_parent` and `wrap_content` respectively.

Let's look at the xml view of the same screen -- we only show the first two buttons in this linear layout because they are almost identical. You can look at the complete layout in the file `activity_main_layout.xml` in the project's layout folder.
In fact you can define your UI with XML or the graphical tool and programmatically in your code in you wish. I recommend specifying your UI not in your program but using the xml presentation. Why? Because it is a good idea to separate the specification of UI from your code. It is more extensible (for example, having different layouts for different devices) rather than littering your program with lots of unnecessary UI code. By keeping things separate you can completely change your UI without changing your code -- that's cool.
It is worth noting in the xml below that the UI elements for example Button closely resemble the name of the class and the methods; for example, Button is the class and the `onLinearLayoutClicked` is the call back set up to handle user interaction with this button. Other elements are properties of the object. We will discus those shortly.
## Styles and themes
Themes are Android's mechanism for applying a consistent style to an app or activity. The style specifies the visual properties of the elements that make up your user interface, such as color, height, padding and font size. Android provides three system themes that you can choose from when building apps for Lollipop (Android 5.0+).
- Material (dark version)
- Material Light (light version)
- Material Light with dark action bars (we will discuss action bars later)
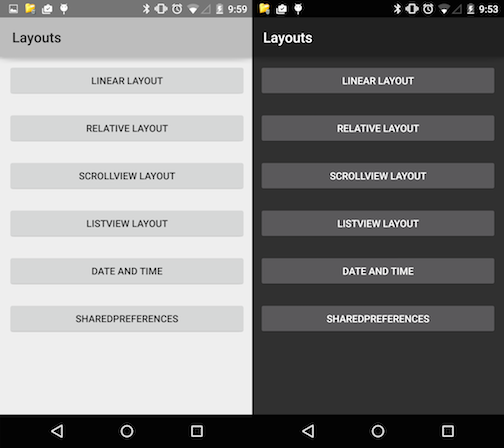
When designing the UI you could start with selecting the theme that matches your needs and then, if you wish, customize it further. For now let's look at the layout app with different styles - Theme.Holo.Light (left) and Theme.Holo (right).
These are set in the xml file res/values/style.xml
~~~{.java}
~~~
The Theme.Material (is Material.Dark in actual fact) style is the default when you create a project and has the dark look. If you want the lighter theme use:
~~~{.java}