The phone really is a Swiss army knife. It is a phone, camera, mp3 player -- and a million other things when you consider all the apps that you can download -- the flashlight app can come in very useful. The camera is used for lots of things: snaps, video, virtual reality, car safety apps. MyRuns1 uses the camera in a simple manner -- just to take a photo for the user profile. Apps can easily fire the camera app to take a photo and then manipulate the image that is returned, such as, cropping a thumbnail version of the picture. In this lecture, we discuss how to use the camera and crop apps.
Also importantly we need to save app data, so this lecture also includes pointers on that:
The demo code used in this lecture include:
Simple use of the camera with camerademo.zip. The first project is a very simple app for just taking and displaying the photo in the gallery. The photo is saved in a file. So you implicitly see how to interact with files. The following demo of the camera app is taken directly from the course book CamerContentDemo.
The version of the next camera app (below) without Dialogs and Fragements (to be discussed next week) is here. Use this code example rather than the one below. Caveat: the notes in this lecture need updating because they refer to Dialog and Fragments. Please try and ignore these. Sorry for being confusing here.
Photo and crop app with camera.zip. This project provides additional cropping and allows the user to update an existing picture in the UI -- we need to do this in MyRuns1 so the code serves as a template to doing that. The project also supports building and displaying of customized dialogs, which will come in handy with the MyRuns app.
We haven't talked about what about what makes the Nexus 4 the Nexus 4.
How beautiful is the Nexus 4 hardware -- the software is darn cool too. You have to love its look and Corning's Gorilla glass but the most geeky thing is that is has a quad-core processor -- think of it class, Moore's law is now doubling the cores every 18 months or less. Nexus 4 is the first smartphone using system on a chip -- Qualcomm Snapdragon S4 Pro CPU. This is an incredibly cool piece of computing technology. These are exciting times for mobile: the hardware and software is incredibly awesome and you have it in your hands.
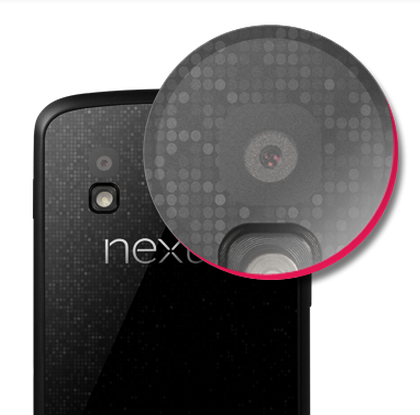
First the Nexus 4 like many of the smartphones on the market today has two cameras -- front and back -- and we will learn to use some very basic part of the camera API in this lecture. The 8-megapixel (MP) camera back camera is fine not a nice as the Samsung S3 12 MP camera. The front camera is typically lower quality -- used for video chat, etc. The front camera is 1.3 MP. The software comes with what Google call Photo Sphere, which lets you capture images in all directions around you -- very cool. The camera sensors are basic.
The Nexus 4 has a lot more than cameras -- checkout the specification:
Radios
Can you believe that!
Sensors
No, no, I can't believe this. We are not done yet.
Processors
Memory
OK back to the camera -- I must admit I get totally excited by what is compressed inside some thing that weighs 139g; I know I'm weird. But it's stunning and do not loose sight of hardware developments.
Many applications want to take a photo. We will discuss how an app can launch the camera, the user can take a photo and the control returns back to the app that invoked the camera. You will do this for the MyRuns Lab 1.
The following simple demo of the camera app is taken directly from the course book -- the code camerademo.zip is a slightly modified version of the original CamerContentDemo.
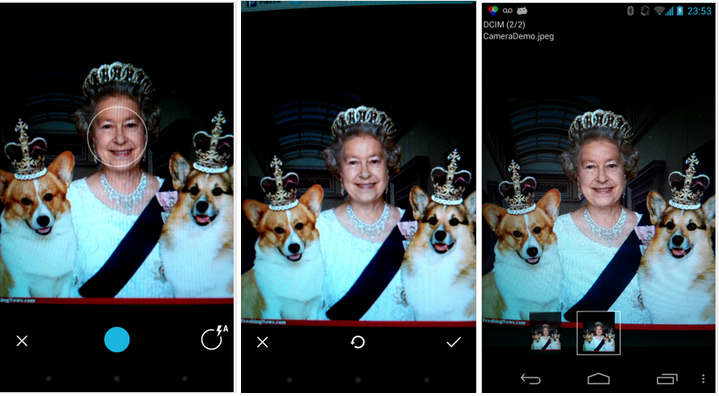
I've had my mother Brenda pose to demo this app with jack and jean her beloved dogs. The three screen dumps show the progression of the app once it is fired. The first image shows the app with the camera app active. The camera app's UI is shown and it is a fully functioning camera view -- full control to set flash, etc. The next image is to check and save the image. The final image is shown after the final part of the demo fires an intent to show the stored image to the user using the gallery app. Note the top left hand corner of the final image: you can see the name of the saved image and its directory. There are two photos in the gallery.
The activation of the camera and gallery apps is via implicit intents. Next, we will discuss how to implement this in the code.
You probably are getting use to this now but if you want to start another activity you need to fire an intent -- and that is exactly what we do below. We create an intent using MediaStore.ACTION_IMAGE_CAPTURE action.
The steps needed to take a photo and store it in a file are as follows:
startActivityForResult(i, CAPTURE_IMAGE_ACTIVITY_REQUEST_CODE). Note, that after you start the intent, the Camera app UI appears on the device screen and the user can take a photo. We ask the system to return back to the calling activity with a result -- hopefully, the photo was successfully taken.The above steps all are implemented as part of onCreate() as shown below.
public class CameraDemoActivity extends Activity {
            private static final int CAPTURE_IMAGE_ACTIVITY_REQUEST_CODE = 111;
            private File output = null;

            @Override
            public void onCreate(Bundle savedInstanceState) {
                        super.onCreate(savedInstanceState);

                        // create Intent to take a picture and return control to the calling
                        // application
                        Intent i = new Intent(MediaStore.ACTION_IMAGE_CAPTURE);

                        // set up the path name and create a file to save the image
                        File dir = Environment
                                        .getExternalStoragePublicDirectory(Environment.DIRECTORY_DCIM);

                        output = new File(dir, "CameraDemo.jpeg");
                        i.putExtra(MediaStore.EXTRA_OUTPUT, Uri.fromFile(output));

                        // start the image capture Intent
                        startActivityForResult(i, CAPTURE_IMAGE_ACTIVITY_REQUEST_CODE);
}The final part of the steps for displaying the photo are implemented as part of the onActivityResult()call back. Here your app receives a callback and data from the camera intent. In the onActivityResult() callback the code fires the viewer using another intent (using ACTION_VIEW to render the photo stored file: CameraContentDemo.jpeg. This file (data) is used by the receiving app (i.e., gallery app, or another app capable of displaying a JPEG file). The result is that the photo taken under user control by the camera app is displayed on the screen for the user to see by the gallery app.
The file is stored in the data/DCIM on your phone. Run the app and the use Android explorer or the File Manager on the phone to view the file. If you use the Android explorer you need to drag and drop the file to your desktop (i.e., copy it over) before looking at it.
            @Override
            protected void onActivityResult(int requestCode, int resultCode, Intent data) {
                        // Check the request is for taking a photo and OK
                        if (requestCode == CAPTURE_IMAGE_ACTIVITY_REQUEST_CODE) {
                                    if (resultCode == RESULT_OK) {

                                                // fire the intent to view the photo in gallery or another app
                                                Intent i = new Intent(Intent.ACTION_VIEW);
                                                i.setDataAndType(Uri.fromFile(output), "image/jpeg");
                                                startActivity(i);
                                                finish();
                                    }
                        }
            }
}
The file in both snippets of code use a uniform resource identifier (URI), which is a string of characters used to identify a name or a web resource.
We have now used two different types of intents called Implicit and explicit intents. We have used explicit intents numerous times to start activities such as shown below where we set the intent up to explicitly start a particular activity by naming the target activity
        Intent intent = new Intent(MainLayoutActivity.this, LinearLayoutActivity.class);
        startActivity(intent);
The second type of intents are implicit intents, which we have been using in this lecture. Implicit intents do not name a target but the action, as shown below. Implicit intents are often used to activate components in other applications.
            Intent i = new Intent(Intent.ACTION_VIEW);
            i.setDataAndType(Uri.fromFile(output), "image/jpeg");
            startActivity(i);
The intent only ACTION_VIEW the action. The system resolves to start the activity capable of handling the action without explicitly starting a browser or gallery. The Android system tries to find an app that is capable of performing the requested action in the implicit intent. It does this by considering the requested action, the data that has been passed in the intent (e.g., JPEG file) -- it uses intent filters that consider -- the action, data and category.
One issue with implicit intents is that you have no control over the app; for example in the case of the camera or the gallery; you fire it and hope for the best. This is a limitation of the approach.
Let's consider a new application that not only takes and stores a photo but also crops the photo based on the user's needs. We now look at the demo project included in this lecture: camera.zip. This is also needed for MyRuns Lab 1. There isn't anything in the book so the code below and Stackoverflow reference should help. The demo app also include a way to build and control customized dialogs, which is also very useful in developing MyRuns.
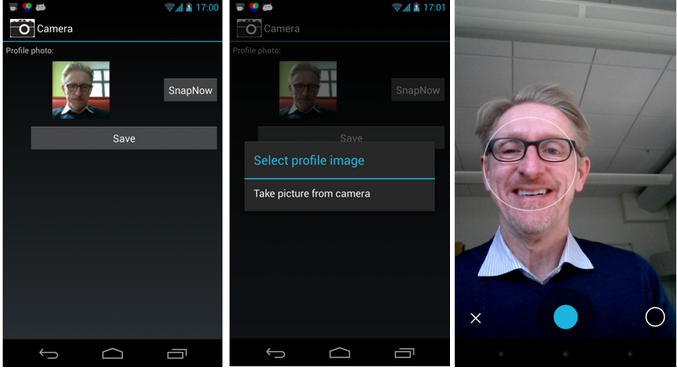
The app works as follows. The first free images are: 1) after the app is first launched; 2) when SnapNow is selected; 3) when the camera app is launched.
The next set of screen dumps show the remainder of the operations in the app workflow: 4) after the photo is take; 5) when the crop app is launched; 6) after the image has been cropped and inserted by replacing the existing photo.
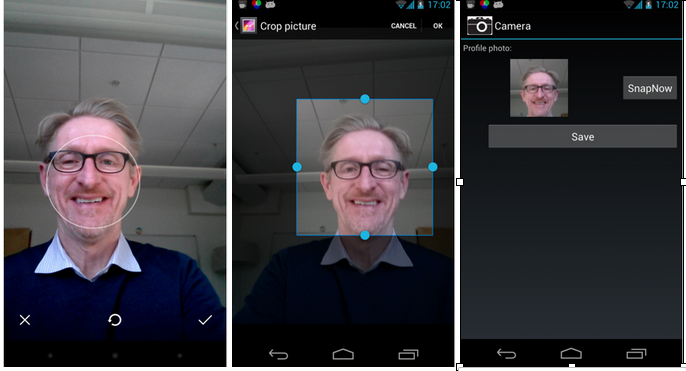
The program allows the user to replace the existing picture if it exists. Note, the program as a better design in terms of helper functions for save_snap() and load_snap(). These help functions load the photo and render it on the UI if it already exists and save a photo it one is taken so it is rendered in the UI next time the app runs.
The code also has a better way for other activities to return to the calling activity. For example onActivityResult() is the return callback for the camera app after taking a photo and from crop app after cropping. This is a clean design.
Similarly, we handle dialogs more cleanly. Because there are many dialogs in the MyRuns application we start to build up a common way to handle them in MyRunsDialogFragment which can be extended to handle different type of dialogs. Again, this is a clean design where all dialogs are managed in a centralized manner.
First, note that in the manifest we have to be granted permission to use the camera app.
    <uses-feature android:name="android.hardware.camera" />
<uses-permission android:name="android.permission.CAMERA" />The onCreate() code sets of the view, gets a reference to the current image and retrieves the current image capture URI if it has been saved by the activity when the app exited and called onSaveInstanceState().
 public class CameraControlActivity extends Activity {

            public static final int REQUEST_CODE_TAKE_FROM_CAMERA = 0;
            public static final int REQUEST_CODE_CROP_PHOTO = 2;

            private static final String IMAGE_UNSPECIFIED = "image/*";
            private static final String URI_INSTANCE_STATE_KEY = "saved_uri";

            private Uri mImageCaptureUri;
            private ImageView mImageView;
            private boolean isTakenFromCamera;

            @Override
            public void onCreate(Bundle savedInstanceState) {
                        super.onCreate(savedInstanceState);
                        setContentView(R.layout.profile);
                        mImageView = (ImageView) findViewById(R.id.imageProfile);

                        if (savedInstanceState != null) {
                                    mImageCaptureUri = savedInstanceState
                                                            .getParcelable(URI_INSTANCE_STATE_KEY);
                        }

                        loadSnap();
            }

            @Override
            protected void onSaveInstanceState(Bundle outState) {
                        super.onSaveInstanceState(outState);
                        // Save the image capture uri before the activity goes into background
                        outState.putParcelable(URI_INSTANCE_STATE_KEY, mImageCaptureUri);
            }
Two important callbacks are shown in the code below. When the user selects the SnapNow as shown above onChangePhotoClicked(View v) is called. This kicks the main workflow of that is shown in the series of images above. The displayDialog() method creates a new dialog fragment and then onCreateDialog() is called -- see the discussion at the end of the notes on this; but, in summary:
            public void onSaveClicked(View v) {
                        // Save picture
                        saveSnap();
                        // Making a "toast" informing the user the picture is saved.
                        Toast.makeText(getApplicationContext(),
                                                getString(R.string.ui_profile_toast_save_text),
                                                Toast.LENGTH_SHORT).show();
                        // Close the activity
                        finish();
            }

            public void onChangePhotoClicked(View v) {
                        // changing the profile image, show the dialog asking the user
                        // to choose between taking a picture
                        // Go to MyRunsDialogFragment for details.
                        displayDialog(MyRunsDialogFragment.DIALOG_ID_PHOTO_PICKER);
            }

            public void displayDialog(int id) {
                        DialogFragment fragment = MyRunsDialogFragment.newInstance(id);
                        fragment.show(getFragmentManager(),
                                                getString(R.string.dialog_fragment_tag_photo_picker));
            }
The onPhotoPickerItemSelected() callback constructs the intent for the camera app as in the first example project using the ACTION_IMAGE_CAPTURE action -- this is an implicit intent. Again, it does not identify the application that meets the action, it just says to the Android system -- need a snap, figure it out for me.
Because we are taking a photo and later cropping it we set up a temporary path and name to save the photo as we work on it using the and store it in private data (to this activity) mImageCaptureUri (crop later access this). We construct a temporary file based on time and extension jpg. Question: can you tell me where on your phone these photos are stored? The mImageCaptureUri is passed in the intent to the camera app, as is the case with first camera app. Then the camera app is implicitly started using startActivityForResult(). Once the user has taken a picture and clicked the tick icon then control will return to startActivityForResult() with REQUEST_CODE_TAKE_FROM_CAMERA as an input parameter.
            public void onPhotoPickerItemSelected(int item) {
                        Intent intent;

                        switch (item) {

                        case MyRunsDialogFragment.ID_PHOTO_PICKER_FROM_CAMERA:
                                    // Take photo from camera
                                    // Construct an intent with action
                                    // MediaStore.ACTION_IMAGE_CAPTURE
                                    intent = new Intent(MediaStore.ACTION_IMAGE_CAPTURE);
                                    // Construct temporary image path and name to save the taken
                                    // photo
                                    mImageCaptureUri = Uri.fromFile(new File(Environment
                                                            .getExternalStorageDirectory(), "tmp_"
                                                            + String.valueOf(System.currentTimeMillis()) + ".jpg"));
                                    intent.putExtra(android.provider.MediaStore.EXTRA_OUTPUT,
                                                            mImageCaptureUri);
                                    intent.putExtra("return-data", true);
                                    try {
                                                // Start a camera capturing activity
                                                // REQUEST_CODE_TAKE_FROM_CAMERA is an integer tag you
                                                // defined to identify the activity in onActivityResult()
                                                // when it returns
                                                startActivityForResult(intent, REQUEST_CODE_TAKE_FROM_CAMERA);
                                    } catch (ActivityNotFoundException e) {
                                                e.printStackTrace();
                                    }
                                    break;

                        default:
                                    return;
                        }
}onActivityResult() is called once the user has completed taken the photo. Note there are two possible execution paths in onActivityResult():
            // Handle data after activity returns.
            @Override
            protected void onActivityResult(int requestCode, int resultCode, Intent data) {
                        if (resultCode != RESULT_OK)
                                    return;

                        switch (requestCode) {
                        case REQUEST_CODE_TAKE_FROM_CAMERA:
                                    // Send image taken from camera for cropping
                                    cropImage();
                                    break;

                        case REQUEST_CODE_CROP_PHOTO:
                                    // Update image view after image crop
                                    Bundle extras = data.getExtras();
                                    // Set the picture image in UI
                                    if (extras != null) {
                                                mImageView.setImageBitmap((Bitmap) extras.getParcelable("data"));
                                    }

                                    // Delete temporary image taken by camera after crop.
                                    if (isTakenFromCamera) {
                                                File f = new File(mImageCaptureUri.getPath());
                                                if (f.exists())
                                                            f.delete();
                                    }

                                    break;
                        }
}To private helper functions support the code for loading the photo from internal storage and committing any changes to the image that have taken place in the execution of the app. More specifically:
            private void saveSnap() {

            // Commit all the changes into preference file
                        // Save profile image into internal storage.
                        mImageView.buildDrawingCache();
                        Bitmap bmap = mImageView.getDrawingCache();
                        try {
                                    FileOutputStream fos = openFileOutput(
                                                            getString(R.string.profile_photo_file_name), MODE_PRIVATE);
                                    bmap.compress(Bitmap.CompressFormat.PNG, 100, fos);
                                    fos.flush();
                                    fos.close();
                        } catch (IOException ioe) {
                                    ioe.printStackTrace();
                        }
            }

            private void loadSnap() {

                        // Load profile photo from internal storage
                        try {
                                    FileInputStream fis = openFileInput(getString(R.string.profile_photo_file_name));
                                    Bitmap bmap = BitmapFactory.decodeStream(fis);
                                    mImageView.setImageBitmap(bmap);
                                    fis.close();
                        } catch (IOException e) {
                                    // Default profile photo if no photo saved before.
                                    mImageView.setImageResource(R.drawable.default_profile);
                        }
            }
There is noting in the books about cropping an image but we can fire an implicit intent to start the crop app and pass the image as data and type in the intent. Extract data is used to set the dimension of the image size needed by the crop. More esoteric data is passed associated with aspect ration and finally the intent is fired with REQUEST_CODE_CROP_PHOTO.
See Android crop Image for more information.
            // Crop and resize the image for profile
            private void cropImage() {
                        // Use existing crop activity.
                        Intent intent = new Intent("com.android.camera.action.CROP");
                        intent.setDataAndType(mImageCaptureUri, IMAGE_UNSPECIFIED);

                        // Specify image size
                        intent.putExtra("outputX", 100);
                        intent.putExtra("outputY", 100);

                        // Specify aspect ratio, 1:1
                        intent.putExtra("aspectX", 1);
                        intent.putExtra("aspectY", 1);
                        intent.putExtra("scale", true);
                        intent.putExtra("return-data", true);
                        // REQUEST_CODE_CROP_PHOTO is an integer tag you defined to
                        // identify the activity in onActivityResult() when it returns
                        startActivityForResult(intent, REQUEST_CODE_CROP_PHOTO);
            }

}If you are designing an app like MyRuns that uses dialogs all over the code it is better to provide a common dialog services that can be used to build, show and return user input from dialogs. MyRunsDialogFragment() handles all the customized dialog boxes in our project -differentiated by dialog id used but the MyRunsDialogFragment constructor. This is all accomplished by extending the simple MyRunsDialogFragment fragment shown below which extends the DialogFragment class . The code is self-explanatory:
When the user touches the dialog "take picture from camera" the onChangePhotoClicked() method calls displayDialog() to display the dialog and trigger the workflow shown in the workflow diagram.
            public void displayDialog(int id) {
                        DialogFragment fragment = MyRunsDialogFragment.newInstance(id);
                        fragment.show(getFragmentManager(),
                                                getString(R.string.dialog_fragment_tag_photo_picker));
            }
You can extend this code for MyRuns 2 where you could select from the galley (and an existing photo) as well as the camera.
public class MyRunsDialogFragment extends DialogFragment {

            // Different dialog IDs
            public static final int DIALOG_ID_ERROR = -1;
            public static final int DIALOG_ID_PHOTO_PICKER = 1;

            // For photo picker selection:
            public static final int ID_PHOTO_PICKER_FROM_CAMERA = 0;

            private static final String DIALOG_ID_KEY = "dialog_id";

            public static MyRunsDialogFragment newInstance(int dialog_id) {
                        MyRunsDialogFragment frag = new MyRunsDialogFragment();
                        Bundle args = new Bundle();
                        args.putInt(DIALOG_ID_KEY, dialog_id);
                        frag.setArguments(args);
                        return frag;
            }

            @Override
            public Dialog onCreateDialog(Bundle savedInstanceState) {
                        int dialog_id = getArguments().getInt(DIALOG_ID_KEY);

                        final Activity parent = getActivity();

                        // Setup dialog appearance and onClick Listeners
                        switch (dialog_id) {
                        case DIALOG_ID_PHOTO_PICKER:
                                    // Build picture picker dialog for choosing from camera or gallery
                                    AlertDialog.Builder builder = new AlertDialog.Builder(parent);
                                    builder.setTitle(R.string.ui_profile_photo_picker_title);
                                    // Set up click listener, firing intents open camera
                                    DialogInterface.OnClickListener dlistener = new DialogInterface.OnClickListener() {
                                                public void onClick(DialogInterface dialog, int item) {
                                                            // Item is ID_PHOTO_PICKER_FROM_CAMERA
                                                            // Call the onPhotoPickerItemSelected in the parent
                                                            // activity, i.e., ameraControlActivity in this case
                                                            ((CameraControlActivity) parent)
                                                                                    .onPhotoPickerItemSelected(item);
                                                }
                                    };
                                    // Set the item/s to display and create the dialog
                                    builder.setItems(R.array.ui_profile_photo_picker_items, dlistener);
                                    return builder.create();
                        default:
                                    return null;
                        }
            }
}Android has a number of options to store the apps data. Take a look at the developer notes for more details. MyRuns1 will require you to save the profile photo to a file.
The options for storage in Android can be summarized as:
We will use all of these options when building out the complete MyRuns app.
Also read saving files.
For example you can use openFileOutput(String name, int mode) to open a private file associated with this Context's application package for writing. This is a good place to store private data associated with an app. Consider the following snippet. The file profile_file.png is saved to /data/data/edu.dartmouthcs.myruns1/files. You may only get access to the file if rooted.
        try {
            if (mProfilePictureArray != null) {
                Log.d(TAG, "Save photo in ByteArray to profile_photo.png");
                FileOutputStream fos = openFileOutput(
                        getString(R.string.profile_photo_file_name),
                        MODE_PRIVATE);
                fos.write(mProfilePictureArray);

                // from the code - path of profile_photo.png
                // is/data/data/edu.dartmouthcs.myruns1/files

                String path = this.getFilesDir().getAbsolutePath();
                Log.d(TAG, "path of profile_photo.png is" + path);

                fos.flush();
                fos.close();
            }
        } catch (Exception ioe) {
            ioe.printStackTrace();
        }