Before we can run a simple Google App Engine (GAE) application, we need to setup local GAE development environment. We will run GAE applications locally. You can also deploy your applications to GAE to provide services to users all over the world. GAE provides a general platform for cloud sides services where native Android apps such as MyRuns can build out the app framework to, for example, store runs in the cloud and allow other users to share data or allow the user to view the data through the web; for example, using a laptop based browser for better viewing and visualization. Getting to know how to use, GAE or App Engine for short, is the final tool for your Android toolkit -- note, there are many other components to Android that we have not have time to cover in detail. What we have done in the class is to focus on a core set of components and skill development that makes your new skills very marketable, or your money back.
The problem with Google App Engine for teaching is that it's fluid. The course book has no information on the App Engine. The best up to date information is Google App Engine on the developers site. Much of the information we have gathered for these notes comes from the developers site and other related documentation -- cited by links in our notes.
A short tutorial on App Engine.
Two demo projects are given out:
The first demo code: first App Engine project allows you to submit a string to web server; the server echo's the string back.
In the second demo code: google app engine project, ancestor queries are used for strong consistency. Data operations are defined in edu.dartmouth.cs.gae_sample.data.ContactDatastore.query_result.jsp is used for displaying query results. QueryServlet put query result list in request object's attribute, query_result.jsp use get the result list from the request object, then generate the result Web page. Data operation servlets(add, delete, update) will redirect browser to QueryServlet so that user can see the operation result immediately.
Don't worry that you don't understand the technical text in the demo description -- come back to it once you have read the notes and thought about the lecture.
Mobile apps require cloud services for many different things: maintain a social network, gaming services, storage services, etc. Many mobile clients interact with these backend services (aka the cloud) through a set of APIs. Whenever you write server code and deploy a server there are a number of infrastructure and configuration issues that you need to take care of such as scaling, access, deploying server side code, protocol interaction between the clients and server.
Google App Engine is a Platform as a Service (PaaS) that manages many of these server side issues. It provides a number of APIs to allow you to deploy servers on the Google cloud and not worry about scaling and other server side issues. It offers different types of storage (e.g., Data Store -- which we will use in MyRuns6) and task management.
The App Engine allows you to interact with services via a web browser (as the demo code in these notes do) or via a native Android app such as MyRuns.
So the App Engine takes away many of the problems of hosting servers on the Internet and provides a set of tools to build scalable services. While the PR is that you just upload your application and your are ready to go -- it is not as simple as that. In these notes we discuss how to set up your ADT environment and set up a simple web application that uses a http based servlet that the client interacts.
Google App Engine also includes a simulation environment where you can deploy your application to a local cloud (that looks and feels like you have actually deployed to Google infrastructure). The local deployment is a good place to start to debug your client and server side of the application.
We will discuss how all the parts of a service are captured in the project folder in ADT and how they are deployed.
While the notes below are targeted to a thin slice through the App Engine you can find more out from the Google App Engine developers site.
There is little of no information in the course book. This is because the App Engine environment is still fluid. We have updated these notes from last year and we have checked they are current and work.
Take a look through the key features of the App Engine APIs and environment. We will use a limited set of these features in the class:
Others not included but important if you wanted to manage a scalable service are:
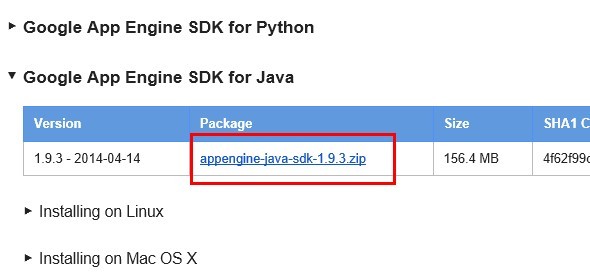
To set up the GAE development environment, you need to firstly install the GAE Java SDK, then install Google Plugin for eclipse. Also, you also need to make sure your eclipse is using JDK instead of JRE if you want to develop JSP in your project.
Google Plugin for eclipse, which is used to develop GAE project in eclipse, requires JDK 1.7. If your version of JDK is not 1.7, you can go to Java SE download site to download and install the latest version of JDK 1.7.
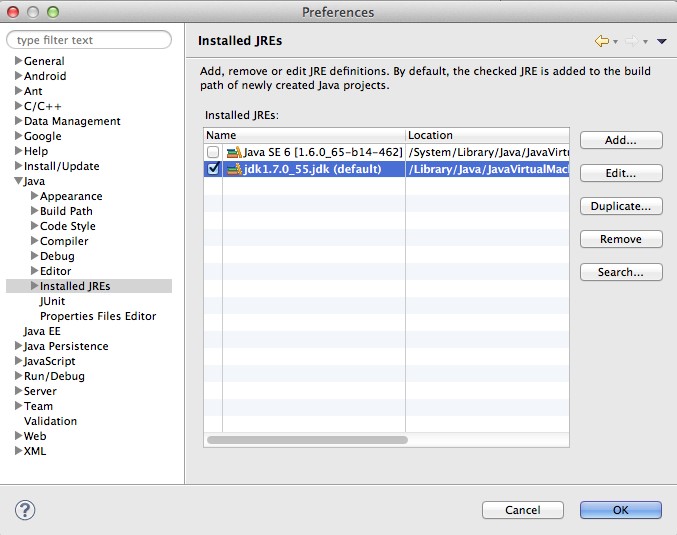
After you installed the JDK, you need to set it up in your eclipse. In eclipse, go to "ADT"->"Preferences", in the left column, find "Java" -> "Installed JREs", check if you have selected the latest JDK you installed.
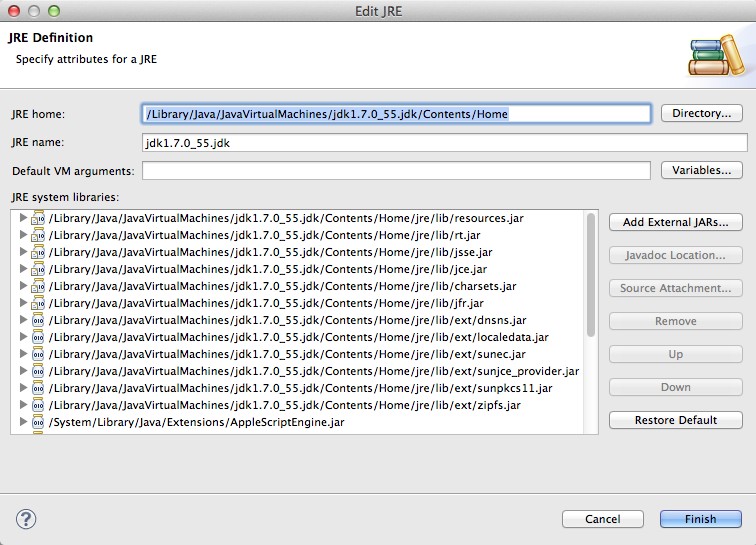
If not, you need to add JDK to eclipse. To do this, click "Add..." button, select "Standard VM" in the following window and click "Next". Input the path to your JDK in "JRE Home" in the following window, as shown below. Click "Finish" when you are done, and remember to select the jdk you just added in the previous window.
Before setting up your eclipse (or ADT), you need to know the version of your install eclipse. Then use corresponding eclipse update site URL to install Google Plugin for Eclipse.
the version is shown like the screenshot below.
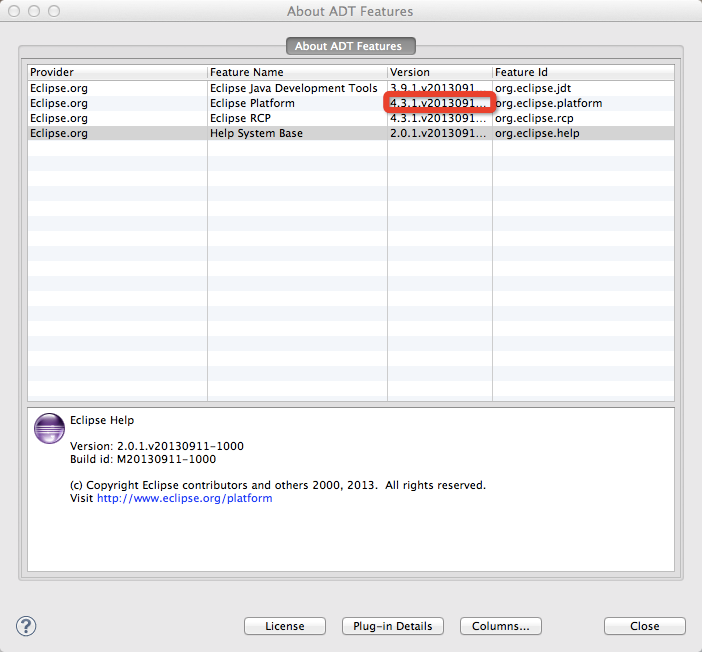
So the Google Plugging version for 4.3 would be:
https://dl.google.com/eclipse/plugin/4.3
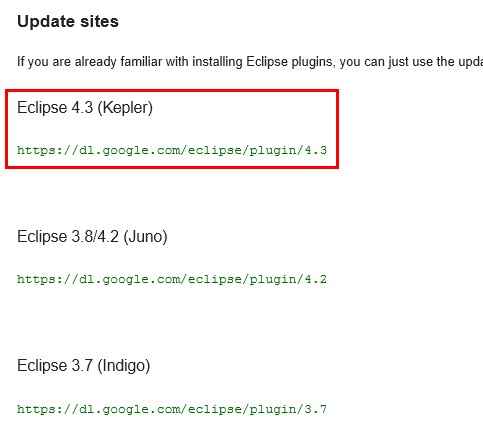
Following this instruction to install the plugin. NOTE: You only need to install Google Plugin for Eclipse. DON'T update "Developer Tools"
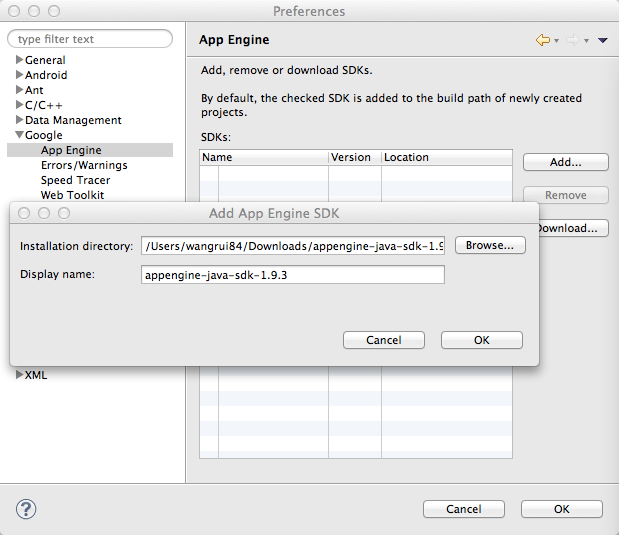
Go to "ADT"->"Preferences", in the left column, find "Google" -> "App Engine", click "Add..." as shown below
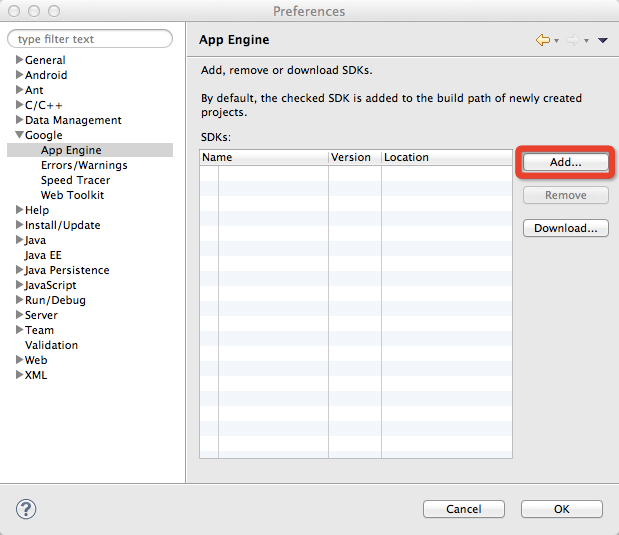
Input the path where you install the GAE SDK. Click OK to close the window.
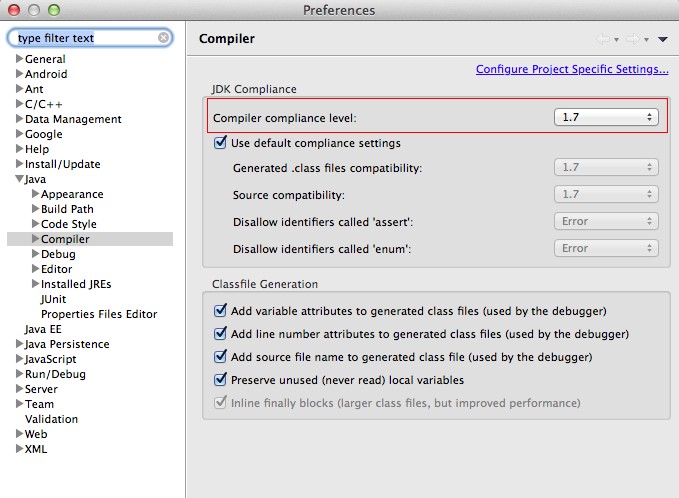
To create a new web app, you need to make sure your eclipse's Java compiler compliance level is 1.7. Open eclipse preference by clicking "ADT"->"Preferences", go to "Java"->"Compiler", select "1.7" in "Compiler compliance level" as shown below.
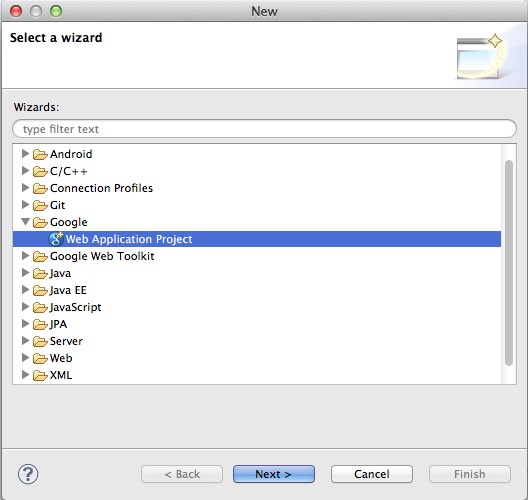
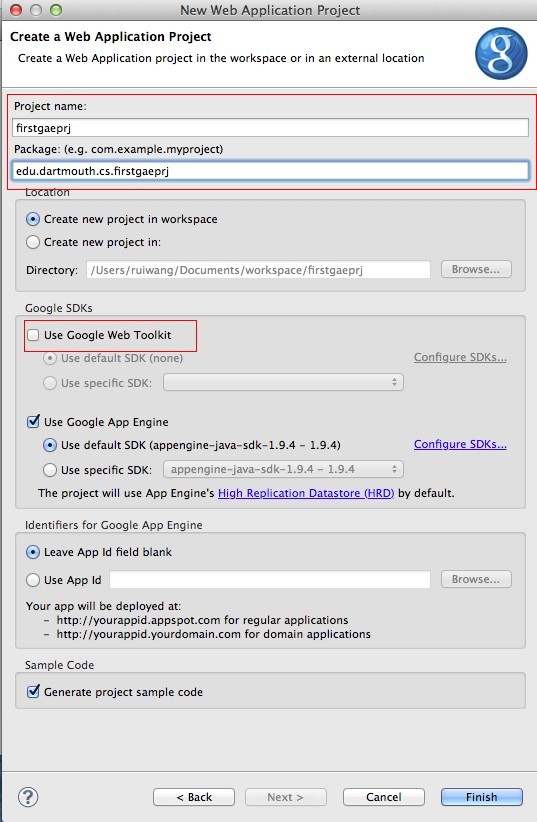
In what follows, we show you how to create a web app project in eclipse called firstgaeprj.
The content of web.xml is shown below.
<?xml version="1.0" encoding="utf-8"?>
<web-app xmlns:xsi="http://www.w3.org/2001/XMLSchema-instance"
xmlns="http://java.sun.com/xml/ns/javaee"
xmlns:web="http://java.sun.com/xml/ns/javaee/web-app_2_5.xsd"
xsi:schemaLocation="http://java.sun.com/xml/ns/javaee
http://java.sun.com/xml/ns/javaee/web-app_2_5.xsd" version="2.5">
        <servlet>
                <servlet-name>Firstgaeprj</servlet-name>
                <servlet-class>edu.dartmouth.cs.firstgaeprj.FirstgaeprjServlet</servlet-class>
        </servlet>
        <servlet-mapping>
                <servlet-name>Firstgaeprj</servlet-name>
                <url-pattern>Firstgaeprj</url-pattern>
        </servlet-mapping>
        <welcome-file-list>
                <welcome-file>index.html</welcome-file>
        </welcome-file-list>
</web-app>
It is important that the servlet Firstgaeprj is embedded correctly in the index.html (or other html, servlet, jsp etc), with
To create a servlet, you need to create a subclass of javax.servlet.http.HttpServlet, then define the servlet in web.xml.
Note, when you a Web Application Project it will create a Servlet for you. However, in MyRuns you will have to create a number of other servlets so we show you how to create a new servlet here. If you chose to write all the code for the first demo project you could just use the servlet created when the project is created. Anyway, back to creating a new servlet:
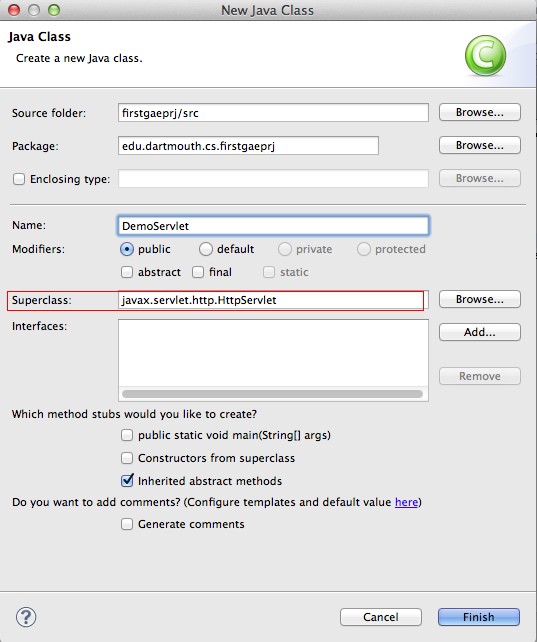
Once you have created the servlet class the template will be in the src folder and look like the following:
package edu.dartmouth.cs.myfirstgae;

import javax.servlet.http.HttpServlet;

public class DemoServlet extends HttpServlet {

}
You need to implement doGet() method and doPost() method to handle both GET and POST requests (the demo code already has this done).
package edu.dartmouth.cs.firstgaeprj;

import java.io.IOException;

import javax.servlet.http.HttpServlet;
import javax.servlet.http.HttpServletRequest;
import javax.servlet.http.HttpServletResponse;

public class DemoServlet extends HttpServlet {
        private static final long serialVersionUID = 1L;

        public void doGet(HttpServletRequest req, HttpServletResponse resp)
                        throws IOException {
                resp.setContentType("text/plain");
                resp.getWriter().println("Hello, world");
        }

        public void doPost(HttpServletRequest req, HttpServletResponse resp)
                        throws IOException {
                resp.setContentType("text/plain");
                resp.getWriter().println("Hello, world");
        }
}
Then you have to define the servlet in web.xml. Open web.xml, define the servlet and its mapping as follows:
.....
        <servlet>
                <servlet-name>DemoServlet</servlet-name>
                <servlet-class>edu.dartmouth.cs.firstgaeprj.DemoServlet</servlet-class>
        </servlet>
        <servlet-mapping>
                <servlet-name>DemoServlet</servlet-name>
                <url-pattern>DemoServlet</url-pattern>
        </servlet-mapping>
    <welcome-file-list>
        <welcome-file>index.html</welcome-file>
    </welcome-file-list>
.....
To complete the project you would need to write the html file -- index.html is created by default. You can look at the html code in the first demo code below to see an example; it's in AppEngineServlet.html. In the demo code there is also a CCS file which we don't really need in the demo but it's there if you fancy being stylistic.
Note, after you started the server on your machine, you can access this servlet from URL: http://127.0.0.1:8888/DemoServlet
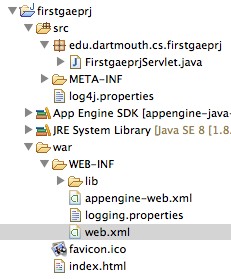
The project structure is shown as follows:
The src folder holds the source code.
The META-INF is an internal Java meta directory that you will typically not update. See META-INF for more information.
There are a number of libraries folders in the project: App Engine SDK (not shown in the figure above) and the JRE (Java Runtime Environment).
There are a number of important files under the war (Web application ARchive) directory. The war: "is a JAR file used to distribute a collection of JavaServer Pages, Java Servlets, Java classes, XML files, tag libraries, static web pages (HTML and related files) and other resources that together constitute a web application". This is a bundle that contains all the files to run your web application.
There a couple of important files and in the war directory, in particular the WEB-INF directory includes: appengine-web.xml and web.xml
The web.xml defines the structure of the web application for example declares servlets and servlet mappings (URLs to servlet), filters,
As stated "If the web application is only serving JSP ( JavaServer Pages) files, the web.xml file is not strictly necessary. If the web application uses servlets (ours does), then the servlet container uses web.xml to ascertain to which servlet a URL request will be routed". This is the case in our simple demo. "The web.xml is also used to define context variables which can be referenced within the servlets and it is used to define environmental dependencies which the deployer is expected to set up".
The appengine-web.xml "includes the registered ID of your application (Eclipse creates this with an empty ID for you to fill in later), the version number of your application, and lists of files that ought to be treated as static files (such as images and CSS) and resource files (such as JSPs and other application data).” (GAE document)
Download the code for a simple demo called first App Engine project
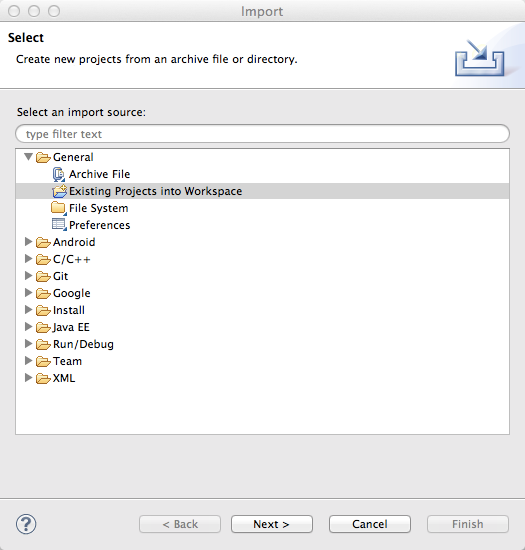
Import the project into eclipse just like importing a general project, as shown below.
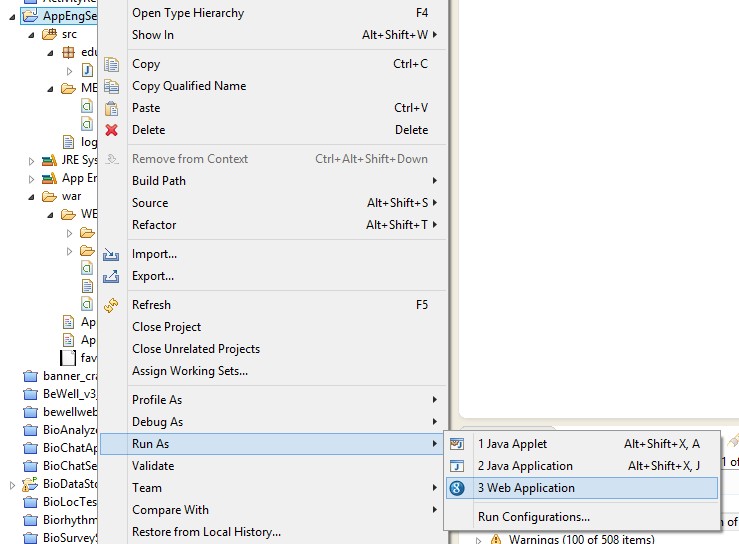
To start the server, right click the project, click "Run As" -> "Web Application".
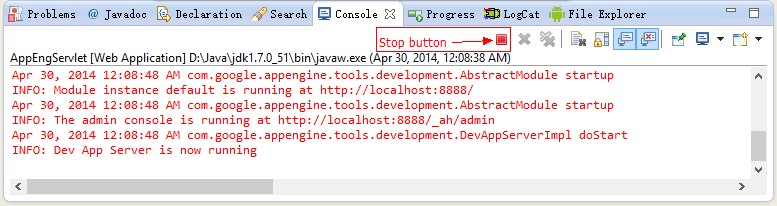
You will see a lot of log showing in the console window. When it says "INFO: Dev App Server is now running", you can open "127.0.0.1:8888" from your web browser to view the web application. If you want to stop the server, click the stop button shown in the screenshot below. Note, "http://localhost:8888" is the same as "http://127.0.0.1:8888" -- either will work to start your service. Also, make sure that you stop the executing servlet when done.
In this a simple web app that allows you to submit a string to web server; the server echo's the string back, as shown below.
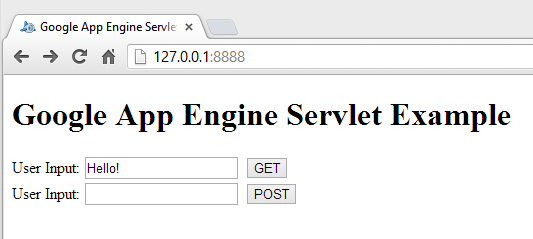
After you type 'Hello!' into the text box (below) and clicked button "GET" you will see:
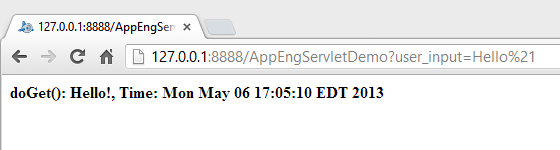
When you click the "GET" and "POST" buttons your browser will submit the text in the text box (to the left of the button) to the web server in either "GET" method or "POST" method. GET and POST are two commonly used methods for a request-response between a client and server. GET requests data from a specified resource -- read server. POST submits data to be processed to a specified resource -- read server. GET and POST are part of the HTTP protocol that make the web tick -- HTTP was invented, yes!, by and English man -- see HTTP Methods: GET vs. POST for more info.
The AppEngServlet.html file uses forms to set up the input buttons in the webpage, get user input and submit the form for processing by the servlet -- the server side form handler (i.e., AppEngServletDemo) as shown below. We look at the html and resulting URL below.
<!doctype html>

<html>
  <head>
    <title>Google App Engine Servlet Example</title>
  </head>
  <body>

    <h1>Google App Engine Servlet Example</h1>

    <form name="input" action="AppEngServletDemo" method="get">
        User Input: <input type="text" name="user_input">
        <input type="submit" value="GET">
    </form>

    <form name="input" action="AppEngServletDemo" method="post">
        User Input: <input type="text" name="user_input">
        <input type="submit" value="POST">
    </form>

  </body>
</html>
So for example, the first form corresponds to the GET button. It displays User Input: and expects text input associated with the variable name "user_input".
Once submitted when the user enters some text and clicks GET then the action is taken to do a HTTP GET on the servlet defined in the action (i.e., AppEngServletDemo). The “action” field of the form defines where to issue the POST/GET request: