We carry on discussing App Engine and support for building cloud services.
The key resource and the most up to date information can be viewed here: Google Cloud Messaging for Android.
In this lecture we will use a demo that implements a simple demo app that comprises native android app on the phone and the cloud side service. The demo uses Google Cloud Messaging (GCM) between the client running on the phone and the cloud side. Download and import the Google Cloud Messaging Demo.
In MyRuns6 you need to store and query ExerciseEntry data using GCM. The demo code provides a framework for doing that lab. You need to add the app side code to MyRuns and build the server side out. The above demo code includes two ADT projects: GCMDemoServer -- the server side; and GCMDemoAndroid -- the Android side. Go through the example. Understand how it works. Now thinking about the requirements of MyRuns6.
Google Cloud Messaging (GCM) is the communications and data transfer glue between your Android app running on your phone and the backend cloud services that we discussed in the last lecture. It's the glue that makes the cloud work.
In what follows we discuss the architecture and services offered by GCM.
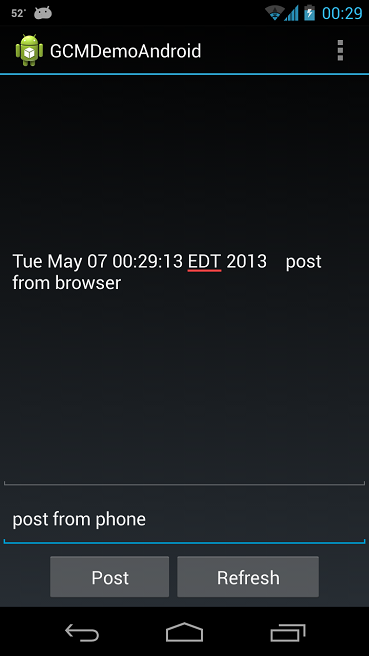
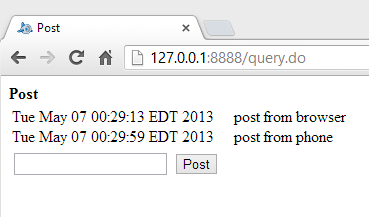
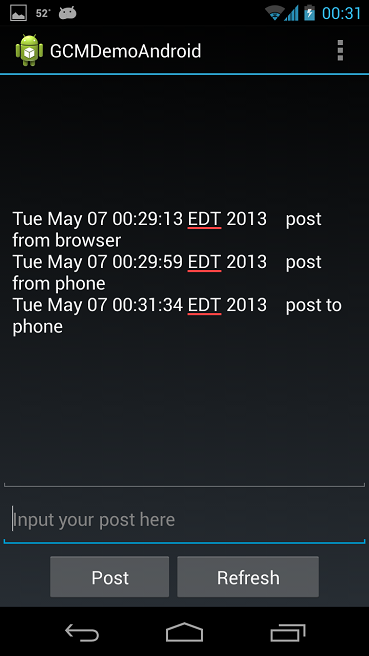
This demo shows how to send text from both Android App and browsers. Previous messages will be saved in datastore. When user submitted a post from browser, the server will send a message to registered devices, notifying them there are updates, then the App will update the post list from the server.
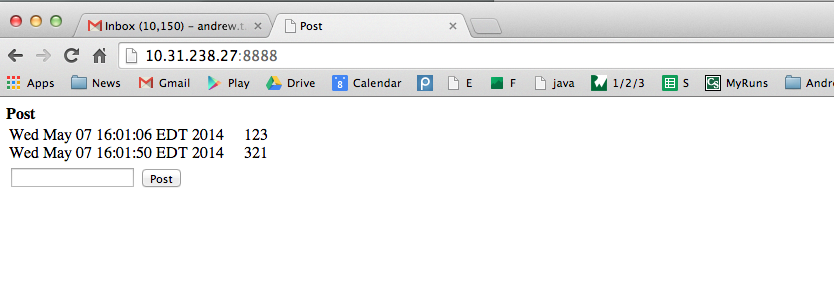
The following screen shots show the App posts a message to the server, then we can get that message from browser. We use browser to post a message, the app receive that message automatically.
The following diagram shows the main components of the system. In what follows, we briefly show how each component works together.
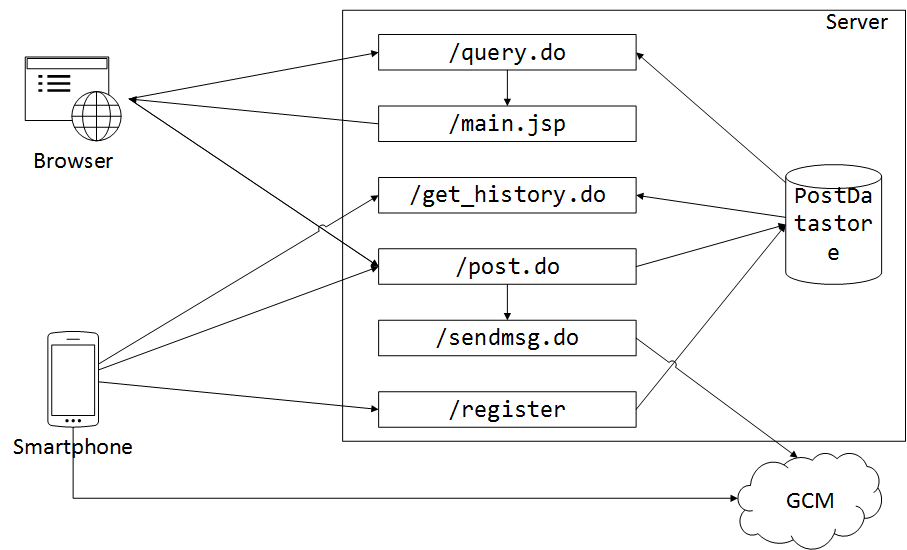
The server side consists 5 servlets, 1 jsp and a Datastore.
query.do This servlet is used by browser to get all posts. It receives requests from user's browser, read posts data from the datastore, put the data in the request object, then redirects to main.jsp.
main.jsp This jsp page generates HTML for all the posts retrieved by query.do servlet.
get_history.do This servlet is used by the smartphone app to get all posts. Similar to query.do, it receives requests from user's browser first, then return all post records to the app in text format.
post.do This servlet is used by both browser and smartphone app to post new messages (posts). It can determine the source of the request (i.e. smartphone app or browser). If the request is from the smartphone app, it returns, otherwise it redirects to sendmsg.do.
sendmsg.do This servlet sends a message to smartphone app to notify that there are updates. It redirect to query.do after sending the message.
register.do This servlet receives smartphone app's registration, and save the registration to the datastore.
To run the demo code, you need the following things:
In what follows, we show you how to set up the environment, run the demo code and how to debug problems.
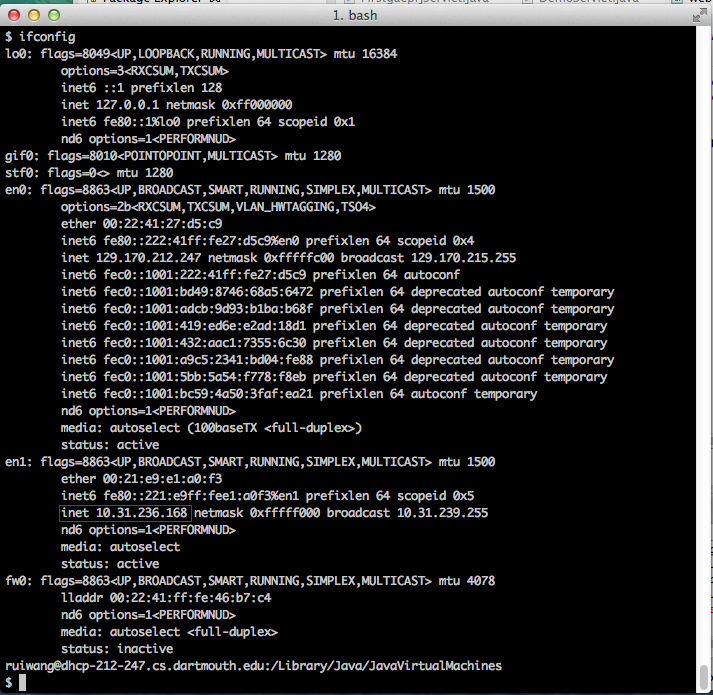
If you use MAC, open the terminal, enter command "ifconfig". It lists all your network interfaces. You are only interested in WiFi, which will be listed as en1. Find the line starts with "inet", where you can find your IP address. The IP address of the example below is 10.31.236.168.
If you use Windows, go to command line, type "ipconfig", you can find your IP Address under "Wireless LAN adapter Wi-Fi".
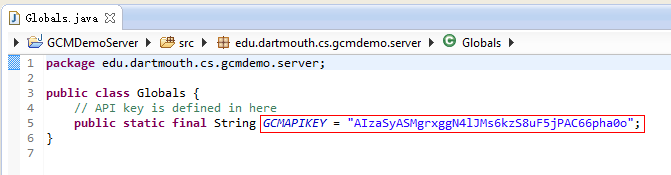
The API key is defined in edu.dartmouth.cs.gcmdemo.server.Globals. You need to change it to your own key, as shown below.
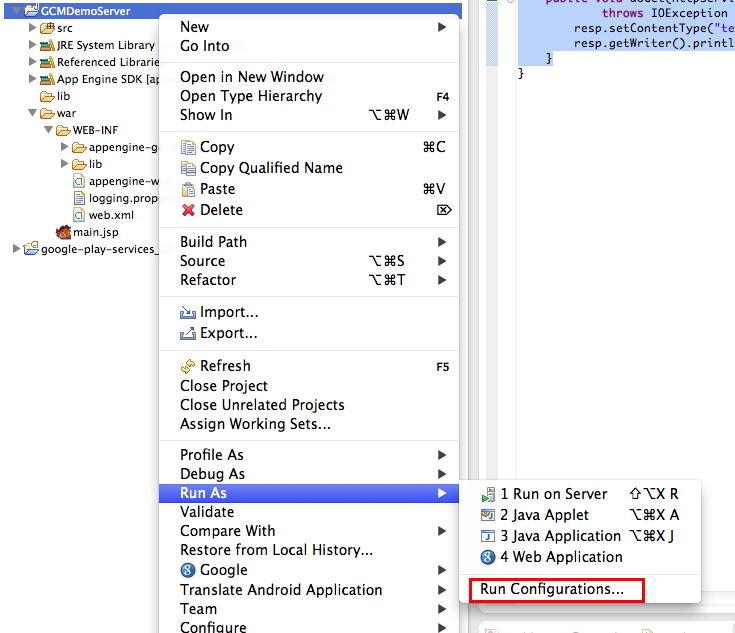
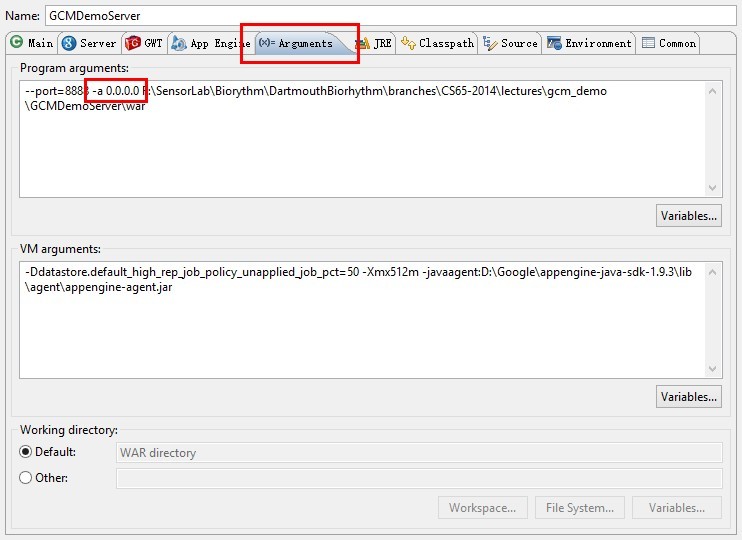
Open the server run configuration in Eclipse's "Run Configurations" dialog, add "-a 0.0.0.0" to "Program arguments" in "Arguments" tab.
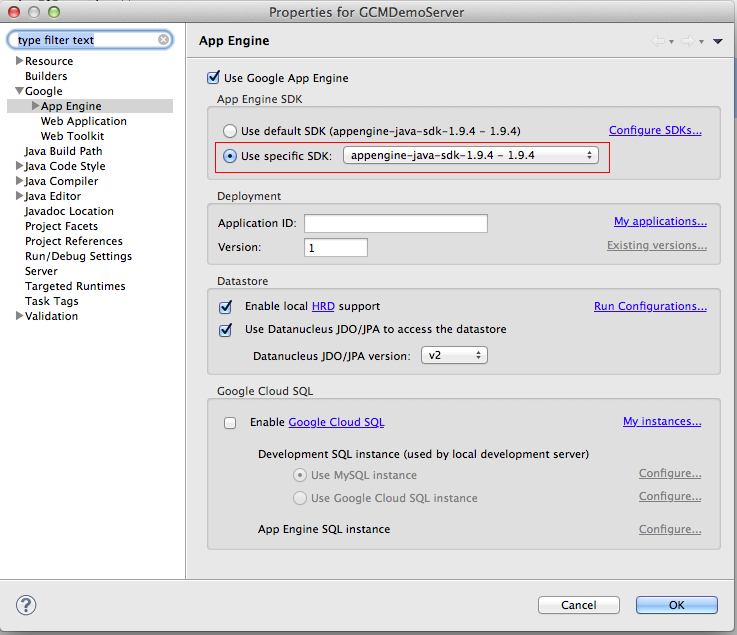
If you get errors after importing the project, open the project's properties (from Project->Properties), go to Google->App Engine, check "Use specific SDK" to allow eclipse to refresh app engine libraries under your project directory.
First, you need to make sure Google Play Services is correctly imported to your project.
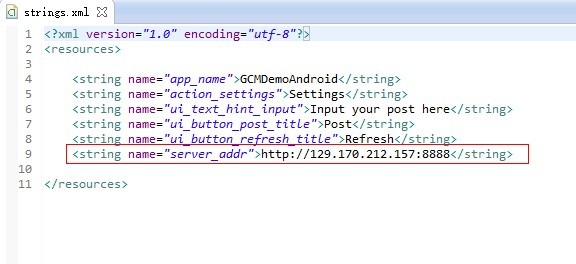
Then, you need to add the complete URL (i.e., IP address: port address -- for example http://129.170.21.157:8888) to res/values/stings.xml as shown below. But you have to us the IP address from your own computer as discussed before. The port address will always be 8888. Recall that to make your demo work your laptop (which runs the server) and your Android phone have to be using the same WiFi networks (e.g., Dartmouth Secure). In summary, get your IP address, update the string server_adr in res/values/stings.xml. And make sure your devices are under the same WiFi network.
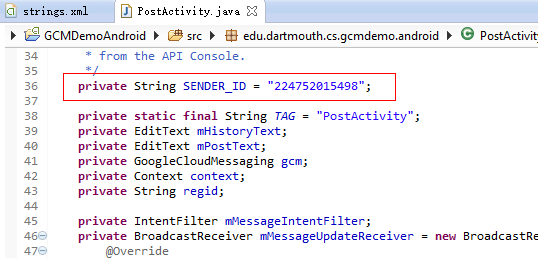
Finally, change SENDER_ID defined in edu.dartmouth.cs.gcmdemo.android.PostActivity to your Project Number.
In previous lecture, we use browser to visit the web server. However, the Android app needs to be able to connect to the server directly and exchange data. In this scenario, the app issue HTTP POST or GET request to the server, the server sends back the result to the app. The server and the app need to use the set of data format to exchange data. For example, the app can put the request's parameters in the request's header as parameters, and the server returns the data in JSON, or xml format.
A HTTP request contains a header and content. The header defines various parameters including method (i.e. POST/GET), host, requesting path, protocol and more, the request body contains the parameters when the request's method is POST.
To construct and send an HTTP request to a web server and receive response from that server in Android app, you can use a HttpURLConnection object. You can implement such method like this:
    public static String post(String endpoint, Map<String, String> params)
            throws IOException {
        URL url;
        try {
            url = new URL(endpoint);
        } catch (MalformedURLException e) {
            throw new IllegalArgumentException("invalid url: " + endpoint);
        }
        StringBuilder bodyBuilder = new StringBuilder();
        Iterator<Entry<String, String>> iterator = params.entrySet().iterator();
        // 1. constructs the POST body using the parameters
        while (iterator.hasNext()) {
            Entry<String, String> param = iterator.next();
            bodyBuilder.append(param.getKey()).append('=')
                    .append(param.getValue());
            if (iterator.hasNext()) {
                bodyBuilder.append('&');
            }
        }
        String body = bodyBuilder.toString();
        byte[] bytes = body.getBytes();
        HttpURLConnection conn = null;
        try {
            // 2. open the HTTP connection
            conn = (HttpURLConnection) url.openConnection();
            // 3. set header parameters
            // 3.1 Sets the flag indicating this connection allows output
            conn.setDoOutput(true);
            // 3.2 Sets the flag indicating this connection does not use cache
            conn.setUseCaches(false);
            // 3.3 Sets the length of the body
            conn.setFixedLengthStreamingMode(bytes.length);
            // 3.4 Sets the method to POST
            conn.setRequestMethod("POST");
            // 3.5 Sets Content-Type
            conn.setRequestProperty("Content-Type",
                    "application/x-www-form-urlencoded;charset=UTF-8");
            // 4. post the request
            OutputStream out = conn.getOutputStream();
            out.write(bytes);
            out.close();

            // handle the response
            int status = conn.getResponseCode();
            if (status != 200) {
                throw new IOException("Post failed with error code " + status);
            }

            // Get Response
            InputStream is = conn.getInputStream();
            BufferedReader rd = new BufferedReader(new InputStreamReader(is));
            String line;
            StringBuffer response = new StringBuffer();
            while ((line = rd.readLine()) != null) {
                response.append(line);
                response.append('\n');
            }
            rd.close();
            return response.toString();

        } finally {
            if (conn != null) {
                conn.disconnect();
            }
        }
    }
In the post method shown above, it takes URL and parameters stored in a Map as its input. It sends the HTTP request to the URL with all the parameters using POST, then return server's responses in string. To construct a request:
After sending the request, we can check the connection's status code. If the status code is "200", then we can read server's response from connection's InputStream.
Finally, remember to close the connection when you are done.
You can find some information on HTTP headers from here.
This demo shows how to send text from both Android app and browsers. The app can post messages to the server, as well as pull all messages from the server. In what follows, we show you how to do both tasks.
The servlet for receiving messages on the server is mapped to "/post.do". It takes two parameters: "post_text" and "from". "post_text" is the content of the message and "from" indicates if the message is from an app or a browser. When the user send a message to the server, it starts an AsyncTask because network operations are not allowed on UI thread. post() method described in previous section is used to send the request. Since we don't care server's response, the retured string is ignored.
    private void postMsg(String msg) {
        new AsyncTask<String, Void, String>() {

            @Override
            protected String doInBackground(String... arg0) {
                String url = getString(R.string.server_addr) + "/post.do";
                String res = "";
                // construct the request parameters
                Map<String, String> params = new HashMap<String, String>();
                params.put("post_text", arg0[0]);
                params.put("from", "phone");
                try {
                    // send post request to the server
                    res = ServerUtilities.post(url, params);
                } catch (Exception ex) {
                    ex.printStackTrace();
                }

                return res;
            }

            @Override
            protected void onPostExecute(String res) {
                mPostText.setText("");
                // retrieve all messages from the server
                refreshPostHistory();
            }

        }.execute(msg);
    }
After a message is sent to the server, the app refreshes its message list by retrieving all messages from the server. The server uses servlet get_history.do to handle this request. The app send a post request to the server, the server returns the result, and finally, the app shows the result in mHistoryText which is a TextView.
    private void refreshPostHistory() {
        new AsyncTask<Void, Void, String>() {

            @Override
            protected String doInBackground(Void... arg0) {
                String url = getString(R.string.server_addr)
                        + "/get_history.do";
                String res = "";
                Map<String, String> params = new HashMap<String, String>();
                try {
                    res = ServerUtilities.post(url, params);
                } catch (Exception ex) {
                    ex.printStackTrace();
                }

                return res;
            }

            @Override
            protected void onPostExecute(String res) {
                if (!res.equals("")) {
                    mHistoryText.setText(res);
                }
            }

        }.execute();
    }
Google Cloud Messaging for Android (GCM) is a service that allows you to send data from your server to your users' Android-powered device. This could be a lightweight message telling your app there is new data to be fetched from the server (for instance, a movie uploaded by a friend), or it could be a message containing up to 4kb of payload data (so apps like instant messaging can consume the message directly). (From Google Cloud Messaging for Android)
The detailed process of creating a new Android application that uses the GCM requires several steps. In what follows we provide a more truncated set of steps with some screen dumps to help you along. In short, you should enable Google Cloud Messaging for Android in your Google API console, add Google Play Services to your app and set up required permissions.
GCM is a part of Google Play Services. It requires to setup the following in the manifest to work properly:
<?xml version="1.0" encoding="utf-8"?>
<manifest xmlns:android="http://schemas.android.com/apk/res/android"

     [Snip code]
         ........
         ........

     <permission
        android:name="edu.dartmouth.cs.whereami_5.MAPS_RECEIVE"
        android:protectionLevel="signature" />

    <uses-permission android:name="android.permission.INTERNET" />
    <uses-permission android:name="android.permission.GET_ACCOUNTS" />
    <uses-permission android:name="android.permission.WAKE_LOCK" />
    <uses-permission android:name="com.google.android.c2dm.permission.RECEIVE" />

    <permission android:name="com.example.gcm.permission.C2D_MESSAGE"
        android:protectionLevel="signature" />
    <uses-permission android:name="com.example.gcm.permission.C2D_MESSAGE" />

     [Snip code]
         ........
         ........
    <application ...>
        ........
        ........
         <meta-data
            android:name="com.google.android.gms.version"
            android:value="@integer/google_play_services_version" />
        ........
        ........
    </application>
</manifest>
com.example.gcm.permission.C2D_MESSAGE is a custom permission, in which com.example.gcm is your app's package name.
In what follows, we show you how to implement GCM in your Android app.
The app need to register itself to GCM when it runs for the first time. It will get a regid from the GCM server (not from your own server) after it successfully registered. You need to save the regid to SharedPref. It does not need to register again next time it the app is already registered. You can check this by reading regid from SharedPref. In what follows, we discuss how to register to GCM step by step.
GoogleCloudMessaging gcm = GoogleCloudMessaging.getInstance(context);
regid = gcm.register(SENDER_ID);
    private void storeRegistrationId(Context context, String regId) {
        final SharedPreferences prefs = getGCMPreferences(context);
        SharedPreferences.Editor editor = prefs.edit();
        editor.putString(PROPERTY_REG_ID, regId);
        editor.commit();
}To receive a message from GCM, you need to implement a GcmBroadcastReceiver. It is the mechanism GCM uses to deliver message. The following code is the implementation of such broadcast receiver. It starts an intent service called GcmIntentService to handle incoming messages.
public class GcmBroadcastReceiver extends WakefulBroadcastReceiver {
    @Override
    public void onReceive(Context context, Intent intent) {
        // Explicitly specify that GcmIntentService will handle the intent.
        ComponentName comp = new ComponentName(context.getPackageName(),
                GcmIntentService.class.getName());
        // Start the service, keeping the device awake while it is launching.
        startWakefulService(context, (intent.setComponent(comp)));
        setResultCode(Activity.RESULT_OK);
    }
}
You also need to define this broadcast receiver in manifest:
<application ......>
        ......
        <receiver
            android:name=".GcmBroadcastReceiver"
            android:permission="com.google.android.c2dm.permission.SEND" >
            <intent-filter>
                <action android:name="com.google.android.c2dm.intent.RECEIVE" />
                <action android:name="com.google.android.c2dm.intent.REGISTRATION" />

                <category android:name="edu.dartmouth.cs.gcmdemo.android" />
            </intent-filter>
        </receiver>
        ......
</application>
As mentioned in the previous step, you need to implement an intent service called GcmIntentService. In its onHandleIntent method, you need to handle various message types as shown below:
    @Override
    protected void onHandleIntent(Intent intent) {
        Bundle extras = intent.getExtras();
        GoogleCloudMessaging gcm = GoogleCloudMessaging.getInstance(this);
        // The getMessageType() intent parameter must be the intent you received
        // in your BroadcastReceiver.
        String messageType = gcm.getMessageType(intent);

        if (!extras.isEmpty()) {  // has effect of unparcelling Bundle
            /*
             * Filter messages based on message type. Since it is likely that GCM
             * will be extended in the future with new message types, just ignore
             * any message types you're not interested in, or that you don't
             * recognize.
             */
            if (GoogleCloudMessaging.
                    MESSAGE_TYPE_SEND_ERROR.equals(messageType)) {
                //handle send error in here
            } else if (GoogleCloudMessaging.
                    MESSAGE_TYPE_DELETED.equals(messageType)) {
                //handle delete message on server in here
            } else if (GoogleCloudMessaging.
                    MESSAGE_TYPE_MESSAGE.equals(messageType)) {
                // If it's a regular GCM message, do some work.
                String message = (String) extras.get("message");
                Intent i = new Intent();
                i.setAction("GCM_NOTIFY");
                i.putExtra("message", message);
                sendBroadcast(i);
            }
        }

        // Release the wake lock provided by the WakefulBroadcastReceiver.
        GcmBroadcastReceiver.completeWakefulIntent(intent);
    }
When it receives a message with type GoogleCloudMessaging.MESSAGE_TYPE_MESSAGE, it sends a broadcast message. You can implement a broadcast receiver in your activity to receive and process the message.
Since sending messages from server needs devices' registration ID, server needs to get regIDs from devices then store them in the datastore. You need to write servlets to handle devices' registration and unregistration requests. In the example code, we implement a register servlet. The servlet's doPost method firstly get the regid from the parameters, then save the regid to the datastore:
    @Override
    protected void doPost(HttpServletRequest req, HttpServletResponse resp)
            throws ServletException {
        String regId = req.getParameter(PARAMETER_REG_ID);

        if (regId != null && !regId.equals("")) {
            RegDatastore.register(regId);
        }
        resp.setStatus(HttpServletResponse.SC_OK);
        resp.setContentType("text/plain");
        resp.setContentLength(0);
    }
The register method in RegDatastore creates a datastore entity, then saves it to the datastore:
    public static void register(String regId) {
        Entity entity = new Entity(ENTITY_KIND_DEVICE, regId);
        entity.setProperty(DEVICE_REG_ID_PROPERTY, regId);
        mDatastore.put(entity);
}To send a message to a device, the server need to find the corresponding regid first. If we want to send a message to all of our clients, we need to get all regids from the datastore:
    public static List<String> getDevices() {
        List<String> devices;

        Query query = new Query(ENTITY_KIND_DEVICE);
        Iterable<Entity> entities = mDatastore.prepare(query).asIterable();
        devices = new ArrayList<String>();
        for (Entity entity : entities) {
            String device = (String) entity.getProperty(DEVICE_REG_ID_PROPERTY);
            devices.add(device);
        }

        return devices;
    }
Then, the application server issues a POST request to https://android.googleapis.com/gcm/send. The format of the POST request is as follows:
Content-Type:application/json
Authorization:key=AIzaSyB-1uEai2WiUapxCs2Q0GZYzPu7Udno5aA

{ "collapse_key": "score_update",
  "time_to_live": 108,
  "delay_while_idle": true,
  "data": {
    "score": "4x8",
    "time": "15:16.2342"
  },
  "registration_ids":["4", "8", "15", "16", "23", "42"]
}
The first two lines are the request's headers. It specifies the content type to be JSON, and the API key to be the one you obtained from Google API console. The content is a JSON format structure. You can find detained specification from here. The GCM server responds with http status code 200 when success.
If the demo cannot run properly, you can follow the steps below to troubleshoot the problem:
To check this, open your browser, enter the URL which uses the external IP instead of the loopback IP (i.e. 127.0.0.1 or localhost). For exampleL http:// 10.31.238.27:8888. If it did not open, it means either you are not using the correct external IP address in the URL, or you have not set the IP parameter in the server's "Run Configurations"
If you cannot post messages from the phone but can do so from the browser, it means your phone and your computer may connected to different WiFi networks that they cannot communicate directly. To fix this, you need to check both your phone's and your computer's WiFi connections.
There is another possibility is that your network firewall blocks incoming connections to your server. You can try to solve this problem by disabling the firewall.
If you post a message from the browser and the app on your phone is open, but the app did not refresh and got the latest message, you need to check if you are using the correct "Project Number" "server API Key" pair: they must belong to the same project.
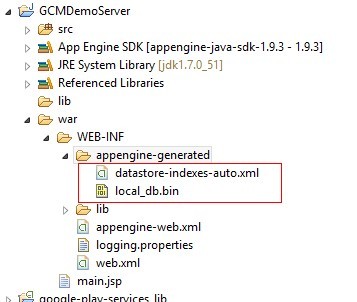
If it did not work, you can clear the app's data, as well as the server's data. To remove the datastore, stop the web server, go to war/WEB-INF/appengine-generated under the project directory, remove local_db.bin and datastore-indexes-auto.xml, restart the server.
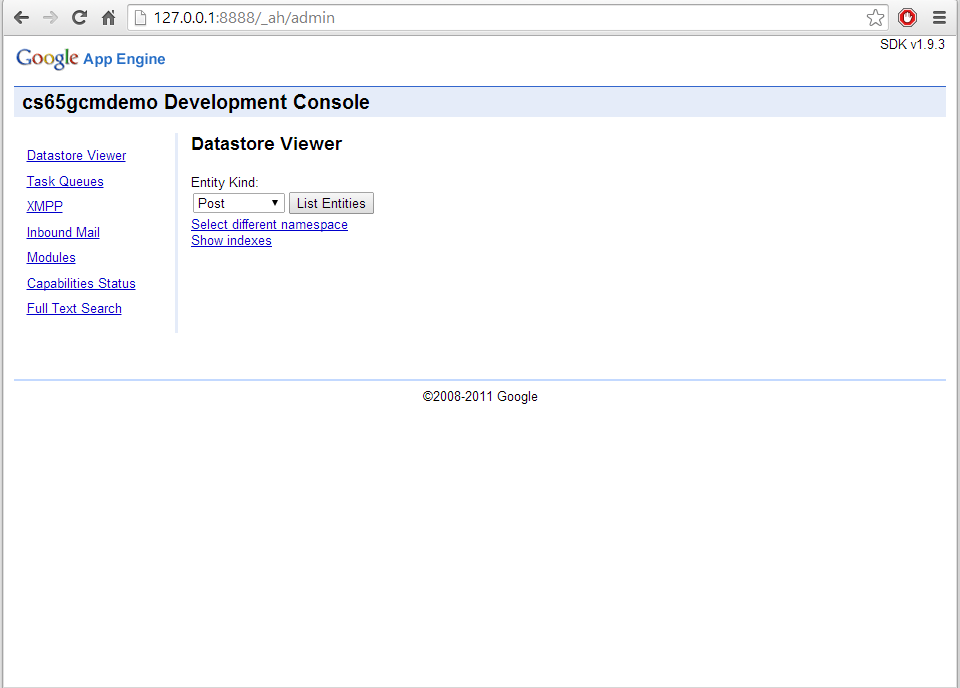
App engine development server provides an admin console where you can view your data in Datastore. Open your browser and open "http://127.0.0.1/_ah/admin", we will see the interface of the console and you can view the data and update the data.
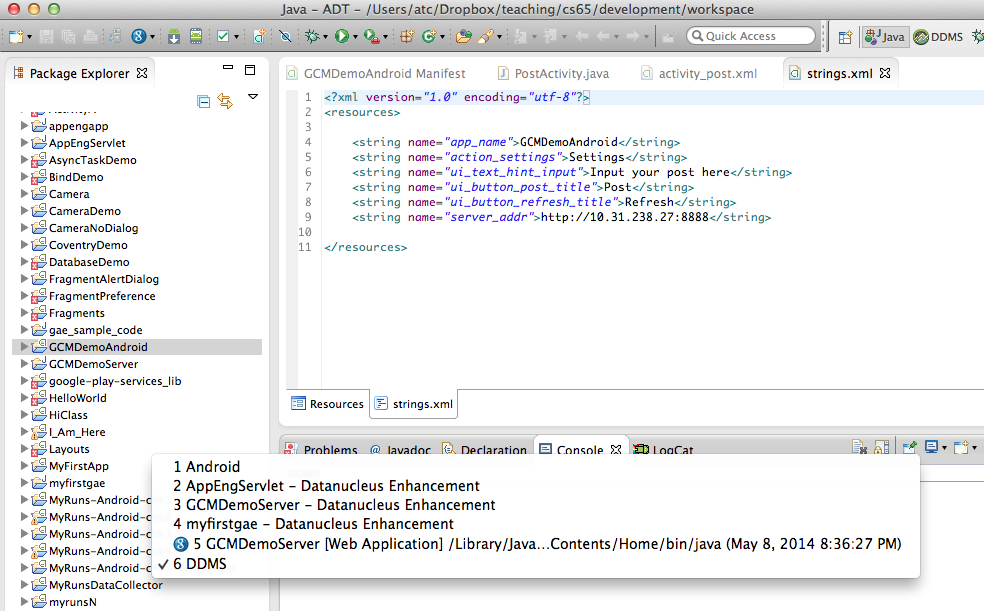
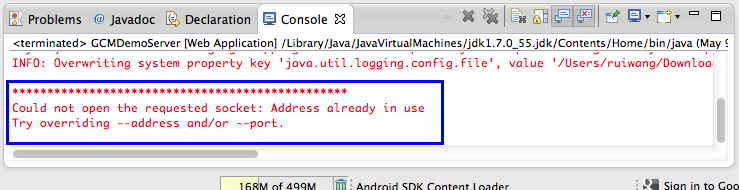
First thing you need to do is to check all your consoles to see if you have started another web app. As the example shown below, you can select the console 5, and terminate that server by clicking the stop button.

If you could not find the project, you can kill the process in the terminal:
$ lsof -i -P | grep 8888
java      15672  atc   65u  IPv6 0x512e2b17d9d3315d      0t0  TCP *:8888 (LISTEN)
$ kill 15672
The first command tries to find which process is using the port 8888, which is the second column of the output (pid). Then you can use "kill" with the pid to terminate the process.