# Our First Android Application
Even though the HelloWorld program is trivial in introduces a wealth of new ideas -- the framework, activities, manifest, intents, UI, resources such as layouts, strings, etc. I know all just to print Hello World! There is a lot to take in regarding the Android program plumbing but an important separation principal presented in the single HelloWorld is the separation between UI design in XML and the program.
Next, we consider a more complex with multiple UIs, activities and intents -- it's called MyFirstApp and the code is linked in so you can download and run it.
What this lecture covers:
* The MainActivity UI and code
* Intents and starting another activity, namely, the DisplayMessageActivity
* The DisplayMessageActivity UI and code
* Application logging
## Checkout the demo project
Download the demo the [MyFirstApp.zip](../code/myfirstapp.zip) app to go with these notes.
I recommend that you code this project up from the notes rather than just open the project in Android Studio and run it -- but feel free to do that if you really want. As a rule I will include all source code examples and projects used in course when I can.
## Open an existing Android project in Android Studio
To open each of the demo projects we give out, you will need to do this:
- Click on the MyFirstApp.zip file and download and save the file on your desktop or download folder
- Unzip the MyFirstApp.zip and you have MyFirstApp directory/ project
- In Android Studio, click File->Open if you have already opened a project. Otherwise, click **Open an existing Android Studio project** at **Welcome to Android Studio** screen. Find the MyFirstApp directory and click **Choose**. The project should be opened and ready to run.
## Clean a project
If for some reason there are errors try a clean. This is always a good thing to do if there are spurious errors in a project you know is clean.
Go to **Build->Clean Project**.
Hope that helped.
## MyFirstApp
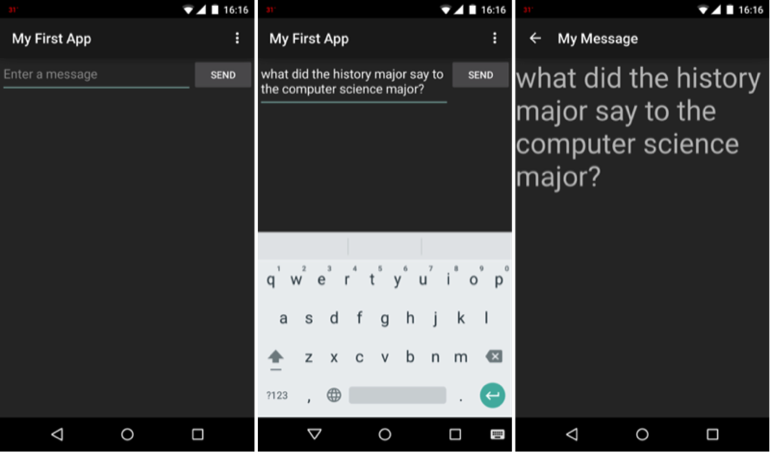
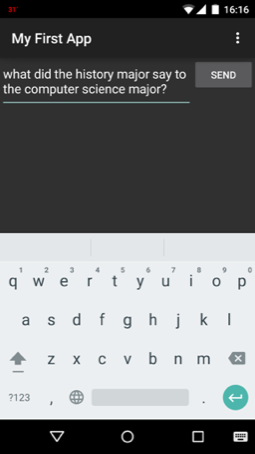
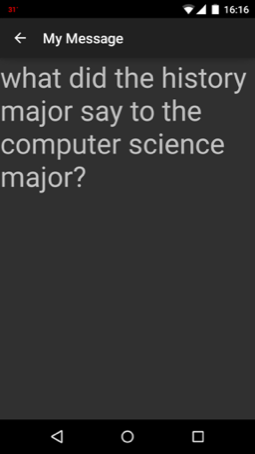
This application moves things forward. First it includes two activities. The main activity starts the second activity using an intent. When the user inputs a message on the UI of the first activity and clicks send the message is bundled up in an intent and the display activity started -- which displays the message on its own UI. Take a look at the screen dumps below: the first one is the UI rendered by the MainActivity UI, next the user enters a message and clicks the Send button -- and wham -- the DisplayMessageActivity is started to display the message in a larger -- sort of uncool -- font. There is a lot more to this simple program. Note, the menus for each UI is different. You can navigate back using the Up button instead of the back button from the DisplayMessageActivity UI. More on this later.
This program -- [myFirstApp](http://developer.android.com/training/basics/firstapp/building-ui.html) -- is taken from the Android developers with minor modifications.
## The MainActivity's UI
Open the `app/java` folder and look at the `MainActivity.java` code.
## Create a linear layout
The MainActivity's layout file is at `app/res/layout/activity_main.xml`
~~~
~~~
## Add a text field
~~~
~~~
## Add String Resources
By default, your Android project includes a string resource file at app/res/values/strings.xml. Add a new string named "edit_message" and set the value to "Enter a message." (You can delete the "hello_world" string.)
While you’re in this file, also add a "Send" string for the button you’ll soon add, called "button_send".
~~~
My First AppEnter a messageSendSettingsMainActivity
~~~
## Add a button
~~~
~~~
## Format the Input box
~~~
~~~
## Final XML
Open the activity_main.xml file from the res/layout/ directory.
~~~
~~~
## Respond to the Send Button
~~~
~~~
## Building an Intent
Open the MainActivity class (located in the project's src/ directory) and add the corresponding method:
~~~
package edu.dartmouth.cs.myfirstapp;
import android.app.Activity;
import android.content.Intent;
import android.os.Bundle;
import android.view.Menu;
import android.view.View;
import android.widget.EditText;
public class MainActivity extends Activity {
public final static String EXTRA_MESSAGE = "com.example.myfirstapp.MESSAGE";
@Override
protected void onCreate(Bundle savedInstanceState) {
super.onCreate(savedInstanceState);
setContentView(R.layout.activity_main);
}
@Override
public boolean onCreateOptionsMenu(Menu menu) {
// Inflate the menu; this adds items to the action bar if it is present.
getMenuInflater().inflate(R.menu.activity_main, menu);
return true;
}
/** Called when the user clicks the Send button */
public void sendMessage(View view) {
// Do something in response to button
Intent intent = new Intent(this, DisplayMessageActivity.class);
EditText editText = (EditText) findViewById(R.id.edit_message);
String message = editText.getText().toString();
intent.putExtra(EXTRA_MESSAGE, message);
}
}
~~~
## Starting another activity
To start an activity, call startActivity() and pass it your Intent. The system receives this call and starts an instance of the Activity specified by the Intent.
With this new code, the complete sendMessage() method that's invoked by the Send button now looks like this:
~~~
.....
// Send the input string to the DisplayMessageActivity using an intent
Intent intent = new Intent(this, DisplayMessageActivity.class);
EditText editText = (EditText) findViewById(R.id.edit_message);
String message = editText.getText().toString();
intent.putExtra(EXTRA_MESSAGE, message);
startActivity(intent);
}
...
~~~
Now you need to create the DisplayMessageActivity class in order for this to work.
## Create another activity -- DisplayMessageActivity
To create a new activity using Android Studio:
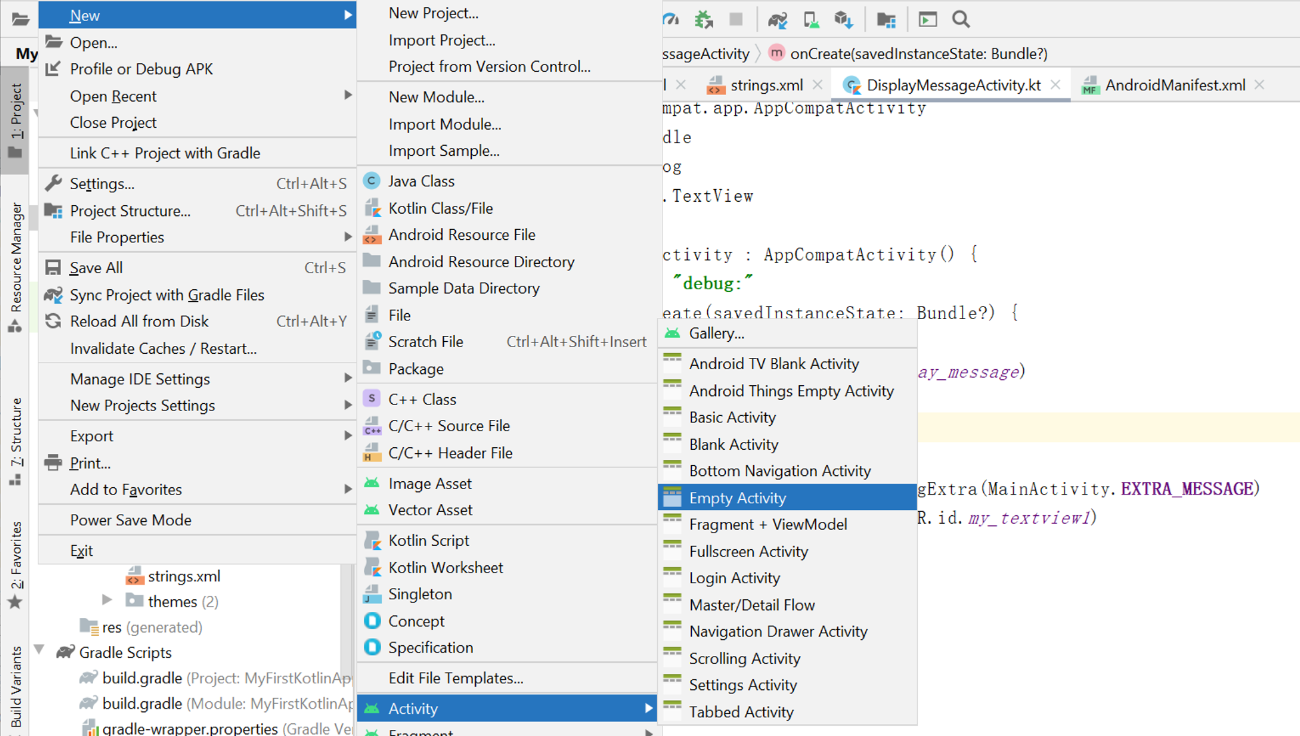
Right click **app**, find **New->Activity->Blank Activity** and click to open the create activity dialog. Fill in the activity details:
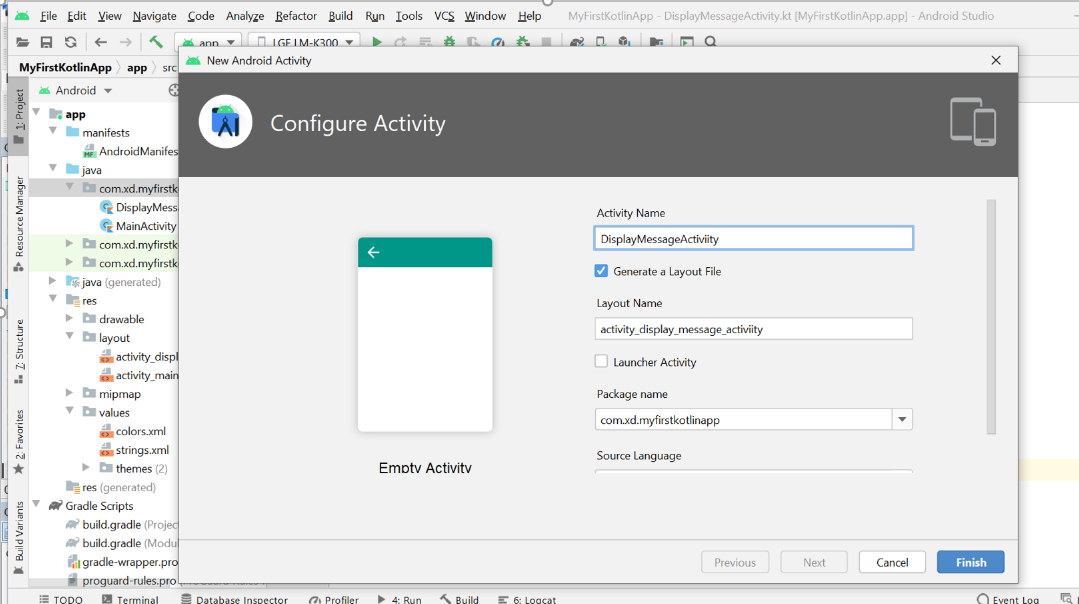
Finally click *Finish*.
The DisplayMessageActivity class should now look like this:
~~~
package edu.dartmouth.cs.myfirstapp;
import android.os.Bundle;
import android.app.Activity;
import android.view.Menu;
import android.view.MenuItem;
import android.support.v4.app.NavUtils;
public class DisplayMessageActivity extends Activity {
@Override
protected void onCreate(Bundle savedInstanceState) {
super.onCreate(savedInstanceState);
setContentView(R.layout.activity_display_message);
// Show the Up button in the action bar.
getActionBar().setDisplayHomeAsUpEnabled(true);
}
@Override
public boolean onCreateOptionsMenu(Menu menu) {
// Inflate the menu; this adds items to the action bar if it is present.
getMenuInflater().inflate(R.menu.activity_display_message, menu);
return true;
}
@Override
public boolean onOptionsItemSelected(MenuItem item) {
switch (item.getItemId()) {
case android.R.id.home:
// This ID represents the Home or Up button. In the case of this
// activity, the Up button is shown. Use NavUtils to allow users
// to navigate up one level in the application structure. For
// more details, see the Navigation pattern on Android Design:
//
// http://developer.android.com/design/patterns/navigation.html#up-vs-back
//
NavUtils.navigateUpFromSameTask(this);
return true;
}
return super.onOptionsItemSelected(item);
}
}
~~~
When you create an activity it provides a number of default methods which we will not use in this project. Remove:
* onCreateOptionsMenu(Menu menu)
The DisplayMessageActivity class should now look like this:
~~~{.java}
package edu.dartmouth.cs.myfirstapp;
import android.os.Bundle;
import android.app.Activity;
import android.view.Menu;
import android.view.MenuItem;
import android.support.v4.app.NavUtils;
public class DisplayMessageActivity extends Activity {
@Override
protected void onCreate(Bundle savedInstanceState) {
super.onCreate(savedInstanceState);
setContentView(R.layout.activity_display_message);
// Show the Up button in the action bar.
getActionBar().setDisplayHomeAsUpEnabled(true);
}
@Override
public boolean onOptionsItemSelected(MenuItem item) {
switch (item.getItemId()) {
case android.R.id.home:
// This ID represents the Home or Up button. In the case of this
// activity, the Up button is shown. Use NavUtils to allow users
// to navigate up one level in the application structure. For
// more details, see the Navigation pattern on Android Design:
//
// http://developer.android.com/design/patterns/navigation.html#up-vs-back
//
NavUtils.navigateUpFromSameTask(this);
return true;
}
return super.onOptionsItemSelected(item);
}
}
~~~
If you get an error with `getActionBar().setDisplayHomeAsUpEnabled(true)` make sure that the minimum API to 11 in the manifest as shown below. Because the ActionBar APIs are available only on HONEYCOMB (API level 11) and higher, you must add a condition around the getActionBar() method to check the current platform version
~~~{.java}
.....
~~~
By setting the minimum API to 11 the error is cleared.
## Add the title string
~~~{.java}
...
My Message
~~~
This is included in the Manifest where the DisplayMessageActivity is specified.
## Add it to the manifest
Take a look at the XML for the new activity `.DisplayMessageActivity` in the manifest. The code is self explanatory.
~~~{.java}
...
~~~
## Running the app
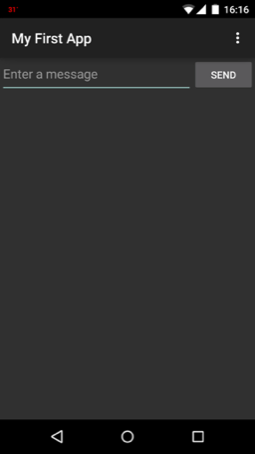
You can run the app now, but not much happens. Clicking the Send button starts the second activity but it uses a default "Hello world" layout provided by the template. You'll soon update the activity to instead display a custom text view.
## Receive the Intent
In the DisplayMessageActivity class’s onCreate() method, get the intent and extract the message delivered by MainActivity:
~~~{.java}
import android.app.Activity;
import android.content.Intent;
import android.os.Bundle;
import android.support.v4.app.NavUtils;
import android.view.MenuItem;
public class DisplayMessageActivity extends Activity {
@Override
protected void onCreate(Bundle savedInstanceState) {
super.onCreate(savedInstanceState);
setContentView(R.layout.activity_display_message);
// Show the Up button in the action bar.
getActionBar().setDisplayHomeAsUpEnabled(true);
// Get the message from the intent
Intent intent = getIntent();
String message = intent.getStringExtra(MainActivity.EXTRA_MESSAGE);
}
......
~~~
##Display the Message
To show the message on the screen, create a TextView widget and set the text using setText(). Then add the TextView as the root view of the activity’s layout by passing it to setContentView().
The complete onCreate() method for DisplayMessageActivity now looks like this:
~~~{.java}
import android.app.Activity;
import android.content.Intent;
import android.os.Bundle;
import android.support.v4.app.NavUtils;
import android.view.MenuItem;
import android.widget.TextView;
public class DisplayMessageActivity extends Activity {
@Override
public void onCreate(Bundle savedInstanceState) {
super.onCreate(savedInstanceState);
// Get the message from the intent
Intent intent = getIntent();
String message = intent.getStringExtra(MainActivity.EXTRA_MESSAGE);
// Create the text view
TextView textView = new TextView(this);
textView.setTextSize(40);
textView.setText(message);
// Set the text view as the activity layout
setContentView(textView);
}
......
~~~
## You are done, now run your Android firstapp!
You should see the following screens on your phone or emulator
## Application Logging using Log.d()
You can put print or log statements your code. You might want to confirm for example that an intent fired by one activity is received by another. You can use `Log.d()` to do this. You have to first create a TAG in your code and then call `Log.d()` with the tag.
In the code snippet below that you need to `import android.util.Log`, set up the `TAG`, and then call `Log.d()`
~~~{.java}
package edu.dartmouth.cs.myfirstapp;
import android.app.Activity;
import android.content.Intent;
import android.os.Bundle;
import android.support.v4.app.NavUtils;
import android.util.Log;
import android.view.MenuItem;
import android.widget.TextView;
public class DisplayMessageActivity extends Activity {
private static final String TAG = "MyFirstApp";
@Override
public void onCreate(Bundle savedInstanceState) {
super.onCreate(savedInstanceState);
// Get the message from the intent
Intent intent = getIntent();
String message = intent.getStringExtra(MainActivity.EXTRA_MESSAGE);
Log.d(TAG, "Got Intent");
// Create the text view
TextView textView = new TextView(this);
textView.setTextSize(40);
textView.setText(message);
// Set the text view as the activity layout
setContentView(textView);
}
......
~~~
## Using LogCat to view application output
An easy way to monitor the output from log.d is to use the LogCat utility. LogCat is integrated into Android Studio. You’ll find the LogCat by clicking the **Android** tab at the bottom of Android Studio. The following screenshot shows the code to print logs in LogCat and viewing logs from the LogCat window.
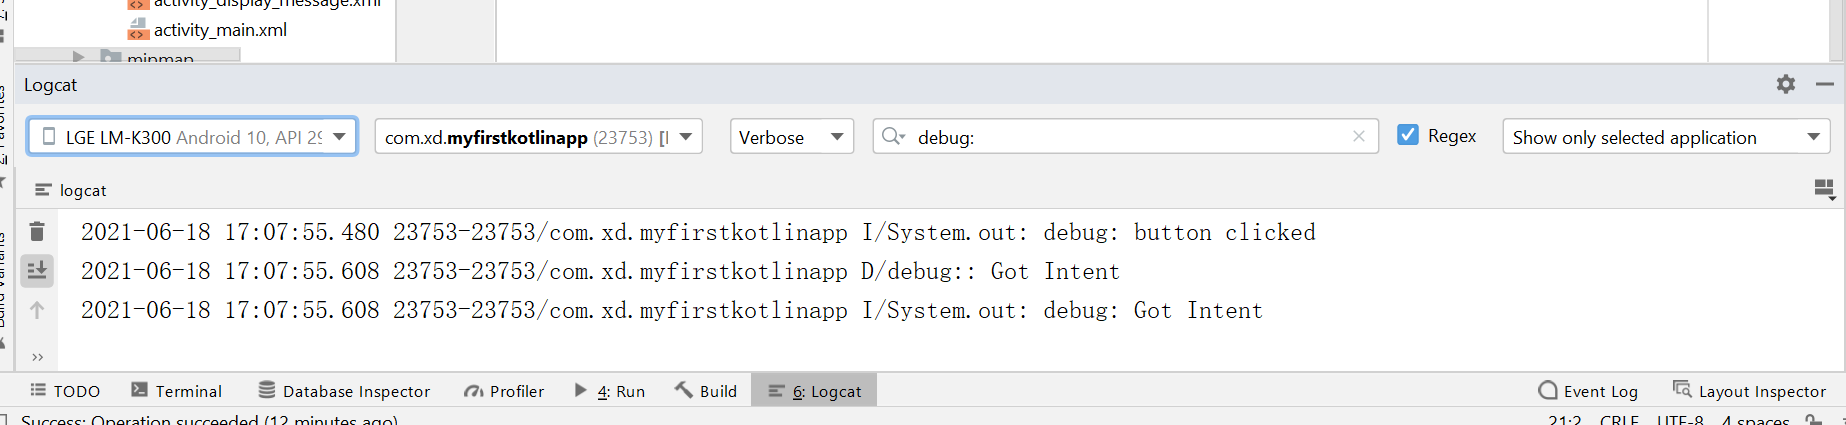
Once you click on run and enter input you will see to logs printed out from the application: one when the user clicks send at the UI; and one when DisplayMessageActivity receives the *Intent* and prints the message, as shown above.
This is a simple example of logging applications. Much more sophisticated logging can be done. More later on this.