The app we have been using to illustrate the lifecycle was modified from the one written by Google . I would like to delve into the code because it nicely illustrates a bunch of interesting things:
The demo code used in this lecture include:
Please import the project into your environment and study the code. Then load it on to your phone and play with it. Isn't it a cool app. A bit geeky granted but cool. It illustrates the theory we discussed in the last lecture beautifully.
Activity A is the launcher activity. After which point any activity can start another one. The code activities A, B and C are identical. The dialog activity is different. The project also includes a utility that prints the activity status to the lifecycle method list, which captures the various activity states in terms of transitions for example from
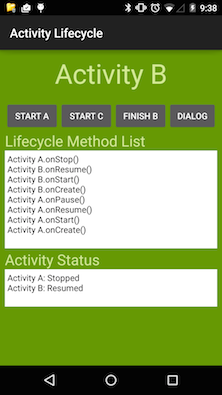
* onCreate() -> onStart() -> onResume() -> onStop()Take a look at the figure below. You can see that activity B is in focus and activity C was stopped to resume activity B. Can you work out the sequence of buttons the user clicked to get to this output for the activity lifecycle method list and activity status shown below? Mail me your answer.
<activity android:name=".DialogActivity"
    android:theme="@android:style/Theme.Dialog">
</activity>
<activity android:name=".ActivityC" />
<activity android:name=".ActivityB" />
<activity android:name=".ActivityA">
    <intent-filter>
        <action android:name="android.intent.action.MAIN" />
        <category android:name="android.intent.category.LAUNCHER" />
    </intent-filter>
</activity>class ActivityA : AppCompatActivity() {
private var mActivityName: String? = null
private var mStatusView: TextView? = null
private var mStatusAllView: TextView? = null
private val mStatusTracker = StatusTracker.getInstance()
override fun onCreate(savedInstanceState: Bundle?) {
super.onCreate(savedInstanceState)
setContentView(R.layout.activity_a)
mActivityName = getString(R.string.activity_a)
mStatusView = findViewById<View>(R.id.status_view_a) as TextView
mStatusAllView = findViewById<View>(R.id.status_view_all_a) as TextView
mStatusTracker.setStatus(mActivityName, getString(R.string.on_create))
Utils.printStatus(mStatusView, mStatusAllView)
}
override fun onSaveInstanceState(outState: Bundle) {
super.onSaveInstanceState(outState)
Log.d("XD", "onSaveInstanceState() called")
}
override fun onStart() {
super.onStart()
mStatusTracker.setStatus(mActivityName, getString(R.string.on_start))
Utils.printStatus(mStatusView, mStatusAllView)
}
override fun onRestart() {
super.onRestart()
mStatusTracker.setStatus(mActivityName, getString(R.string.on_restart))
Utils.printStatus(mStatusView, mStatusAllView)
}
override fun onResume() {
super.onResume()
mStatusTracker.setStatus(mActivityName, getString(R.string.on_resume))
Utils.printStatus(mStatusView, mStatusAllView)
}
override fun onPause() {
super.onPause()
mStatusTracker.setStatus(mActivityName, getString(R.string.on_pause))
Utils.printStatus(mStatusView, mStatusAllView)
}
override fun onStop() {
super.onStop()
mStatusTracker.setStatus(mActivityName, getString(R.string.on_stop))
}
override fun onDestroy() {
super.onDestroy()
mStatusTracker.setStatus(mActivityName, getString(R.string.on_destroy))
mStatusTracker.clear()
}
fun startDialog(v: View?) {
val intent = Intent(this@ActivityA, DialogActivity::class.java)
startActivity(intent)
}
fun startActivityB(v: View?) {
val intent = Intent(this@ActivityA, ActivityB::class.java)
startActivity(intent)
}
fun startActivityC(v: View?) {
val intent = Intent(this@ActivityA, ActivityC::class.java)
startActivity(intent)
}
fun finishActivityA(v: View?) {
finish()
}
}
For most callbacks the the StatusTracker keeps track of the current status and the calls Utils.printStatus(mStatusView, mStatusAllView) to update the method list and activity status. Yes, we can run java code in Kotlin. Both Utils.java and StatusTracker.java are written in Java. We do not explain or highlight the code in them. Feel free to look at it. As java programmers you might make sense of it. But don't worry if you don't.
class DialogActivity : Activity() {
override fun onCreate(savedInstanceState: Bundle?) {
super.onCreate(savedInstanceState)
requestWindowFeature(Window.FEATURE_NO_TITLE)
setContentView(R.layout.activity_dialog)
}
fun finishDialog(v: View?) {
finish()
}
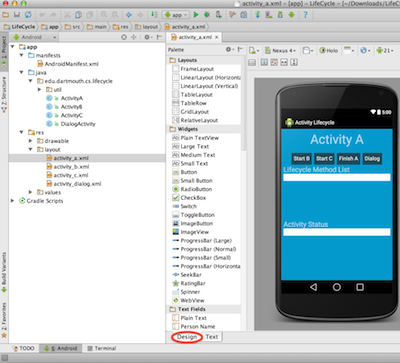
}If you open the layout folder and click on activity_a.xml you will see the layout for the activity UI. You can look at the UI in graphical or xml mode. The graphical mode is drag and drop widgets but once you get use to designing UIs you start to feel more comfortable editing the xml source directly.
You can toggle between the design and xml text layouts by clicking on the respective buttons, as shown in the figure.
    <RelativeLayout
        xmlns:android="http://schemas.android.com/apk/res/android"
        android:layout_width="wrap_content"
        android:layout_height="wrap_content"
        android:layout_gravity="center_horizontal"
        android:orientation="vertical" >

        <Button
            android:id="@+id/btn_start_b"
            android:layout_width="wrap_content"
            android:layout_height="wrap_content"
            android:onClick="startActivityB"
            android:text="@string/btn_start_b_label" />

        <Button
            android:id="@+id/btn_start_c"
            android:layout_width="wrap_content"
            android:layout_height="wrap_content"
            android:layout_toRightOf="@id/btn_start_b"
            android:onClick="startActivityC"
            android:text="@string/btn_start_c_label" />

        <Button
            android:id="@+id/btn_finish_a"
            android:layout_width="wrap_content"
            android:layout_height="wrap_content"
            android:layout_toRightOf="@id/btn_start_c"
            android:onClick="finishActivityA"
            android:text="@string/btn_finish_a_label" />

        <Button
            android:id="@+id/btn_start_dialog"
            android:layout_width="wrap_content"
            android:layout_height="wrap_content"
            android:layout_toRightOf="@id/btn_finish_a"
            android:onClick="startDialog"
            android:text="@string/btn_start_dialog_label" />
    </RelativeLayout>
The definition of a button in xml is as follows: