Let's continue our discussion of the Android UI and its layout options.
This is the same demo you download and installed in the last lecture: - Download the demo the LayoutKotlin.zip app specifically designed to go with these notes.
If you want to design a UI with a long list of items then the list view is for you. The ListView controller allows you to vertically scrawl through a list of text items for example -- this has some properties of the ScrollView layout, which we discuss later.
Try the demo: Click on ListView Layout button and check it out.
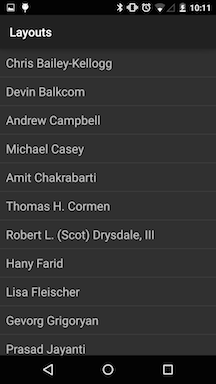
In the example below we list the Dartmouth CS faculty and allow you select one of them. When you click on a prof a message (i.e., toast) is displayed for a short period. If you look at the XML you will see that there a ListView defined in the XML.
a TextView is defined -- for one of the elements in the
ListView table: the height, width, padding and text size are all set up
statically in the XML.
If you look at the code ListViewLayoutActivity.kt you can see that we have defined a string array programmatically and not in the XML as is the case with the LinearLayout example we discussed earlier. Here we are illustrating that you can do things in XML and the code -- tip: push as much static data definition such as array strings to the XML world as you can. So in summary, in this layout we do the heavy lifting of the layout design in the code and not the XML; for example, we set up the item list in the code and not in strings.xml as we did in the Linearlayout example.
We specify the layout of individual rows in the list using a pre-defined TextView provided by Android (e.g., android.R.layout.simple_list_item_1).This TextView is defined -- for one of the elements in the ListView table: the height, width, padding and text size are all set up statically in the XML
A ListAdapter constructor (see below in the code) takes a parameter that specifies a layout resource for each row -- android.R.layout.simple_list_item_1.xml -- that specifies the row template to use, that is: TextView. Android uses Adapters to provide the data to the ListView object. The adapter also defines how each row the ListView is displayed.
val arrayAdapter: ArrayAdapter<String> = ArrayAdapter<String>(this, android.R.layout.simple_list_item_1, FACULTY)The ArrayAdapter constructor has three parameters:
Note, we bind the string array of faculty names to the listview
layout using the ArrayAdapter. The adapter is assigned to the ListView
via this line "myListView.adapter = arrayAdapter", which
will
fill
the complete screen of the activity with the faculty list based on the
formatting information in the XML found in the android.R.layout.simple_list_item_1
file.
How do we handle when the user selects one of the items in the
ListView? Well, as usual the programmer has to exposes event handlers
when the user selects an item. We set up the myListView.setOnItemClickListener
and when the user clicks an item the Lambda executes. The parameters
provided by the callback
include:
The code snippet below shows the implementation of the
ListViewLayoutActivity.kt.
class ListViewLayoutActivity : AppCompatActivity() {
    private val FACULTY = arrayOf(
        "Chris Bailey-Kellogg",
        "Devin Balkcom", "Andrew Campbell", "Michael Casey",
        "Amit Chakrabarti", "Thomas H. Cormen ",
        "Robert L. (Scot) Drysdale, III", "Hany Farid", "Lisa Fleischer",
        "Gevorg Grigoryan", "Prasad Jayanti", "David Kotz", "Lorie Loeb",
        "Fabio Pellacini", "Daniel Rockmore", "Sean Smith",
        "Lorenzo Torresani", "Peter Winkler", "Emily Whiting", "Xia Zhou"
    )
    private lateinit var myListView: ListView

    override fun onCreate(savedInstanceState: Bundle?) {
        super.onCreate(savedInstanceState)
        setContentView(R.layout.activity_list_view_layout)

        myListView = findViewById(R.id.myListView)

        val arrayAdapter: ArrayAdapter<String> = ArrayAdapter<String>(this,
            android.R.layout.simple_list_item_1, FACULTY)
        myListView.adapter = arrayAdapter
        myListView.setOnItemClickListener(){parent, view, position, id ->
            println("debug: parent: $parent | view: $view | position: $position | id: $id")
        }
    }
}
If you are not familiar with adapters and how they are used with views see the Android developers notes on building layouts with adapters. These notes cover ListViews and ArrayAdapters used above. We use an ArrayAdapter as our data source is an array as in the case of the "FACULTY" String array.When the content for your layout is dynamic or not pre-determined, you can use a layout that subclasses AdapterView (i.e., ListView) to populate the layout with views at runtime. ListView is a subclass of the AdapterView class and uses an Adapter to bind data to its layout.
Android provides a set of standard widgets for setting the date and time -- these are called Pickers. The XML and code below show examples of using theDatePicker and TimePicker widgets to set the date and time, respectively. The DateAndTimeActivity.kt allows the user to set date and time and then displays it in a TextView as shown the figure below.
Try the demo: Click on the data and time button and check it out.
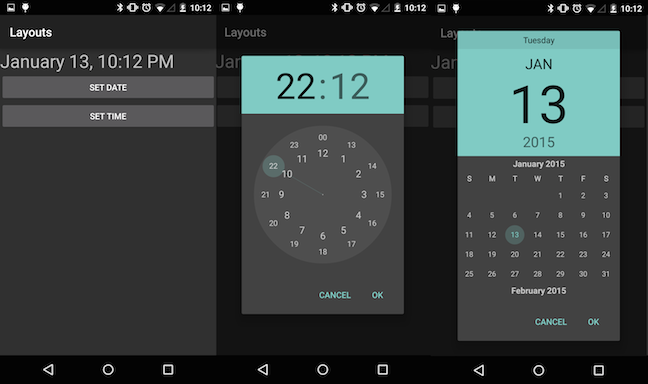
The date_time_layout.xml is straightforward. A TextView is set up for displaying the date and time -- not the large than standard font (i.e., 30sp) is used. Two buttons are used to display the pickers, which are really wrapped dialog boxes. More on dialogs later. The onClick callbacks are set up in the XML as usual. The text displayed on each button is defined too.
<LinearLayout xmlns:android="http://schemas.android.com/apk/res/android"
    android:layout_width="fill_parent"
    android:layout_height="fill_parent"
    android:orientation="vertical" >

    <TextView
        android:id="@+id/dateTime"
        android:layout_width="fill_parent"
        android:layout_height="wrap_content"
        android:text="@string/ui_date_time_title"
        android:textSize="30sp" />

    <Button
        android:id="@+id/dateBtn"
        android:layout_width="fill_parent"
        android:layout_height="wrap_content"
        android:onClick="onDateClicked"
        android:text="@string/ui_button_date_title" />

    <Button
        android:id="@+id/timeBtn"
        android:layout_width="fill_parent"
        android:layout_height="wrap_content"
        android:onClick="onTimeClicked"
        android:text="@string/ui_button_time_title" />

</LinearLayout>
When the user clicks on set the date the following dialog is presented to the user. Note, that the picker handles the internal setting on the time and click on the done button. However, you are responsible for reading and storing the date and time set by the user after they have clicked the "OK" button on the dialog using callback objects; that is, OnDateSetListener for the date picker and OnTimeSetListener for the time picker. Take a look at the code below to see the callback processing on the DatePickerDialog object for example. The date is year, month, and day.
The TimePicker widgets provides a similar callback object so you can access the time as a 24.00 hour clock (if configured) or a 12 hour clock with AM/PM. Time is hours and minutes. In this case the time callback object is TimePickerDialog. The OnTimeSetListener callback interface is used to indicate the user is done filling in the time (they clicked on the OK button)
The DatePickerDialog object is first created using the
constructor with five parameters: Context, OnDateSetListener, int year,
int month, and int dayOfMonth. It is displayed to the user using the
show() method as shown below,
which starts the dialog and display it on screen. Since the
DateAndTimeActivity class implements
DatePickerDialog.OnDateSetListener, we pass "this" as the second
parameter.
val datePickerDialog = DatePickerDialog(this, this, calendar.get(Calendar.YEAR), calendar.get(Calendar.MONTH), calendar.get(Calendar.DAY_OF_MONTH)
datePickerDialog.show()
Similarly the TimePickerDialog also has five parameters: Context, OnTimeSetListener, int hourOfDay, int minute, boolean is24HourView.
val timePickerDialog = TimePickerDialog(this, this, calendar.get(Calendar.HOUR_OF_DAY), calendar.get(Calendar.MINUTE), true)
timePickerDialog.show()
Note that the time picker dialog is constructed with the previously selected time (or date in the case of the date picker) from the Calendar -- as indicated above and below true indicates we want a 24.00 hour view.
We implement the TimePickerDialog.OnTimeSetListener
interface to receive a callback when the user sets the time. The
TimePickerDialog.OnTimeSetListener
has a single public method: onTimeSet(view: TimePicker, hourOfDay: Int,
minute: Int), as shown below. We simply show
the time input from the picker.
override fun onTimeSet(view: TimePicker, hourOfDay: Int, minute: Int) {
    textView.text = "$hourOfDay : $minute"
}Many time you will want to design a layout that has too many views and widgets for a simple phone screen. Maybe the views might be truncated? No, Android has a scrollable view that allows you to load up the layout. In this case the user simply swipes down and up to get to the view of interest.
Try the demo: Click on ScrollView Layout button and check it out.
The code snippet below shows viewgroups embedded around the ScrollView.
<ScrollView xmlns:android="http://schemas.android.com/apk/res/android"
    android:id="@+id/mainLayout"
    android:layout_width="match_parent"
    android:layout_height="match_parent" >

    <LinearLayout
        android:layout_width="fill_parent"
        android:layout_height="wrap_content"
        android:orientation="vertical" >

        <ToggleButton
            android:id="@+id/toggleButton1"
            android:layout_width="wrap_content"
            android:layout_height="wrap_content"
            android:layout_margin="5dp" />

        <CheckBox
            android:id="@+id/checkBox1"
            android:layout_width="wrap_content"
            android:layout_height="wrap_content"
            android:text="@string/ui_profile_demand_title" />

        <LinearLayout
            android:layout_width="match_parent"
            android:layout_height="wrap_content"
            android:layout_margin="5dp" >

            <Button
                android:id="@+id/btnSave"
                android:layout_width="wrap_content"
                android:layout_height="wrap_content"
                android:layout_marginLeft="40dp"
                android:layout_weight="1"
                android:onClick="onSaveClicked"
                android:text="@string/ui_button_save_title" >
            </Button>

            <Button
                android:id="@+id/btnCancel"
                android:layout_width="wrap_content"
                android:layout_height="wrap_content"
                android:layout_marginRight="40dp"
                android:layout_weight="1"
                android:onClick="onCancelClicked"
                android:text="@string/ui_button_cancel_title" >
            </Button>
        </LinearLayout>
    </LinearLayout>

</ScrollView>
The following is also a snippet of the ScrollViewLayoutActivity. Note is has callbacks for onCancelClicked() and onSaveClicked(). However these callbacks do not save the user input. In the next example we discuss how user data is saved using SharedPreference.
class ScrollViewLayoutActivity : AppCompatActivity() {
    override fun onCreate(savedInstanceState: Bundle?) {
        super.onCreate(savedInstanceState)
        setContentView(R.layout.activity_scroll_view_layout)
    }

    fun onSaveCancelClicked(v: View) {
        if (v.id == R.id.btnSave) {
            Toast.makeText(applicationContext, R.string.save_message, Toast.LENGTH_SHORT).show()
        } else if (v.id == R.id.btnCancel) {
            Toast.makeText(applicationContext, R.string.cancel_message, Toast.LENGTH_SHORT).show()
        }
        finish()
    }
}
We will use a ScrollView layout for our first programming assignment. More later.
If an activity is destroyed for any reason -- the user exists through the back key, or the system needs reclaims resources so kills activities that are currently not in the focus of the user -- then any user data entered is lost. So what if you wanted to save user data so when the app opens again you don't have to renter the data -- which, you'd agree would be a royal pain. Well android allows you to do this in a number of ways. You can use a simple SharedPreference object to store small amounts of user data. For more sophisticated data storage we will use databases and particular SQLite -- we will build an app that uses SQLite later in the course. But for now let's assume we want to save a small amount of user data between invocations of our layout app.
Try the demo Click on SharedPereference button and check it out. Try inputting data and then destroying and starting the app again. You should see your data.
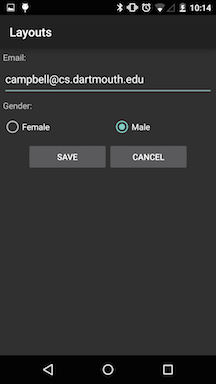
The XML snippet of shared_preferences_layout.xml
below shows presents nothing new for you -- it's clear, right. OK, onto
the code. The XML includes to onClick callbacks to Save
or Cancel. If save is selected by the user the input data
is stored in the SharedPrefence object. If cancel is clicked nothing is
saved.
<LinearLayout xmlns:android="http://schemas.android.com/apk/res/android"
    xmlns:tools="http://schemas.android.com/tools"
    android:layout_width="fill_parent"
    android:layout_height="fill_parent"
    android:orientation="vertical">

    **snippet**

    <LinearLayout
        android:layout_width="match_parent"
        android:layout_height="wrap_content"
        android:layout_margin="5dp" >

        <Button
            android:id="@+id/btnSave"
            android:layout_width="wrap_content"
         android:layout_height="wrap_content"
            android:layout_marginLeft="40dp"
            android:layout_weight="1"
            android:onClick="onSaveClicked"
            android:text="@string/ui_button_save_title" >
        </Button>

        <Button
            android:id="@+id/btnCancel"
            android:layout_width="wrap_content"
            android:layout_height="wrap_content"
            android:layout_marginRight="40dp"
            android:layout_weight="1"
            android:onClick="onCancelClicked"
            android:text="@string/ui_button_cancel_title" >
        </Button>
    </LinearLayout>

</LinearLayout>
In the SharedPreferencesActivity class, onCreate() simply sets the
view and loads any stored data using a SharedPreferences object
retrieved using getSharedPreferences(PREFERENCE_NAME, MODE_PRIVATE).
Specifically, getSharedPreferences() has two parameters:
MODE_PRIVATE
specifies
that the preference file can only be accessed by the application that
created it.
Let's assume the user inputs some data and clicks the Save
button. The onSaveClicked() callback gets and saves user input before closing the Activity by calling finish(). If the user clicked the Cancel
button then nothing happens in the callback other closing the Activity.
class SharedPreferencesActivity : AppCompatActivity() {
    ...

    override fun onCreate(savedInstanceState: Bundle?) {
	...
	...

        val sharedPreferences = getSharedPreferences(PREFERENCE_NAME, MODE_PRIVATE)
        val line = sharedPreferences.getString(TEXT_KEY, "")
	...
        editText.setText(line)

    }

    fun onSaveClicked(v: View?) {
        val line = editText.text.toString()
	...
        val sharedPreferences = getSharedPreferences(PREFERENCE_NAME, MODE_PRIVATE)
        val editor = sharedPreferences.edit()
        editor.clear()
        editor.putString(TEXT_KEY, line)
	...
        editor.commit()
        finish()
    }

    fun onCancelClicked(v: View?) {
        finish()
    }
}
The code in the onSaveClicked() callback first gets user input data from the EditText and RadioGroup. It then uses the name of the preference data file to obtain an instance of the SharedPreferences class. This is the object what we will store data using key/data pairs to save and restore. The getSharedPreferences() method retrieve the contents of the preferences file 'name', returning a SharedPreferences object through which you can retrieve and modify its values. *Only one instance of the SharedPreferences object is returned to any callers for the same name, meaning they will see each other's edits as soon as they are made*.
To update the value of preference we use getString(). Note, if there is nothing stored for that key then we use the default of an empty string.
Once we have the value we update the EditText view on the screen by
getting the view and then setting the restored value.
editText.setText(line)This is repeated for all views in the shared_preferences_layout.xml
file. The RadioButtons do not store strings but an
integer value where -1
is the default used if nothing has already been saved and 0/1 for the
gender buttons female/male from the order of the widgets in the
RadioGroup.
val radioButtonId = sharedPreferences.getInt(RADIOBUTTON_ID, -1)
As discussed above there are a number of options of storing persistent application data in Android:
The type of storage depends on what your application is trying to achieve. We will discuss storage later in the class but read the relevant bood chapter on storage and the Android developers notes on storage options
We have covered a lot of ground in this first set of UI lectures. Please make sure you go through the code provided and extend it. For example, note when you flip to landscape mode for some of the layouts the layout gets truncated -- can you fix this. The UI described so far is fairly low level and comprises important but small building blocks. Fortunately, you don't have to build your UI from low level views and widgets like we did here. App designers can use higher level pre-made UI components to build UIs. We will discuss these later -- examples of these high level components include ActionBar, Dialogs and Status Notification. We will use all of these components in the UI we build. That should be fun. But is good to understand the weeds first, forgive the poorly chosen metaphor.