# More User Interface (UI)
Let's continue our discussion of the Android UI and its layout options.
## What this lecture will teach you
- Create ListView layout
- Use adapters and click listeners
- Create picker widgets
- Define some coding/naming style guidelines
- Save user data using SharedPreferfence
- Introduce higher-level UI components
- Storage options
## Demo
This is the same demo you download and installed in the last lecture:
- Download the demo the layouts.zip app specifically designed to go with these notes.
## Resources
* Checkout the section in the book on UI
* See a tutorial on [using lists](http://www.vogella.com/tutorials/AndroidListView/article.html)
## ListView Layout: Click on a computer science professor
If you want to design a UI with a long list of items then the list view is for you. The _ListView_ controller allows you to vertically scrawl through a list of text items for example -- this has some properties of the _ScrollView_ layout, which we discuss later.
**Try the demo:** Click on ListView Layout button and check it out.

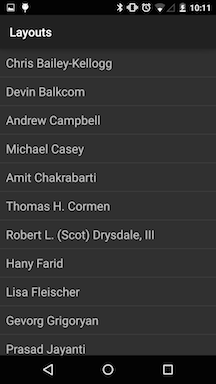
In the example below we list the Dartmouth CS faculty and allow you select one of them. When you click on a prof a message (i.e., toast) is displayed for a short period. If you look at the XML you will see that only a _TextView_ is defined -- for one of the elements in the ListView table: the height, width, padding and text size are all set up statically in the XML. There is no ListView defined in the XML -- we do that in the code.
First note that we do not extend activity in ListViewLayoutActivity.java rather `ListViewLayoutActivity extends ListActivity`. ListActivity has a number of methods that help create, manage and control ListViews; check out [ListActivity]( http://developer.android.com/reference/android/app/ListActivity.html). Also, if you look at the code ListViewLayoutActivity.java you can see that we have defined a string array programmatically and not in the XML as is the case with the LinearLayout example we discussed earlier. Here we are illustrating that you can do things in XML and the code -- tip: push as much static data definition such as array strings to the XML world as you can. So in summary, in this layout we do the heavy lifting of the layout design in the code and not the XML; for example, we set up the item list in the code and not in strings.xml as we did in the Linearlayout example.
We specify the layout of individual rows in the list using a TextView in the XML. A ListAdapter constructor (see below in the code) takes a parameter that specifies a layout resource for each row -- listview_layout.xml -- that specifies the row template to use, that is: TextView. Android uses Adapters to provide the data to the ListView object. The adapter also defines how each row is the ListView is displayed.
The adapter is assigned to the ListView via the setAdapter method on the ListView object.
~~~{.java}
~~~
Note, we bind the string array of faculty names to the listview layout (in listview_layout.xml) using the _ArrayAdapter_ as shown in the code below. We first get the listview set up (enable) the TextFilter and then set up the setOnItemClickListener for the list view for each of the entries in the array. That means if any entry is clicked on the onItemClick() method is called and the toast displayed. You could add some code that prints out the position in the list and tailor an toast if you wish.
The method _setListAdapter_ will fill the complete screen of the activity with the ListView based on the formatting information in the XML found in the `listview_layout.xml` file. The _ArrayAdapter_ object is used to bind the faculty names (i.e., generically an array of strings in this example) to the ListView prior to setListAdapter displaying the view to the screen.
Note, there is no need to call setContentView() to load the UI from the listview_layout.xml.
How do we handle when the user selects one of the items in the ListView? Well, as usual the programmer has to exposes event handlers when the user selects an item. We set up the _listView.setOnItemClickListener_ and when the user clicks and item the onItemClick callback executes. onItemClick() callback method is when an item in the AdapterView has been clicked by the user; the parameters provided by the callback include:
- parent: the AdapterView where the click happened.
- view: the view within the AdapterView that was clicked
- position: the position of the view in the adapter.
- id: the row id of the item that was clicked.
We don't do any view or item specific processing in onItemClick() . We simply display toast.
setListAdapter() sets the activity's list view widget. The ArrayAdapter constructor has three parameters:
- context - typically this will be your activity instance
- resource ID of a view to use (e.g., listview_layout.xml)
- actual array (e.g., FACULTY)
The code snippet of shows ...
~~~{.java}
public class ListViewLayoutActivity extends ListActivity {
static final String[] FACULTY = new String[] { "Chris Bailey-Kellogg",
"Devin Balkcom", "Andrew Campbell", "Michael Casey",
"Amit Chakrabarti", "Thomas H. Cormen ",
"Robert L. (Scot) Drysdale, III", "Hany Farid", "Lisa Fleischer",
"Gevorg Grigoryan", "Prasad Jayanti", "David Kotz", "Lorie Loeb",
"Fabio Pellacini", "Daniel Rockmore", "Sean Smith",
"Lorenzo Torresani", "Peter Winkler" };
@Override
public void onCreate(Bundle savedInstanceState) {
super.onCreate(savedInstanceState);
// Don't have to do this anymore
// setContentView(R.layout.listview_layout);
// Define a new adapter
ArrayAdapter mAdapter = new ArrayAdapter(this,
R.layout.listview_layout, FACULTY);
// Assign the adapter to ListView
setListAdapter(mAdapter);
// Define the listener interface
OnItemClickListener mListener = new OnItemClickListener() {
public void onItemClick(AdapterView parent, View view,
int position, long id) {
// When clicked, show a toast with the TextView text
Toast.makeText(getApplicationContext(),
((TextView) view).getText() + " is an awesome prof!",
Toast.LENGTH_SHORT).show();
}
};
// Get the ListView and wired the listener
ListView listView = getListView();
listView.setOnItemClickListener(mListener);
}
}
~~~
## Building Layouts with Adapters
If you are not familiar with adapters and how they are used with views
see the Android developers notes on [building layouts with
adapters](https://developer.android.com/guide/topics/ui/declaring-layout.html#AdapterViews). These
notes cover ListViews and ArrayAdapters used above. We use an
ArrayAdapter when our data source is an array as in the case of the
"FACULTY" String array[]. We use an array of strings that is displayed in a
ListView. We initialize a new ArrayAdapter using a constructor to specify
the layout for each string and the string array.
~~~{.java}
ArrayAdapter mAdapter = new ArrayAdapter(this,
R.layout.listview_layout, FACULTY);
~~~
Again, as mentioned above, the arguments are:
* app's Context
* layout that contains a TextView for each string in the array -- listview_layout
* string array
Once we have done that we need to call setAdapter() on the ListView:
~~~{.java}
setListAdapter(mAdapter);
~~~
This sets the adapter that provides the data and the view.
The ListActivity hosts a ListView object that can be bound to different data sources. Adapters allow you to bind the data source to the view. It serves as
an intermediary between the data and view. An AdapterView is a view
whose children are determined by an Adapter e.g., ListView.
When the content for your layout is dynamic or not pre-determined, you
can use a layout that subclasses AdapterView (i.e., ListView) to populate the layout
with views at runtime. ListView is a subclass of the AdapterView class and uses an
Adapter to bind data to its layout.
## Some coding/naming style guidelines
There are a number of good guidelines out there for writing Android code. Please try and follow these field naming conventions:
- Non-public, non-static field names start with m.
- Static field names start with s.
- Other fields start with a lower case letter.
- Public static final fields (constants) are ALL_CAPS_WITH_UNDERSCORES.
For example:
~~~{.java}
public class MyClass {
public static final int SOME_CONSTANT = 42;
public int publicField;
private static MyClass sSingleton;
int mPackagePrivate;
private int mPrivate;
protected int mProtected;
}
~~~
Check out [Code Style Guidelines for Contributors](http://source.android.com/source/code-style.html#follow-field-naming-conventions) but don't get hung up on the term `strict rules`. Just consider them style pointers.
## Other layouts: using date and time pickers
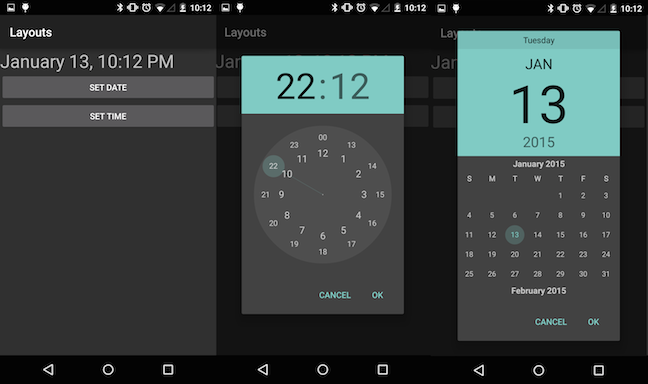
Android provides a set of standard widgets for setting the date and time -- these are called Pickers http://developer.android.com/guide/topics/ui/controls/pickers.html. The XML and code below show examples of using theDatePicker and TimePicker widgets to set the date and time, respectively. The DateAndTimeActivity.java allows the user to set date and time and then displays it in a TextView as shown the figure below.
**Try the demo:** Click on the data and time button and check it out.

The date_time_layout.xml is straightforward. A TextView is set up for displaying the date and time -- not the large than standard font (i.e., 30sp) is used. Two buttons are used to display the pickers, which are really wrapped dialog boxes. More on dialogs later. The onClick callbacks are set up in the XML as usual. The text displayed on each button is defined too.
~~~{.java}
~~~
When the user clicks on set the date the following dialog is presented to the user. Note, that the picker handles the internal setting on the time and click on the done button. However, the you are responsible for reading and storing the date and time set by the user after they have clicked the _Done_ button on the dialog using callback objects; that is, _OnDateSetListener_ for the date picker and _OnTimeSetListener_ for the time picker. Take a look at the code below to see the callback processing on the DatePickerDialog object for example. The date is year, month, and day.
The TimePicker widgets provides a similar call back object so you can access the time as a 24.00 hour clock (if configured) or a 12 hour clock with AM/PM. Time is hours and minutes. In this case the time callback object is TimePickerDialog. The OnTimeSetListener callback interface is used to indicate the user is done filling in the time (they clicked on the _Done_ button)
The DatePickerDialog object is first created using the constructor and then displayed to the user using the show() method as shown below, which starts the dialog and display it on screen.
TimePickerDialog(Context context, TimePickerDialog.OnTimeSetListener callBack, int hourOfDay, int minute, boolean is24HourView).
Note that the time picker dialog is constructed with the previously selected time (or date in the case of the date picker) from the Calendar -- as indicated above and below _true_ indicates we want a 24.00 hour view.
~~~{.java}
new TimePickerDialog(DateAndTimeActivity.this, mTimeListener,
mDateAndTime.get(Calendar.HOUR_OF_DAY),
mDateAndTime.get(Calendar.MINUTE), true).show();
~~~
We implement the TimePickerDialog.OnTimeSetListener interface to receive a callback when the user sets the time. The callback TimePickerDialog.OnTimeSetListener (_t_ parameter above) is setup below. The TimePickerDialog.OnTimeSetListener i(http://developer.android.com/reference/android/app/TimePickerDialog.OnTimeSetListener.html) has a single public method that you implement _onTimeSet(TimePicker view, int hourOfDay, int minute)_, as shown below. We simply store the time input from the picker in the Calendar object _dateAndTime_ that is created in the code (see the complete solution code below). Once we have stored the time we display it by calling the helper updateDateAndTimeDisplay(). This helper displays the input time using the view displayDateTime = (TextView) findViewById(R.id.dateTime); this writes the time in the correct format to the screen -- dateTime in the XML.
~~~{.java}
TimePickerDialog.OnTimeSetListener mTimeListener = new TimePickerDialog.OnTimeSetListener() {
public void onTimeSet(TimePicker view, int hourOfDay, int minute) {
mDateAndTime.set(Calendar.HOUR_OF_DAY, hourOfDay);
mDateAndTime.set(Calendar.MINUTE, minute);
updateDateAndTimeDisplay();
}
};
~~~
Let's discuss the code solution that handles the interaction with the pickers and display of the current time in the TextView -- as shown below in DateAndTimeActivity.java. As we mentioned before the Calendar instance sets the data and time
in onCreate() by calling the helper method updateDateAndTimeDisplay(); the method uses takes the current data and time from the Calendar and uses DateUtils object to format the date and time correctly for the TextView _dateTime_ defined in the XML. DateUtils contains various date-related utilities for creating text for things like elapsed time and date ranges, strings for days of the week and months, and AM/PM text etc -- see [DateUtils](http://developer.android.com/reference/android/text/format/DateUtils.html) for more details.
~~~{.java}
public class DateAndTimeActivity extends Activity {
TextView mDisplayDateTime;
Calendar mDateAndTime = Calendar.getInstance();
@Override
protected void onCreate(Bundle savedInstanceState) {
super.onCreate(savedInstanceState);
setContentView(R.layout.date_time_layout);
mDisplayDateTime = (TextView) findViewById(R.id.dateTime);
updateDateAndTimeDisplay();
}
public void onTimeClicked(View v) {
TimePickerDialog.OnTimeSetListener mTimeListener = new TimePickerDialog.OnTimeSetListener() {
public void onTimeSet(TimePicker view, int hourOfDay, int minute) {
mDateAndTime.set(Calendar.HOUR_OF_DAY, hourOfDay);
mDateAndTime.set(Calendar.MINUTE, minute);
updateDateAndTimeDisplay();
}
};
new TimePickerDialog(DateAndTimeActivity.this, mTimeListener,
mDateAndTime.get(Calendar.HOUR_OF_DAY),
mDateAndTime.get(Calendar.MINUTE), true).show();
}
public void onDateClicked(View v) {
DatePickerDialog.OnDateSetListener mDateListener = new DatePickerDialog.OnDateSetListener() {
public void onDateSet(DatePicker view, int year, int monthOfYear,
int dayOfMonth) {
mDateAndTime.set(Calendar.YEAR, year);
mDateAndTime.set(Calendar.MONTH, monthOfYear);
mDateAndTime.set(Calendar.DAY_OF_MONTH, dayOfMonth);
updateDateAndTimeDisplay();
}
};
new DatePickerDialog(DateAndTimeActivity.this, mDateListener,
mDateAndTime.get(Calendar.YEAR),
mDateAndTime.get(Calendar.MONTH),
mDateAndTime.get(Calendar.DAY_OF_MONTH)).show();
}
private void updateDateAndTimeDisplay() {
mDisplayDateTime.setText(DateUtils.formatDateTime(this,
mDateAndTime.getTimeInMillis(), DateUtils.FORMAT_SHOW_DATE
| DateUtils.FORMAT_SHOW_TIME));
}
}
~~~
Note, Android developers use (most of the time anonymous) inner classes to define specialized listeners such as TimePickerDialog.OnTimeSetListener, which register a callback -- new TimePickerDialog.OnTimeSetListener() -- to implement the program to take care of events such as set time. For example, in the case of new TimePickerDialog.OnTimeSetListener() it takes no specific parameters but creates a nested object to handle the callback. What the user clicks on _Done_ to set the time onTimeSet(TimePicker view, int hourOfDay, int minute) method is called to implement the specific behavior of the user event (i.e., the user clicks on _Done_). See [Power of Anonymous Inner Classes](http://mobile.tutsplus.com/tutorials/android/java-inner-classes/).
## ScrollView
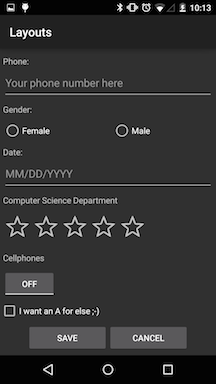
Many time you will want to design a layout that has too many views and widgets for a simple phone screen. Maybe the views might be truncated? No, Android has a scrollable view that allows you to load up the layout. In this case the user simply swipes down and up to get to the view of interest.
**Try the demo:** Click on ScrollView Layout button and check it out.

The code snippet of [`scrollview_layout.xml`](lecture06.txt) below shows viewgroups embedded around the ScrollView.
~~~{.java}
~~~
The following is also a snippet of the ScrollViewLayoutActivity. Not is has callbacks for onCancelClicked() and onSaveClicked(). However these callbacks do not save the user input. In the next example we discuss how user data is saved using SharedPreference.
~~~{.java}
public class ScrollViewLayoutActivity extends Activity {
public void onSaveClicked(View v) {
Toast.makeText(getApplicationContext(),
getString(R.string.save_message), Toast.LENGTH_SHORT).show();
Intent intent = new Intent(ScrollViewLayoutActivity.this,
MainLayoutActivity.class);
startActivity(intent);
}
public void onCancelClicked(View v) {
Toast.makeText(getApplicationContext(),
getString(R.string.cancel_message), Toast.LENGTH_SHORT).show();
Intent intent = new Intent(ScrollViewLayoutActivity.this,
MainLayoutActivity.class);
startActivity(intent);
}
}
~~~
We will use a ScrollView layout for our first programming assignment. More later.
## SharedPrefences: Storing user data
If an activity is destroyed for any reason -- the user exists through the back key, or the system needs reclaims resources so kills activities that are currently not in the *focus* of the user -- then any user data entered is lost. (Note, we will discuss the various phases of an activity when we discuss activity lifecycle). So what if you wanted to save user data so when the app opens again you don't have to renter the data -- which, you'd agree would be a royal pain. Well android allows you to do this in a number of ways. You can use a simple SharedPreference object to store small amounts of user data. For more sophisticated data storage we will use databases and particular SQLite -- we will build an app that uses SQLite later in the course. But for now let's assume we want to save a small amount of user data between invocations of our layout app.
**Try the demo** Click on SharedPereference button and check it out. Try inputting data and then destroying and starting the app again. You should see your data.

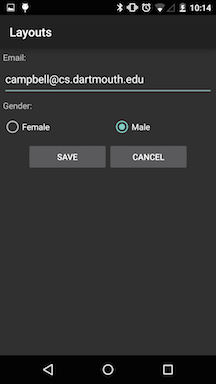
The XML snippet of [`shared_preferences_layout.xml`](lecture06.txt) below shows presents nothing new for you -- it's clear, right. OK, onto the code. The XML includes to onClick callbacks to `Save` or `Cancel`. If save is selected by the user the input data is stored in the SharedPrefence object. If cancel is clicked nothing is saved.
~~~{.java}
**snippet**
~~~
The [SharedPreferencesActivity.java]() code is divided up for easy of discussion below. We cluster the onCreate() and onClick callbacks. Following this we discuss two helper methods used to support the saving and restoring the user data -- `saveUserData()` and `loadUserData()`. Frist, note that SharedPreferencesActivity extends Activity. Let's discuss how the code works. onCreate() simply set the view and calls the helper to load any stored data. Note, the first time the app runs there is no stored data so this is an edge case that needs to be taken care of in the code -- we will discuss this edge case when we discuss the helper methods.
Let's assume the user inputs some data and clicks the`Save` button. The onSaveClicked() callback calls saveUserData() and then displays some toast informing the user that their data is saved -- it's important to keep the user in the loop. If the user clicked the `Cancel` button then nothing happens in the callback other than displaying toast and returning to the MainLayoutActivity (main menu) using an Intent. Note, we will discuss intents in much more detail in this course but for now let's go with the flow regarding the magic on intents.
~~~{.java}
public class SharedPreferencesActivity extends Activity {
private static final String TAG = "CS65";
public static final String PREFS_MYRUNS = "MyPrefs";
@Override
protected void onCreate(Bundle savedInstanceState) {
super.onCreate(savedInstanceState);
setContentView(R.layout.shared_preferences_layout);
// Load user data to screen using the private helper function
// loadProfile
loadUserData();
}
public void onSaveClicked(View v) {
// Save all information from the screen into a "shared preferences"
// using private helper function
saveUserData();
Toast.makeText(getApplicationContext(),
getString(R.string.save_message), Toast.LENGTH_SHORT).show();
Intent mIntent = new Intent(SharedPreferencesActivity.this,
MainLayoutActivity.class);
startActivity(mIntent);
}
public void onCancelClicked(View v) {
Toast.makeText(getApplicationContext(),
getString(R.string.cancel_message), Toast.LENGTH_SHORT).show();
Intent mIntent = new Intent(SharedPreferencesActivity.this,
MainLayoutActivity.class);
startActivity(mIntent);
}
~~~
Let's assume that onCreate() invokes the loadUserData() helper when the app starts or resumes. To start with let's assume that no user data is stored in the activities SharedPreference object.
## Helper functions - loadUserData() and saveUserData()
loadUserData() first gets the key for the preference name which is used to obtain an instance of the SharedPreferences class. This is the object what we will store data using key/data pairs to save and restore (using the other helper function). Specifically, getSharedPreferences() has two parameters:
- name: the preferences file (mKey in our case). If a preferences file by this name does not exist, it will be created when you retrieve an editor (SharedPreferences.edit()) and then commit changes (Editor.commit()).
- mode:the operating mode. The `MODE_PRIVATE` specifies that the preference file can only be accessed by the application that created it.
The getSharedPreferences() method retrieve the contents of the preferences file 'name', returning a SharedPreferences (i.e., mPrefs) through which you can retrieve and modify its values. Only one instance of the SharedPreferences object is returned to any callers for the same name, meaning they will see each other's edits as soon as they are made.
To update the value of preference we first use getString() to get the key -- for example, `preference_key_profile_email` -- and then get the string value for the email using the mKey in this case. Note, if there is nothing stored for that key (i.e., no email details have been saved) then we use the default of an empty string. Once we have the value we update the EditText view on the screen by getting the view and then setting the restored value.
~~~{.java}
((EditText) findViewById(R.id.editEmail)).setText(mValue);
~~~
This is repeated for all views in the `shared_preferences_layout.xml` file, as shown above. The RadioButtons do not store strings but an integer value where `-1` is the default used if nothing has already been saved and 0/1 for the gender buttons female/male from the order of the widgets in the RadioGroup. Finally, the helper function displays some toast with the RadioGroup value.
~~~{.java}
// ****************** private helper functions ***************************//
// load the user data from shared preferences if there is no data make sure
// that we set it to something reasonable
private void loadUserData() {
// We can also use log.d to print to the LogCat
Log.d(TAG, "loadUserData()");
// Load and update all profile views
// Get the shared preferences - create or retrieve the activity
// preference object
String mKey = getString(R.string.preference_name);
SharedPreferences mPrefs = getSharedPreferences(mKey, MODE_PRIVATE);
// Load the user email
mKey = getString(R.string.preference_key_profile_email);
String mValue = mPrefs.getString(mKey, " ");
((EditText) findViewById(R.id.editEmail)).setText(mValue);
// Please Load gender info and set radio box
mKey = getString(R.string.preference_key_profile_gender);
int mIntValue = mPrefs.getInt(mKey, -1);
// In case there isn't one saved before:
if (mIntValue >= 0) {
// Find the radio button that should be checked.
RadioButton radioBtn = (RadioButton) ((RadioGroup) findViewById(R.id.radioGender))
.getChildAt(mIntValue);
// Check the button.
radioBtn.setChecked(true);
Toast.makeText(getApplicationContext(),
"number of the radioButton is : " + mIntValue,
Toast.LENGTH_SHORT).show();
}
}
~~~
Once the loadUserData() is complete the screen is updated with any stored data. Now, assume the user has changed these values (email and gender) and clicked the `Save` button. The following happens. The callback calls the saveUserData() helper function. The helper function gets the preference file key and gets the reference to the SharedPeference object. While same key/value pairs are used to store data in the object the difference here is that an editor is needed to update the values. We first create (SharedPreferences.Editor object) and clear an editor through the mPrefs.edit() method. Following this we get the key of the value we want to update and then use mEditor.putString() to change the value. To save all the changes to the preference file we use mEditor.commit(). Finally, the helper displays the toast informing the user that their email address and gender information has been successfully saved.
~~~{.java}
// load the user data from shared preferences if there is no data make sure
// that we set it to something reasonable
private void saveUserData() {
Log.d(TAG, "saveUserData()");
// Getting the shared preferences editor
String mKey = getString(R.string.preference_name);
SharedPreferences mPrefs = getSharedPreferences(mKey, MODE_PRIVATE);
SharedPreferences.Editor mEditor = mPrefs.edit();
mEditor.clear();
// Save email information
mKey = getString(R.string.preference_key_profile_email);
String mValue = (String) ((EditText) findViewById(R.id.editEmail))
.getText().toString();
mEditor.putString(mKey, mValue);
// Read which index the radio is checked.
// edit this out and use as a debug example
// interesting bug because you try and write an int to a string
mKey = getString(R.string.preference_key_profile_gender);
RadioGroup mRadioGroup = (RadioGroup) findViewById(R.id.radioGender);
int mIntValue = mRadioGroup.indexOfChild(findViewById(mRadioGroup
.getCheckedRadioButtonId()));
mEditor.putInt(mKey, mIntValue);
// Commit all the changes into the shared preference
mEditor.commit();
Toast.makeText(getApplicationContext(), "saved name: " + mValue,
Toast.LENGTH_SHORT).show();
}
~~~
## Storage options
As discussed above there are a number of options of storing
persistent application data in Android:
- using Shared Preferences for primitive data such as Int, strings,
etc.
- using internal or external device storage; and
- using SQLite databases for storing structured data.
The type of storage depends on what your application is trying to achieve. We will discuss storage later in the class but read the relevant bood
chapter on storage and the Android developers notes on [storage options](http://developer.android.com/guide/topics/data/data-storage.html)
## Higher level UI components
We have covered a lot of ground in this first set of UI lectures. Please make sure you go through the code provided and extend it. For example, note when you flip to landscape mode for some of the layouts the layout gets truncated -- can you fix this. The UI described so far is fairly low level and comprises important but small building blocks. Fortunately, you don't have to build your UI from low level views and widgets like we did here. App designers can use higher level pre-made UI components to build UIs. We will discuss these later -- examples of these high level components include ActionBar, Dialogs and Status Notification. We will use all of these components in the UI we build. That should be fun. But is good to understand the weeds first, forgive the poorly chosen metaphor.