# Fragments and ActionBars
The Android framework contains a number of UI components that allow a common feel to design simple UIs -- one is the ActionBar. These UI components integrate `fragments` which are associated with a view. Fragments let us build reusable and extensible UIs.
## What this lecture will teach you
- How to build the ActionTab app, which uses ActionBar and fragments
- Creating the ActionBar with Tabs
- Setting up Menus
- Fragments, Fragment lifecycle and fragment layouts
## Resources
* Android developers [Action Bar](http://developer.android.com/guide/topics/ui/actionbar.html)
* Android Official Code Sample [SlidingTabsBasic](http://developer.android.com/samples/SlidingTabsBasic/index.html)
* Google DevByte [Sliding Tabs](https://www.youtube.com/watch?v=tRg_eDfQ8fk)
* Android developers [Fragments](http://developer.android.com/guide/components/fragments.html)
* Course book [The Tactics of Fragments](http://commonsware.com/Android/) page 279
* Iconography resources: [a bunch of icons to beautify your app.](http://developer.android.com/design/style/iconography.html)
## Checkout the demo project
- Download the demo the [actiontabs.zip](../code/actiontabs.zip) app specifically designed to go with these notes.
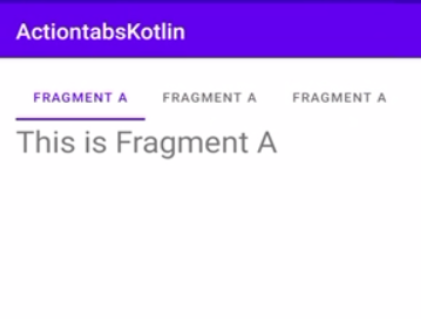
## ActionTab app
ActionTab is a simple application used to demonstrate the use on the ActionBar and fragments. If you click through the tabs you will find to answer to the question - why Dartmouth.
Fragments are associated with the UI. We will develop the ActionTab app to best illustrate how fragments can use Android UI components such as ActionBar (more on that in a moment). The ActionTab app will combine multiple fragments (four in all) in a single activity to build a multi-pane UI. These fragments can be considered self-contained components and could be reused by multiple activities potentially across multiple applications.
The app is made up of 4 tabs and 4 corresponding fragments.
Note, that when the app is shown in landscape the ActionBar is configured differently from the normal portrait view -- Android rearranges the icons visible in the actionbar; that is, in landscape the "add" option is shown as an icon on the actionbar rather than in the drop down, as is the case in portrait mode; we show the landscape below:
Play with the app to get a feel for the UI -- cool hey? Simple, compact and a nice way to build up the features and services offered by your app. We will use this ActionBar and fragment combination as part of Lab2.
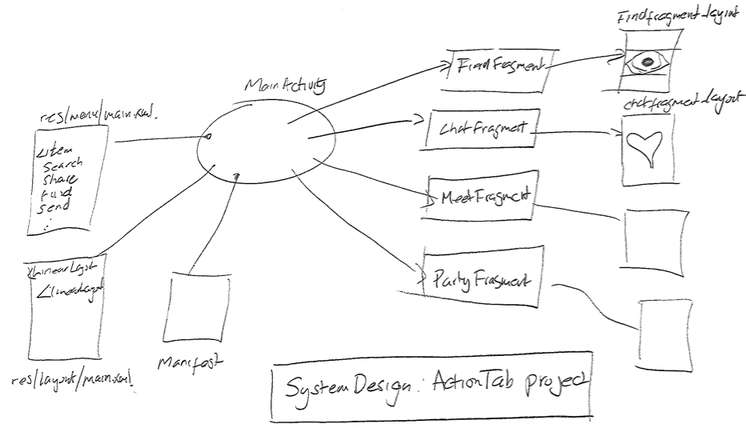
There is one activity and four fragments in this project:
- activity: MainActivity.java
- fragments: ChatFragment.java, FindFragment.java, MeetFragment.java, PartyFragment.java
- layouts: each activity and fragment has a layout
- menu: this is **new** the action bar has a menu that is in res/menu/main.xml
The systems design diagram (below) captures the main components and their interaction. This is not meant to be a detailed diagram. Rather, it shows the main activity, the four fragments and their layouts. The menu and manifest are also shown.
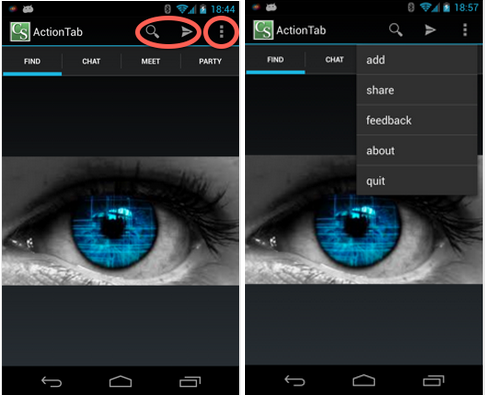
## ActionBar
ActionBar is a simple UI component that can be used by many different applications -- it gives a common feel that can be customized to the specific needs on different applications. Let's take a closer look at the action bar of our app -- now shown in portrait mode, as shown below. The action bar shows the application icon on the left -- the CS logo, followed by the activity title -- ActionTab. Our activity defines a number of "action items" (in menu/main.xml). Selected items can be made visible on the action bar such as search and send (which are directly accessible as icons defined in the menu/main.xml). If a menu item does not appear as an action item (for example add, share, feedback) then the action bar places it in the overflow menu -- the action item icons and the overflow menu are down in the figure(left). The overflow menu button is shown on far right of the figure -- 3 dots stacked. If we click on that we see the hidden menu options -- shown in the figure (right).
## Tabs
[Tabs](http://developer.android.com/design/building-blocks/tabs.html) in the action bar are often where you put titles for different pages in your app. They make it easy to explore and switch between different views or functional aspects of your app, or to browse categorized data sets. Check out the Google Play app on your phone for a quick demonstration of scrollable tabs, where tab strip indicators move smoothly from tab to tab. Users can gain continuous touch feedback as they swipe between pages.

## Developing sliding tabs with SlidingTabLayout and ViewPager
Add SlidingTabLayout and ViewPager to the main.xml file. We put them into a RelativeLayout where ViewPager is below the SlidingTabLayout. At onCreate(), the MainActivity will load these two components to render the sliding tabs and swipeable pages. To use the ViewPager class, you need to import support library v4 to your project. Check a [previous post](https://piazza.com/class/i4inyeqim7262d?cid=10) on how to import the library in Android Studio.
~~~{.java}
~~~
## Creating the ActionBar and Tabs
Our design uses [ViewPager](http://developer.android.com/reference/android/support/v4/view/ViewPager.html) to switch between Fragment objects, and each Fragment is titled by one sliding tab, as shown in the code snippet. ViewPager is most often used in conjunction with Fragment, which is a convenient way to supply and manage the lifecycle of each page. There are standard adapters implemented for using fragments with the ViewPager, which cover the most common use cases. These are FragmentPagerAdapter and FragmentStatePagerAdapter; each of these classes have simple code showing how to build a full user interface with them. In Android, adapters are a bridge between Adapter View (e.g., ViewPager, ListView, etc.) and the underlying data sources for that view (e.g., arraylists, databases, fragments, etc.). We will revisit the concept of adapter in the week 4.
~~~{.java}
public class MainActivity extends Activity {
/** Called when the activity is first created. */
@Override
public void onCreate(Bundle savedInstanceState) {
super.onCreate(savedInstanceState);
setContentView(R.layout.main);
// Define SlidingTabLayout (shown at top)
// and ViewPager (shown at bottom) in the layout.
// Get their instances.
slidingTabLayout = (SlidingTabLayout) findViewById(R.id.tab);
viewPager = (ViewPager) findViewById(R.id.viewpager);
// create a fragment list in order.
fragments = new ArrayList();
fragments.add(new FindFragment());
fragments.add(new ChatFragment());
fragments.add(new MeetFragment());
fragments.add(new PartyFragment());
// use FragmentPagerAdapter to bind the slidingTabLayout (tabs with different titles) and ViewPager (different pages of fragment) together.
myViewPagerAdapter =new ActionTabsViewPagerAdapter(getFragmentManager(),
fragments);
viewPager.setAdapter(myViewPagerAdapter);
slidingTabLayout.setDistributeEvenly(true);
slidingTabLayout.setViewPager(viewPager);
}
~~~
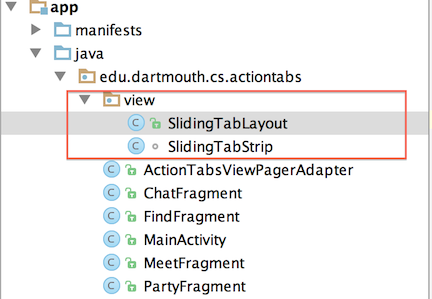
We use the SlidingTabLayout and SlidingTabStrip in the official code [sample](http://developer.android.com/samples/SlidingTabsBasic/index.html) to render tabs, and call setDistributeEvenly to make sure the tabs are evenly distributed rather than dynamically distributed as default. We put these two files under the view folder of our app package, as they are specifically created for rendering tasks.
Once the tabs are set up we create 4 new fragments; we simply use the new key word in front of the class names for each of the fragments created in the files:
- ChatFragment.java
- FindFragment.java
- MeetFragment.java
- PartyFragment.java
These are all pretty much identical code. Each fragment inflates its own layout (e.g., R.layout.chatfragment) in onCreateView().
Next, in our customized ActionTabsViewPagerAdapter we set up the titles for each of the created tabs.
~~~{.java}
public CharSequence getPageTitle(int position) {
switch (position) {
case CHAT:
return UI_TAB_CHAT;
case FIND:
return UI_TAB_FIND;
case MEET:
return UI_TAB_MEET;
case PARTY:
return UI_TAB_PARTY;
default:
break;
}
return null;
}
~~~
## Setting up the menu with action Items
The menu declares all of the menu items. We show a few items below. The object ID is set up; note Android has a number of nice icons we can use and in the case below we use the search and send icons from @android:drawable; regards "ifRoom":
You can specify that a menu item appear as an action item in the XML file by using `android:showAsAction="ifRoom"` as shown above in our menu for each of the - element. Depending on space (could be a tablet or phone, or could be a phone flipping between portrait and landscape) the item might be in the actionbar or if there is no room it will appear in the overflow menu. The final of the item set up is a title @string/ui_menu_send that can be used in the overflow menu if it can't be accommodated in the action bar.
~~~{.java}
~~~
## Inflating the menu
The onCreateOptionsMenu() callback is invoked when the activity is created to inflate the main.xml in the menu folder as discussed above -- this inflates the XML menu resources that populates the he action bar and overflow menu. You can add menu items to the menu programmatically using onCreateOptionsMenu() but in our example we simply inflate the items set up in main.xml.
~~~{.java}
@Override
public boolean onCreateOptionsMenu(Menu menu) {
MenuInflater inflater = getMenuInflater();
inflater.inflate(R.menu.main, menu);
return true;
}
~~~
## Selecting menu items
If you added the menu item from a fragment, via the Fragment class's onCreateOptionsMenu callback, then the system calls the respective onOptionsItemSelected() method for that fragment when the user selects one of the fragment's items. When any of the options are selected by the user the onOptionsItemSelected is called with the reference to the related MenuItem. In most cases the callback justs displays toast but in the case of quit we call `finish()` to close the app.
~~~{.java}
@Override
public boolean onOptionsItemSelected(MenuItem item) {
switch (item.getItemId()) {
case R.id.menuitem_search:
Toast.makeText(this, getString(R.string.ui_menu_search),
Toast.LENGTH_LONG).show();
return true;
case R.id.menuitem_send:
Toast.makeText(this, getString(R.string.ui_menu_send),
Toast.LENGTH_LONG).show();
** snippet**
case R.id.menuitem_quit:
Toast.makeText(this, getString(R.string.ui_menu_quit),
Toast.LENGTH_SHORT).show();
finish(); // close the activity
return true;
}
return false;
}
~~~
## Fragments
Up until now we have used activities as drivers to display views to the screen. The previous example each screen is associated with an activity that is used to render and manage the user interaction with the view. All that changes in this lecture. We move away from activities and start to use fragments -- a fragment is now used to render and manager a particular UI view. Think of fragments as lightweight activities for now. Your application still needs activities but we don't use them to solely render views. Most applications, and ones we will develop, include one or more activity and fragments.
What are fragments?
- Fragments are parts of application's UI or behavior that are integrated into activities -- a fragment needs an activity to run.
- Fragments are flexible and reusable components defined by the programmer
- each fragment has its own lifecycle and associated UI (for example, a fragment for the user to enter profile information, another one to render maps).
- Fragments present a consistent UI across different apps and devices; fragments are flexible in adapting the user experience across these different environments.
In implementation there are considerable differences; for example, an activity has to be specified in the manifest, while fragments do not because they can only exist in the context of an activity and are coupled to the activity state. While fragments are strongly integrated into the UI you can use fragments without a view or UI components. Fragments can implement a number of application behaviors, such as, code to handle listeners, files, database, etc. These types of fragments can be thought of as invisible worker for the activity -- more later on this. For now we will just consider fragments when applied to the UI.
## Why use fragments over activities?
A fragment is a modular part of an activity. It has its own lifecycle and receives its own input events. Fragments can created, added or removed while the activity is running. Consider a fragment a "sub activity" that you can reuse in different activities. But you could ignore fragments and just use activities if you wish -- but not recommend. Why use fragments over activities? Well fragments are wired to create reusable Android user inferences components -- however, it is true to say you can implement similar application UIs with a pure activity solution, which might be confusing for students. Here are some reasons why you should use fragments as a designer:
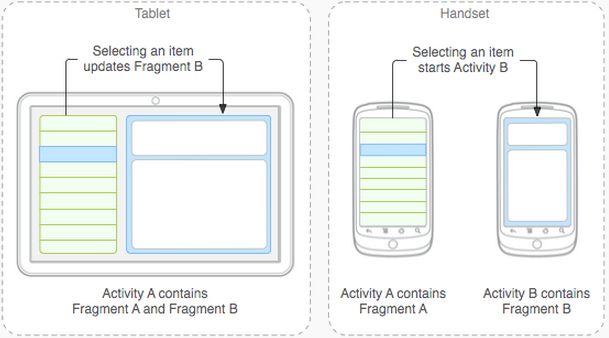
- Consider the diagram below. You are designing a cool new app that you want gazillions of people to use on all sorts of phones and tablets with different sized screens. The figure shows how your UI based on fragment design could run on a tablet and phone UI; in the case of the tablet with larger screen real estate the UI fragment components are rendered side by side but on the phone with a smaller form factor the two fragments are treated differently and brought into focus at different times. The activity that handles the UI is smart enough to adapt the UI to the type of device.
- As we will see in the sample project code ActionTab fragments have been integrated into UI components such as ActionBar which is a the recommend way to build a common UI feel across different apps. We will discuss ActionBar later in these notes where we *bind* tabs (to navigate your app) on the ActionBar to fragments. When we look at the callback (i.e., ActionBar.TabListener interface) for handling the event when the user taps a tab the interface passes a `FragmentTransaction` as an input argument to the onTabSelected method. In brief, many UI components assume you are using fragments and not activities -- as a result, fragments are wired into the UI and activities are not.
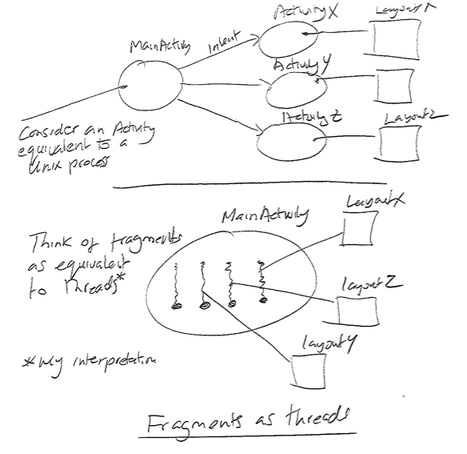
## Fragment and activities akin to processes and threads
Fragments are reusable UI but can also be considered lightweight in how they handle operations on the UI. As I mentioned before you can do most things with activities that fragments do but consider for the moment (if you did this) the relationship between design using all processes or threaded design. Fragments can be considered to be threads in such a choice, as shown below.
## Fragment Lifecycle
Though Fragment defines its own lifecycle, that lifecycle is dependent on its activity: if the activity is stopped, no fragments inside of it can be started; when the activity is destroyed, all fragments will be destroyed.
A fragment runs with in the activity and the activity lifecycle that we discussed. So it an activity is stopped so are all its fragments. Similarly if the activity is destroyed so are all the associated fragments. However, when an activity is `running` (i.e., onResume() state) fragments can be independently managed -- added, replaced or removed. As we will see what we discuss the ActionTab application we will use *fragment transactions* to remove and replace fragments associated with the action bar tabs: such as:
- ft.remove(fragment); remove a fragment from the UI
- ft.replace(R.id.fragment_container, fragment); replace one fragment (or view) with another.
These fragment transactions allow the activity to manage the `back stack` - a back stack entry in the activity is a record of the fragment transaction that occurred. This, for example, allows the user to reverse a fragment transaction (navigate backwards), by pressing the back button.
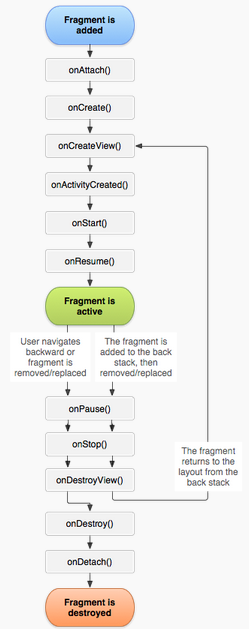
The [fragment lifecycle](http://developer.android.com/guide/components/fragments.html) diagram shown below looks complicated but as we discuss it consider that this set of fragment states run inside of the running state of the activity lifecycle diagram we discussed in earlier lecture on activity lifecycle. Therefore the state diagram shown below is only valid when the activity associated with the fragment
Like the activity lifecycle the fragment lifecycle is represented by a bunch of states and associated event handlers, which are triggered when a fragment is:
- created
- resumed
- paused
- stopped
- destroyed
In addition there are a number of callbacks associated with a number of fragment specific events, such as, 1) binding and unbinding a fragment from its activity; 2) when a fragment is created and destroyed. If you look at the core states shown in the figure you see:
- fragment is added
- fragment is active
- fragment is destroyed
## Fragment lifecycle events
Many events can occur between these states -- for example the user can hit the back button.
- onAttach() is called when the Fragment is attached to its parent activity
- onCreate() is called to initially create the fragment
- onCreateView() is called to created its user interface -- it inflates the fragment UI
- onActivityCreated() is called once the parent activity and the fragment UI are created.
- onStart() is called the start of the visible lifetime, any UI changes can be applied before the fragment goes visible
- onResume() is called at the start of the active lifetime such as resuming any paused UI updates needed by the fragment that were
suspended when it became inactive.
- onPause() called at the end of the active lifetime; persist all edits or state changes, suspend UI updates, threads, or CPU intensive processes that don't need to be updated when the Activity isn't the active foreground activity
- onSaveInstanceState() called to save UI state changes at the end of the active lifecycle
- void onStop() called at the end of the visible lifetime
- onDestroyView() called when the fragment's view is detached
- onDestroy() called at the end of the full lifetime
- onDetach() called when the Fragment has been detached from its parent activity.
If we consider the ActionTab app it has four fragments - one for each tab view. As the use taps through the tab options the fragment transitions through the states in the lifecycle diagram -- moving say from being in focus in onResume() to hidden in onPause(). But the complete fragment lifecycle is tightly coupled to the activity but also governed by the user interaction with the UI (as is the case with the ActionTab app). The activity can dynamically construct the UI and its associated fragments -- such as adding and removing fragments where each fragment transitions through its full, visible and active lifecycle several times within the lifetime of its parent activity -- for example as a fragment is added and removed from the view.
See [MySkeletonFragment.java](MySkeletonFragment.html) for an example of a skeleton fragment. There are many events and we will only use a few of these events in terms of populating code. So don't be overwhelmed -- at least, not yet ;-). Let's discuss some of the important events.
## onAttach() and onDetach() events
The lifecycle starts and ends when a fragment is attached and detached from its parent activity. The onAttach() event occurs before the fragment's UI is created and before the fragment or its parent activity have completed initialization. Keep this in mind when we are looking at the ActionTab activity's onCreate() when it creates its fragments. It is a good idea to create fragments in the activities onCreate() to ensure they are created only once in the fragment lifetime.
## onCreateView() event
The fragment's UI is created and destroyed in onCreateView() and onDestroyView() callbacks, respectively. The onCreateView() method initializes the fragment by inflating the UI, getting references and binding any data to the views that it contains -- and then any addition initialization such as setting up services (we will talk about services later on in the course).
## onCreateView(): ActionTab example
The onCreateView()'s main job in code we will write is a one liner -- taken from FindFragment.java in the ActionTab app:
~~~{.java}
return inflater.inflate(R.layout.findfragment, container, false)
~~~
## An example of a fragment layout
The R.layout.findfragment is the ID for an XML layout resource to load (e.g., R.layout.findfragment). This is defined in the res/layout/findfragment.xml of the ActionTab project. This specifies the UI for the fragment, which is just a simple image but could be a sophisticated view group.
~~~{.java}
~~~
## Creating fragments and inflating: MeetFragment.java example
A fragment extends the Fragment class as shown below. When the MainActivity creates the fragments it calls onCreateView() for all fragments. All onCreateView() creates and returns the view hierarchy associated with the fragment-- essentially it returns the view for the fragment's UI. The code below overrides the onCreateView() handler into inflate and return the requires *view hierarchy*; that is, R.layout.meetfragment, as shown below. Note, if your fragment does not use a UI (such as providing the activity with background behavior) you do not inflate of course.
Importantly, fragments do not have to be registered in the manifest like activities are. And, as the fragment lifecycle, fragments are tied to the state of the activity so this makes good sense; that is, they can't exist without an activity.
~~~{.java}
public class MeetFragment extends Fragment {
@Override
public View onCreateView(LayoutInflater inflater, ViewGroup container, Bundle savedInstanceState) {
// Inflate the layout for this fragment
return inflater.inflate(R.layout.meetfragment, container, false);
}
}
~~~