
There are many ways to handle data on mobile devices. Unstructured data such as a jpeg file or html page is best stored in files. Structured or relational data such as your list of contacts is best stored and managed using relational databases. Android supports the very simple and very cool SQLite. In this lecture, we will discuss how to use Android SQLite database and Room through a simple demo project example. We will relate this simple example to the SQLite database you need to design and implement as part of MyRuns3.
The demo code used in this lecture is RoomDatabaseKotlin.zip.
You can find the starter code here.
Every Android app that wants to store structured
data (e.g., contact
information, march madness bracket) needs to create its own private
database that the app creates and manages by itself. The database
access is restricted to the app that created it. SQLite is a
transactional database engine which is lightweight: in
overhead, fast performance, small footprint and implemented as a c
library. When an application creates a private database it is stored in
/data/data/<package-name>/database, but you have to root
your phone
to see it.
SQLite databases store relational data in tables
of rows and columns:
ID  COMMENT
01  Dartmouth
02  Hanover
03  is
04  place
For details of the SQLite database, see the SQLite website.
Room is a SQLite database library that is part of Android
Jatpack.
Room takes care of the chores of setting up and configuring a databse.
You can also use Room to interact with a SQLite database using ordinary
function calls. In comparison to the alternatives using SQLite
helper, Room is much easier to use.
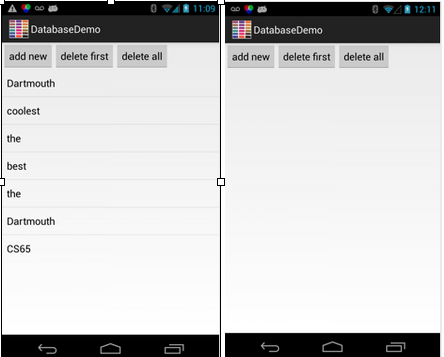
The application simply allows the user to add randomly selected comments to the database and display them to the UI. Comments can be added one at a time, deleted (from the top) one at a time or all comments can be deleted. So comment is the main object that the user deals with.
The application is very simple but allows us to understand how the database is set up and accessed. When the application first starts up there is not existing database so it displays no items. As the user adds and deletes items (i.e., comment) the UI reflects that. Finally, the user can delete all items in the data base. These various steps are shown in the screen dumps below of the app.
The first image represents the app when it is first installed and started. No database items have been stored. The next iteration is when the user has tapped the add new button a number of times and as a result a number of items have been (randomly selected) inserted in the database and rendered to a listview from the array below. Next, the user tapped on delete first once and the top item is deleted from the database and removed from the listview.
String[] comments = new String[] { "England", "Dartmouth", "CS65",
         "is", "is", "the", "best", "coolest", "place", "in", "the",
         "universe!" };
Next, the app is destroyed and then restarted. When the app is started again it shows the state of the database when it was last closed. In this case there are a number of items still in the database.
While the app is very simple the plumbing around constructing a database is complex at first. The Model-View-ViewModel (MVVM) architecture is shown in the figure below. The operation on the SQLite database is wrapped in a few layers of abstraction:
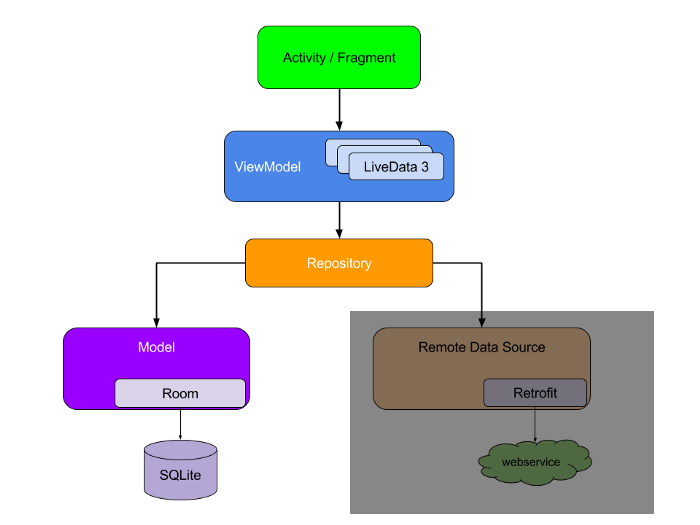
You use the SQL query language to interact with the database. Here are four basic operations:
With Room, the data access object (DAO) provides convenience methods for inserting, deleting, and updating the database.
In Kotlin and Android, data is represented in code using "data
classes". There is a notion of "Entity", which represents an object and
its properties that we want to store in the database. So a data class
of Entity defines a table. Each instance of that class represents a row
in a table. Each property of that class defines a column. In our demo
app, an Entity is a comment. With Room, we simply define each entity as
a data class and the interactions as a DAO interface. We use
annotations to add metadata to both. The system uses these annotated
classes to create tables in a database and queries that operate the
database.
To create a data class, we define the class using keyword data.
In our example, the Comment data class has two properties: id and
comment. To turn this into a description of an Entity for Room, we need
to annotate the class. Here, we annotate the data class with the @Entity keyword
with the name of the table (e.g., comment_table) for storing Entity
objects. The first property in the Comment class is for a unique
numeric primary key. We use the "id" property for this and annotate it
with the @PrimaryKey keyword. To
make sure that the key is unique, we let the system generate the key
for us for each new row by setting autoGenerate
to be true. We annotate the second property with @ColumnInfo to specify the name of the
column.
@Entity(tableName = "comment_table")
data class Comment (
    @PrimaryKey(autoGenerate = true)
    var id: Long = 0L,

    @ColumnInfo(name = "comment_column")
    var comment: String = ""

)
Tip: Note, in MyRuns3 where you build a database. It will have a table of exercises. Each row will include a number of different columns -- for example: activityType, dateTime, duration, distance, avgPace, avgSpeed, calorie, heart rate, comment. Consider this row an ExerciseEntry object -- which compares in this simple example to the Comment object. When you insert in the database you will be adding an ExerciseEntry object. When you query you might get one or more ExerciseEntry objects. Point is: your database code will be much more complex than this simple example. But it will use the operations in the same manner as discussed here.
When you use a Room database, you query the database by defining and
calling Kotlin functions in your code that map to SQL queries. You
define these mappings in a database access object or DAO using
annotation and Room creates the necessary code for you. Essentially a
DAO is a custom interface for accessing the database. For common
database operations, the Room library provides convenient annotations
such as @Insert, @Delete, and @Update. So you don't need to write SQL
code. For everything else, there is the @Query
annotation and you can write any queries that are supported by
SQLite.
In our sample code, we define an interface that is annotated with @DAO,
which tells the compiler that this interface's role is to define how to
access data in a Room database. We have a method called insertComment() to insert one item. It
is annotated with the @Insert annotation.
Note that we only provide the signature of the insertComment function
that has one Entity (e.g., a Comment object) as is a parameter. From
this, Room creates the SQL and any other code needed to insert that
Comment item when insertComment() is called from the Kotlin code. For
the remaining functions, we use the @Query
annotation
because the queries that we want to execute are not available as a
shortcut for an annotation. The SQL code is provided as an argument for
the annotation. For example, the SELECT
* FROM comment_table query
asks for all entities in the table called "comment_table". Below the
annotation, we provide the signature of a corresponding Kotlin
function. The functions are defined as suspend functions. This is
because all of our database operations will have to be run away from
the main UI thread and we will do that using coroutines. Note that the
exception is getAllcomments(). Kotlin treats all the functions
returning a Flow object as
suspending functions so we don't need to explicitly state it (more on
this later).
@Dao
interface CommentDatabaseDao {

    @Insert
    suspend fun insertComment(comment: Comment)

    @Query("SELECT * FROM comment_table")
    fun getAllComents(): Flow<List<Comment>>

    @Query("DELETE FROM comment_table")
    suspend fun deleteAll()

    @Query("DELETE FROM comment_table WHERE id = :key")
    suspend fun deleteComment(key: Long)
}
Flow object.
Flow handles the stream of data asynchronously so that once we
have all the data from the database, we don't have to get them again
every time there is a change to the database (e.g., deleting a row).
This is an amazing feature of Room as the system will update the data
for us whenever something changes. All we need to do is attaching an
observer to it and then if the data changes, the UI will update itself
to show the changed data without us having to get the data again. Once
the
DAO is defined, Room creates all the code to map between the database
queries and our functions so that we can call the functions in our
Kotlin code and under the hood the query is executed against the
database.
Now we have an entity and a DAO, we can move forward with the
database. We need to create a public abstract class that extends RoomDatabase. This class is abstract
because Room creates the implementation for it for us. We annotate the
class with @Database and the
arguments declare the entities for the database and set the version
number (e.g., entities =
[Comment::class], version = 1).
If you have more than one table, add them all to the entity list.
Whenever you change the database schema, you need to change the version
number or your app won't work. After we tell the database what entity
to use, we need to tell it about the DAO associated with our entity so
that we can interact with the databse. We do this by declaring an
abstract property that returns the DAO. In this app, we have only one
table and one DAO, but you can have multiple tables and DAOs.Since we
only need only one instance of the same Room database for the
whole app, we make the Room database a singleton. Inside a companion
object, we use Room's database builder (e.g., Room.databaseBuilder)
to create the database only if it does not exist. Otherwise, we return
the existing database. To tell the database builder which database to
build, we pass in a reference to the CommentDatabase class. We also
need to give the database a name, here we use "comment_table".
@Database(entities = [Comment::class], version = 1)
abstract class CommentDatabase : RoomDatabase() {
    abstract val commentDatabaseDao: CommentDatabaseDao

    companion object{
        @Volatile
        private var INSTANCE: CommentDatabase? = null

        fun getInstance(context: Context) : CommentDatabase{
            synchronized(this){
                var instance = INSTANCE
                if(instance == null){
                    instance = Room.databaseBuilder(context.applicationContext, CommentDatabase::class.java, "comment_table").build()
                    INSTANCE = instance
                }
                return instance
            }
        }
    }
}
The companion object allows clients to access
the getInstance() method without
instantiating the class (like JAVA's abstract method). Note that the
INSTANCE variable is annotated with @Volatile.
This helps us make sure the value of INSTANCE is always up to date and
the same to all execution threats. The value of a volatile variable
will never be cached and all writes and reads will be done to and from
the main memory. It means that changes made by one thread to INSTANCE
are visible to all other threads immediately. Multiple threads can
potentially ask for a database instance at the same time (not likely in
this demo app but highly possible with more complex apps). Wrapping
code into synchronized means
only
one thread of execution at a time can enter this block of code, which
makes sure the database only gets initialized once.
As we mentioned early, a repository serves as an extra layer of
abstraction for hiding the data source from a layer above (e.g.,
ViewModel). A repository manages queries and allows you to use multiple
backends. In the most common example, the Repository implements the
logic for deciding whether to fetch data from a network or use results
from a local database. We don't have these in our demo app so our
repository only handles the direct operations with the database using
DAO. In our demo app, we name our repository class CommentRepository.
It taks a commentDatabaseDao as a
parameter and makes it available from inside as a private property.
Inside the repository class,
we have another property called allComments. Upon calling this property
(e.g., in ViewModel), we will have all the data that is currently
stored in the database. We do this by assigning it with the return list
of the getAllComents() method
defined in commentDatabaseDao. In
all the remaining functions, we execute the other database operations
using coroutines.
class CommentRepository(private val commentDatabaseDao: CommentDatabaseDao) {

    val allComments: Flow<List<Comment>> = commentDatabaseDao.getAllComents()

    fun insert(comment: Comment){
        CoroutineScope(IO).launch{
            commentDatabaseDao.insertComment(comment)
        }
    }

    fun delete(id: Long){
        CoroutineScope(IO).launch {
            commentDatabaseDao.deleteComment(id)
        }
    }

    fun deleteAll(){
        CoroutineScope(IO).launch {
            commentDatabaseDao.deleteAll()
        }
    }
}
Now we have completed the Model layer, the next step is to collect
some data and add it to the database and display it. All this work is
done in the ViewModel layer. Our ViewModel will interact with the
database via the repository and it will provide data to the UI via
LiveData. Our custom ViewModel class takes an instance of CommentRepository as a parameter and
makes it available to the inner functions as a private property. We
convert repository.allComments from
Flow to LiveData and store the list in another property (you can do the
conversion inside the repository too). Later, we can write code inside
the View layer to observe the change in the database. The remaining
functions are straightforward, where we insert a comment to the
database, delete the first row in the database, and delete everything
in the database.
class CommentViewModel(private val repository: CommentRepository) : ViewModel() {
    val allCommentsLiveData: LiveData<List<Comment>> = repository.allComments.asLiveData()

    fun insert(comment: Comment) {
        repository.insert(comment)
    }

    fun deleteFirst(){
        val commentList = allCommentsLiveData.value
        if (commentList != null && commentList.size > 0){
            val id = commentList[0].id
            repository.delete(id)
        }
    }

    fun deleteAll(){
        val commentList = allCommentsLiveData.value
        if (commentList != null && commentList.size > 0)
            repository.deleteAll()
    }
}
Unlike the ViewModels we saw from the early examples, this time our
custom ViewModel has takes a parameter, meaning that it can only be
instantiated using a ViewModelFactory. Our CommentViewModelFactory
class takes the CommentRepository
as an argument. Our factory extends ViewModelProvider.Factory. Inside the
factory, we override create,
which takes any class type as an argument and returns a ViewModel. In
the body of create(), we check if there is a CommentViewModel class
available. If yes, we return an instance of it. Otherwise, we throw an
exception.
class CommentViewModelFactory (private val repository: CommentRepository) : ViewModelProvider.Factory {
    override fun<T: ViewModel> create (modelClass: Class<T>) : T{
        if(modelClass.isAssignableFrom(CommentViewModel::class.java))
            return CommentViewModel(repository) as T
        throw IllegalArgumentException("Unknown ViewModel class")
    }
}
CommentDatabase.getInstance.
The database object gives us access to the CommentDatabaseDao.
We then use the DAO to create a repository, which is used to create a ViewModelFactory.
The ViewModelFactory is finally used by ViewModelProvider
to create an instance of our custom ViewModel. Using the ViewModel, we
can observe what is inside the database table. Upon any change that is
made to the databse, we update the content of the ListView and ask the
system to update the UI by calling arrayAdapter.notifyDataSetChanged(). Here the
arrayAdapter is
a custom Adapter created to better show the content of each Comment
object in the list. Have a look at it. The code is straightforward. The
rest of the MyListFragment handles button click events for insertion
and deletion, which won't be discussed here. override fun onCreateView(inflater: LayoutInflater, container: ViewGroup?, savedInstanceState: Bundle?): View? {
val view = inflater.inflate(R.layout.fragment_my_list, container, false)
...
...
database = CommentDatabase.getInstance(requireActivity())
databaseDao = database.commentDatabaseDao
repository = CommentRepository(databaseDao)
viewModelFactory = CommentViewModelFactory(repository)
commentViewModel = ViewModelProvider(requireActivity(), viewModelFactory).get(CommentViewModel::class.java)
commentViewModel.allCommentsLiveData.observe(requireActivity(), Observer { it ->
arrayAdapter.replace(it)
arrayAdapter.notifyDataSetChanged()
})
...
...
return view
}