## Google Maps
In this lecture, we learn how to incorporate Google Maps into
applications - this is very cool. We have all used Google Maps on laptop browsers
and smartphones but only as user up until now.
We will first learn how to create a map activity. Then through two simple
demos apps we get a sense of the main programming features needed to
construct and control maps. I even named a demo app after the
city recently described by New York Times journalist Neil
MacFarquhar as a "drab industrial
city". Cheers Neil - I was born and brought up in the hip,
bustling, vibrant town of Coventry. You clearly now "darb" when you see
it Neil. I digress. Now we transition from one Android aka Neil to another.
## What this lecture will teach you
- How to create an activity with map in.
- I Am Here app.
- Coventry Demo app (dedicated to [Neil MacFarquhar](http://www.neilmacfarquhar.com/))
## Demo projects
The demo code used in this lecture include:
* We will use the [i_am_here.zip](../code/i_am_here.zip) app to
demonstrate how to display a single map and update it as we move. This
app can track you as you move around and put a marker on the map of
your current location.
* We also use the [coventrydemo.zip](../code/coventrydemo.zip) app
which allows the user to interact with the map by placing markers on
the map and then connecting up the markers with
[polylines](http://developer.android.com/reference/com/google/android/gms/maps/model/Polyline.html)
drawn on the map. A polyline is a list of points, where line segments
are drawn between consecutive points.
The Coventry demo is take from here: [detect MarkerClick and add
Polyline](http://android-er.blogspot.com/2013/01/google-maps-android-api-v2-example_5213.html)
The app detects long click on map and adds a marker. Lines can be
drawn between markers using polylines.
These two apps will provide the necessary background to implement maps
for [MyRuns4](http://www.cs.dartmouth.edu/~campbell/cs65/myruns/myruns_manual.html#chap:labs:4).
## Resources
Some excellent references.
* Course book section on [Mapping with MapView](http://commonsware.com/Android/) page 817
* [Google Maps Android API v2 - Tutorial](http://www.vogella.com/articles/AndroidGoogleMaps/article.html)
* [Google Maps Android API v2 example: detect MarkerClick and add Polyline](http://android-er.blogspot.com/2013/01/google-maps-android-api-v2-example_5213.html)
* [com.google.android.gms.maps](https://developers.google.com/maps/documentation/android/reference/com/google/android/gms/maps/package-summary) reference.
* Installing [Google Maps Android
API v2 ](https://developers.google.com/maps/documentation/android/start).
## Running the demo code
The new version of Android makes creating Google maps much easier than
previous versions of the API. Just follow the [two steps](#steps) below to
create Google Maps Activity and you are all set.
However, to get the existing demo code to run on your phone you need
to follow the old way of creating maps. Here you need to (1) manually
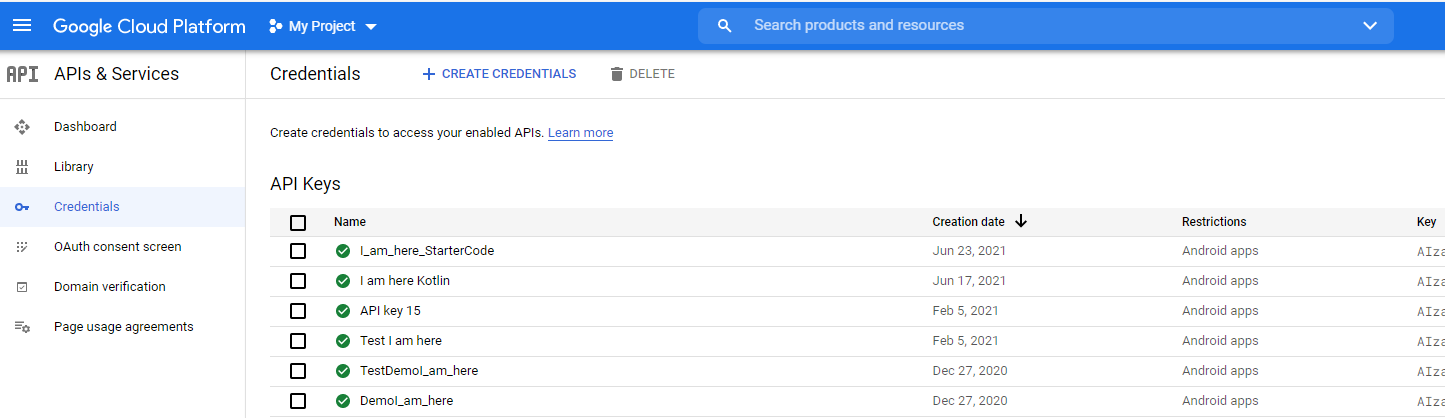
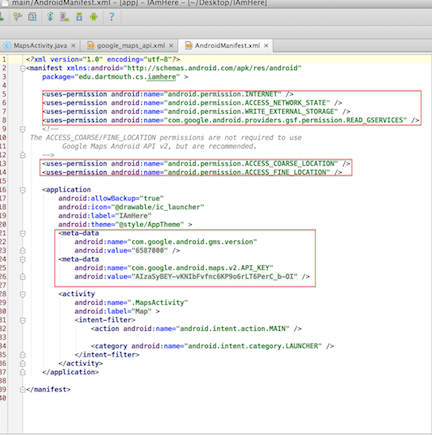
get a SHA1- fingerprint; (2) create Maps API key using Google Console; and (3) replace the existing Maps API key in the demo code’s google_maps_api.xml file (e.g., i_am_here or coventrydemo) with your new Maps API key. Sounds complicated but it is not. If you don’t do this and just run the demo code you will get errors such as 522-6622/edu.dartmouth.cs.iamhere E/Google Maps Android API﹕ Authorization failure.
Here is what you have to do to get the demo code to work:
1) The Maps API key is based on a short form of your application's
digital certificate, known as its SHA-1 fingerprint. Follow the these
instructions: [Display your app's certificate
information](https://developers.google.com/maps/documentation/android/start#display_your_apps_certificate_information). Make
sure you expand the section on "Displaying the debug certificate
fingerprint" (which folds the text by default so click on the triangle
and expand it). OK, now you have your SHA you need to use it to create a Map API key.
2) In order to create your key read the section [Create an API project
in the Google APIs
Console](https://developers.google.com/maps/documentation/android/start#create_an_api_project_in_the_google_apis_console)
and the [Obtain a Google Maps API
key](https://developers.google.com/maps/documentation/android/start#obtain_a_google_maps_api_key).
OK now you have your Map API key.
3) Finally, you need to replace the
existing key with your new key (as shown below) to in the google_maps_api.xml file
under the values directory. Note, you do not have to add this to the
manifest file.
~~~{.java}
AIzaSyDVlNw0hUMQYRhQXdrPAScw5HkJ_bkSg74
~~~
## Creating Google Maps Activity {#steps}
Above we explained how to run the demo code. But to create a new app
from scratch it is a lot easier. Android Studio creates the SHA and
key and you update the google_maps_api.xml
The overall process of adding a Google Map to an Android application is as follows:
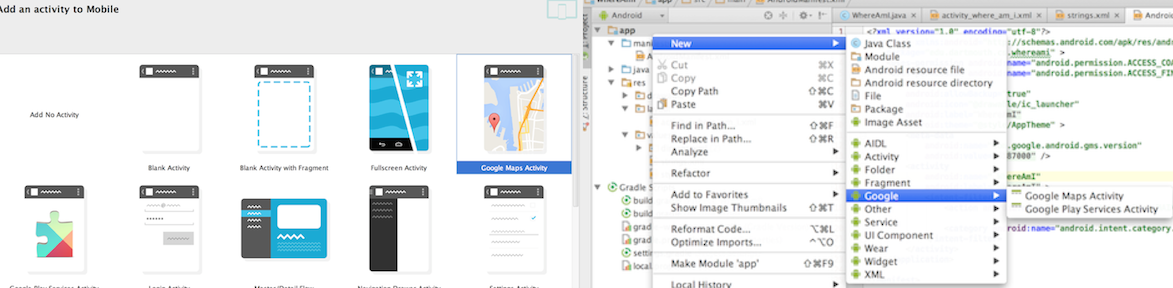
## STEP 1: Add a Google Maps Activity to your project
1. As shown in figures below, you can either create a Google Maps Activity project from scratch (left) or add a Google Maps Activity (right) to your existing projects (e.g, MyRuns).
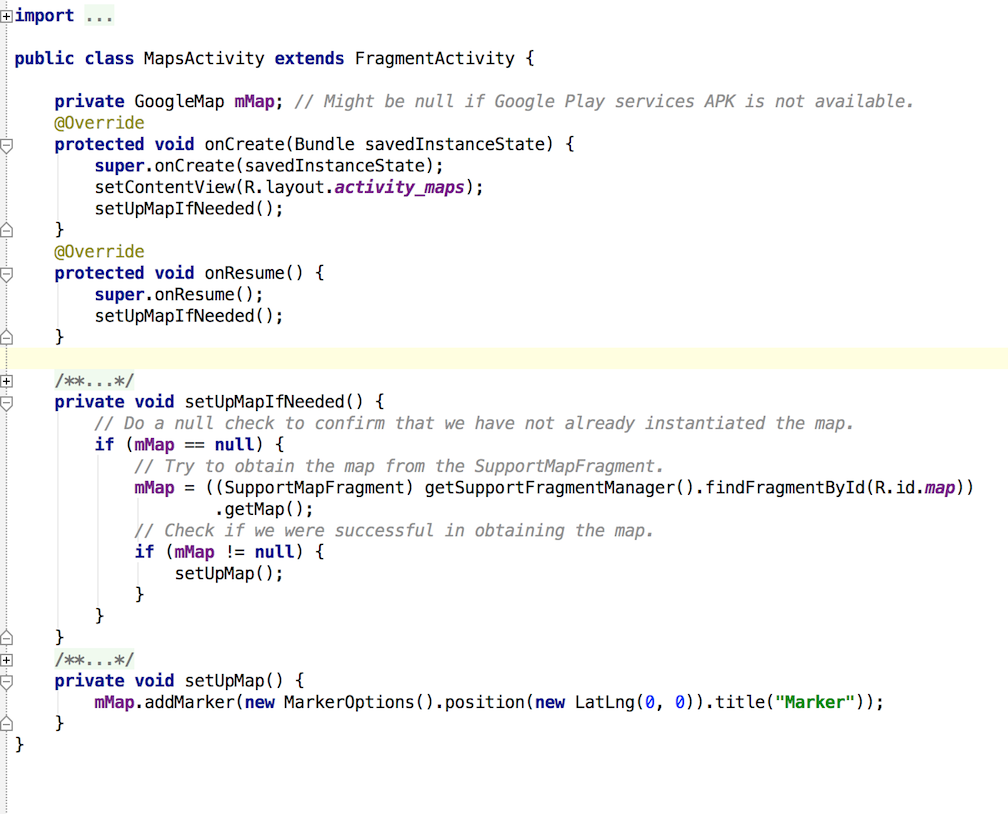
2. Have a first look of the generated MapsActivity. It extends itself from a FragmentActivity, containing a GoogleMap instance. It uses setUpMapIfNeeded() and setUpMap() to configure settings of the GoogleMap in this activity. Read through the comments for these two methods - we will extend the functionalities of them in the following samples and MyRuns4.
## STEP 2: Obtain an API key for Google Maps v2.0
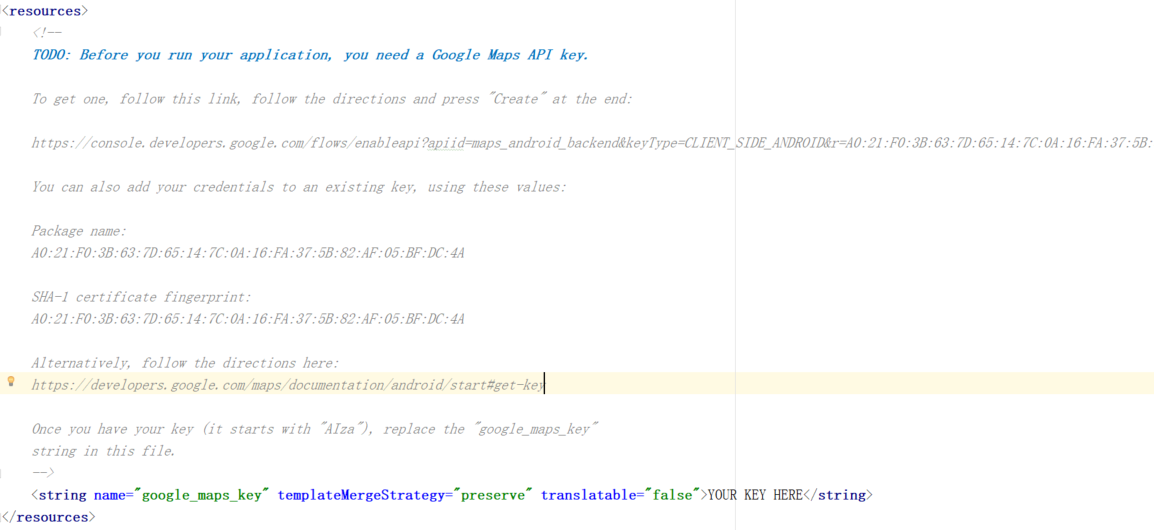
1. Go to google_maps_api.xml, you will find a generated url in the comments. This url is generated using the unique SHA-1 key of your current computer and the package name of the app. We also notice that there is a placeholder specifying the "google_maps_key". We need to get the key from the Google API Console and fill it in.
2. Copy this link to your browser and hit Enter, you will be directed to a page on the API console as shown below:
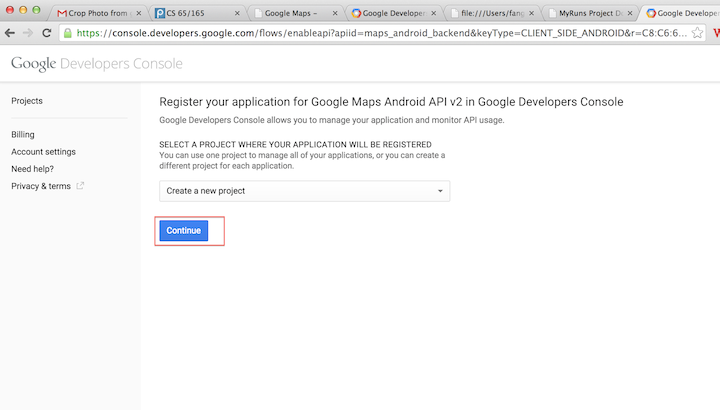
3. Hit "Continue" and "Create" to proceed. Wait a few seconds - your API key is being generated. Note that in the textbox your SHA-1 and package name are already there. You don't need to edit them at all.
4. Once the server is ready, you will be presented with the page like below. Copy the API Key back to the key placeholder in the xml file.

5. There are a number of meta-data and uses-permissions added to the Manifest file by Android Studio. Once you have the API key you added to google_maps_api.xml, you will find the meta-data for the api key in Manifest is updated as well (shown below). Now you are done with the setup for a Google Maps Activity.
## I _Am_Here -- a tracking app
The first application we look at this is an extension of the
applications we developed for the lecture on the
[LocationManger](http://www.cs.dartmouth.edu/~campbell/cs65/lecture17/lecture17.html). As
shown in the image below the app lists:
- current longitude and latitude of your location
- the address
- and location on a map with a sickly green marker
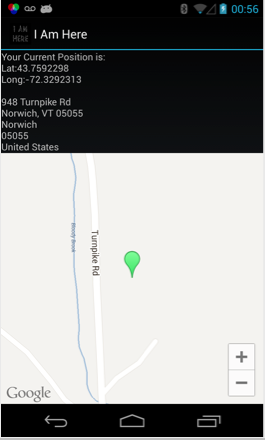
The cool thing about this app is that as you move around it will
update your position on the map. It tracks you. There is little
control over the app. You can move the map around or use the simple
zoon in / zoom out buttons on the map -- that is about it.
Let's discuss the code. Note, in the code examples below we **snip** some of the code that we have
already discussed in the [pervious
lecture](http://www.cs.dartmouth.edu/~campbell/cs65/lecture17/lecture17.html). You
can look at the demo app source code to see the complete source code.
Much of the structure of the code is familiar now.
### Set up Google Maps in onCreate()
The code first gets a reference to a GoogleMap using
getSupportFragmentManager() on SupportMapFragment set up in
layout/activity_main.xml, as shown below in the layout file
~~~{.java}
~~~
The getMap() method renders the Google Map returned from the server
into the SupportMapFragment in layout. The type of map is then set to normal.
There are a number of types of maps that can be selected:
- MAP_TYPE_HYBRID: Satellite maps with a transparent layer of major streets.
- MAP_TYPE_NONE: No base map tiles.
- MAP_TYPE_NORMAL: Basic maps.
- MAP_TYPE_SATELLITE: Satellite maps with no labels.
- MAP_TYPE_TERRAIN Terrain maps.
Change the type of the map in your code and look at the map rendered.
~~~{.java}
mMap.setMapType(GoogleMap.MAP_TYPE_NORMAL);
~~~
After the map type is set we get the current location and set a
marker at that location and zooms in. The location manager sets up the time and
distance parameters as well as the call back listener for location
updates:
~~~{.java}
locationManager.requestLocationUpdates(provider, 2000, 10,
locationListener);
~~~
We discussed these call backs in the [last
lecture](http://www.cs.dartmouth.edu/~campbell/cs65/lecture17/lecture17.html). So
check that out again if you need to. The helper function then gets called to update the map if necessary.
~~~{.java}
public class WhereAmI extends Activity {
public GoogleMap mMap;
public Marker whereAmI;
@Override
public void onCreate(Bundle savedInstanceState) {
super.onCreate(savedInstanceState);
setContentView(R.layout.main);
setUpMapIfNeeded();
LocationManager locationManager;
String svcName= Context.LOCATION_SERVICE;
locationManager = (LocationManager)getSystemService(svcName);
[Code snippet]
........
........
........
Location l = locationManager.getLastKnownLocation(provider);
LatLng latlng=fromLocationToLatLng(l);
whereAmI=mMap.addMarker(new MarkerOptions().position(latlng).icon(BitmapDescriptorFactory.defaultMarker(
BitmapDescriptorFactory.HUE_GREEN)));
// Zoom in
mMap.animateCamera(CameraUpdateFactory.newLatLngZoom(latlng,
17));
updateWithNewLocation(l);
locationManager.requestLocationUpdates(provider, 2000, 10,
locationListener);
}
public static LatLng fromLocationToLatLng(Location location){
return new LatLng(location.getLatitude(), location.getLongitude());
}
~~~
### User Tracking
Each time the callback onLocationChanged() is called the map is
updated simply by calling the helper function discussed below. There
is no action for the other callbacks in this code -- there really
should be.
~~~{.java}
private final LocationListener locationListener = new LocationListener() {
public void onLocationChanged (Location location) {
updateWithNewLocation(location);
}
public void onProviderDisabled(String provider) {}
public void onProviderEnabled(String provider) {}
public void onStatusChanged(String provider, int status,
Bundle extras) {}
};
~~~
### Helper for Tracking
The helper function simply has the current location passed to it. It
first removed the current marker and redraws a new marker at the new location.
~~~{.java}
private void updateWithNewLocation(Location location) {
TextView myLocationText;
myLocationText = (TextView)findViewById(R.id.myLocationText);
String latLongString = "No location found";
String addressString = "No address found";
if (location != null) {
// Update the map location.
LatLng latlng=fromLocationToLatLng(location);
mMap.animateCamera(CameraUpdateFactory.newLatLngZoom(latlng,
17));
if(whereAmI!=null)
whereAmI.remove();
whereAmI=mMap.addMarker(new MarkerOptions().position(latlng).icon(BitmapDescriptorFactory.defaultMarker(
BitmapDescriptorFactory.HUE_GREEN)).title("Here I Am."));
[Snip code]
........
........
........
}
~~~
## Coventry Demo
The Coventry app allows the user to interact with the map by placing markers on
the map and then connecting up the markers with
[polylines](http://developer.android.com/reference/com/google/android/gms/maps/model/Polyline.html)
drawn on the map. A polyline is a list of points, where line segments
are drawn between consecutive points. The app detects **long clicks** on map and adds a marker. Lines can be
drawn between markers using polylines. To do this the use clicks (do
not long click) on a marker then moves to another marker and
clicks. To remove the markers and lines click on the map.
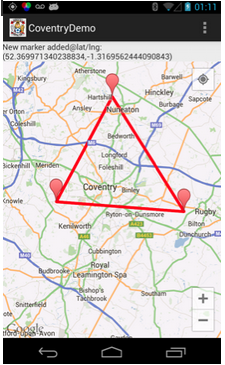
In the image below the user has **long clicked** on three places on
the map creating three markers. Then the user has clicked (just normal
short click) on each point and the lines are drawn constructing a
triangle around the vibrant metropolis of Coventry, England.
### onCreate()
~~~{.java}
public class MainActivity extends Activity
implements OnMapClickListener, OnMapLongClickListener, OnMarkerClickListener{
private GoogleMap myMap;
Location myLocation;
TextView tvLocInfo;
boolean markerClicked;
PolylineOptions rectOptions;
Polyline polyline;
static final LatLng COVENTRY = new LatLng(52.4081, -1.5106);
@Override
protected void onCreate(Bundle savedInstanceState) {
super.onCreate(savedInstanceState);
setContentView(R.layout.activity_main);
setUpMapIfNeeded();
tvLocInfo = (TextView)findViewById(R.id.locinfo);
}
~~~
### Adding markers and drawing lines
The user can move the map around and zoom in/out as they wish. The
callbacks set up in onCreate() are shown below:
- onMapLongClick(LatLng point), which will create and display a marker
- onMarkerClick(Marker marker), which will enable a polyline to be drawn between to markers that are clicked consecutively.
- onMapClick(LatLng point) , which will clear the current lines after the map has been clicked followed by the user clicking on an existing marker or creating a new marker.
Let's look at the code more below.
~~~{.java}
@Override
public void onMapClick(LatLng point) {
tvLocInfo.setText(point.toString());
myMap.animateCamera(CameraUpdateFactory.newLatLng(point));
markerClicked = false;
}
@Override
public void onMapLongClick(LatLng point){
tvLocInfo.setText("New marker added@" + point.toString());
myMap.addMarker(new MarkerOptions().position(point).title(point.toString()));
markerClicked = false;
}
@Override
public boolean onMarkerClick(Marker marker){
if(markerClicked){
if(polyline != null){
polyline.remove();
polyline = null;
}
rectOptions.add(marker.getPosition());
rectOptions.color(Color.RED);
polyline = myMap.addPolyline(rectOptions);
}else{
if(polyline != null){
polyline.remove();
polyline = null;
}
rectOptions = new PolylineOptions().add(marker.getPosition());
markerClicked = true;
}
return true;
}
}
~~~
The logic for onMarkerClick() is straightforward. First time
onMarkerClick() is called it will call new
PolylineOptions().add(marker.getPosition()) to add the marker to the
polyline. Next time it is called it will add the second marker
--rectOptions.add(marker.getPosition()) -- and then draw the line.
Each time a new marker is added (via a long click) and a line drawn --
the complete set of lines are redrawn starting at the first marker
added to the rectOptions (i.e., the ployline).
If the user clicks on the map (not the markers) and then clicks on any
marker or does a long click to create a new marker then the line or
polyline is remove - that is, the line between the markers is cleared.