In this lecture, we discuss a number of building blocks for MyRunds and any complex Android app:
The demo code used in this lecture include:
Android supports a number of different ways to inform the user including:
We will focus on the status bar notification in this lecture. You will need to implement this type of notification for MyRuns4.
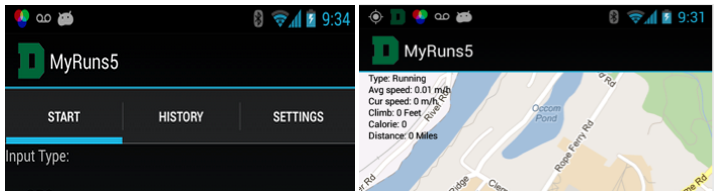
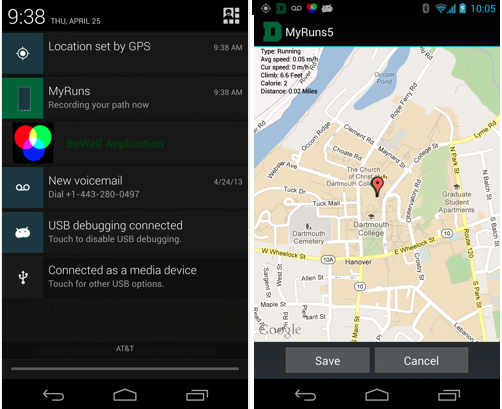
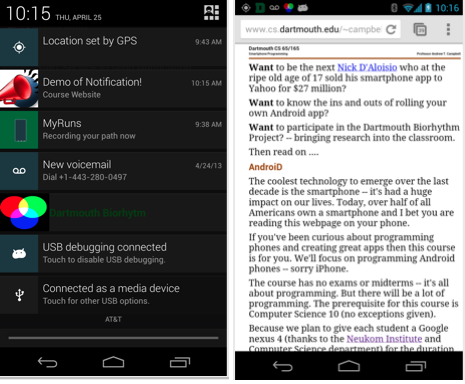
Typically a programmer develops an app and needs to inform the user of an event that is outside of the normal UI. For example if we consider MyRuns4 that you are coding right now. When the user starts an exercise using the GPS mode (or automatic) the code creates a service to process location updates. When this service starts on an independent thread in the background it informs the user that it is running by display first message (i.e., "MyRuns is recording your path" ) and then an icon (i.e., the D icon) in the notification area. We can see this below
To see the details of the MyRuns4 notification, the user needs to wipe down on the status bar (i.e., notification area) to open the notification drawer. The system controls the notification area and drawer and allows the user to view and interact with it at any point. For example, in the case of MyRuns4 notification in the drawer the user can wipe down the status bar and click on the MyRuns notification in the drawer and it bring the app back into focus, as shown in the image below.
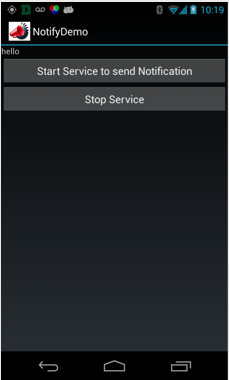
The simple notification app used in this lecture uses the status bar to inform the user that a service has been started (we will discuss services next). When the user starts the service an icon is displayed in the status bar. If you wipe down the status bar you will see that the notification drawer for the service displays an icon and text. If you click on this notification the service will launch a browser to display a webpage.
When the app starts up there is no service running and nothing in the status bar associated with the notify app, as shown below.
When the user starts the service the icon shows up in the status bar or notification area, as shown in the image below.
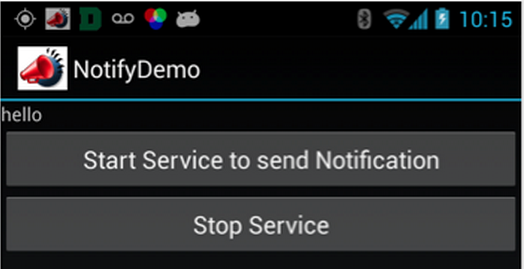
The user can wipe down the status bar and click on the notification which triggers the service to start the browser with a webpage, as illustrated in the digram below.
In addition, the user could mindlessly ;-) start and stop the service and see the icon come and go -- be mindless, just do it.
This simple application introduces a number of new things. Importantly a background service is started to interact with the status bar. In MyRuns4 we will implement a service to manage location updated from the LocationManager.
Let's look at the code.
The activity simply takes input from the user and starts and stops the service.
class MainActivity : AppCompatActivity() {
    private lateinit var startButton: Button
    private lateinit var stopButton: Button

    override fun onCreate(savedInstanceState: Bundle?) {
        super.onCreate(savedInstanceState)
        setContentView(R.layout.activity_main)

        startButton = findViewById(R.id.startservice)
        stopButton = findViewById(R.id.stopservice)

        startButton.setOnClickListener(){
            val intent = Intent(this, NotifyService::class.java)
            startService(intent)
        }

        stopButton.setOnClickListener(){
            val intent = Intent()
            intent.action = NotifyService.STOP_SERVICE_ACTION
            sendBroadcast(intent)
        }
    }
}
Checkout a detailed discussion of servers at the Android developers site. The notes below are taken from that site.
There are two reasons that a service can be run by the system. If someone calls Context.startService() then the system will retrieve the service (creating it and calling its onCreate() method if needed) and then call its onStartCommand(Intent, int, int) method with the arguments supplied by the client. The service will at this point continue running until Context.stopService() or stopSelf() is called. Note that multiple calls to Context.startService() do not nest (though they do result in multiple corresponding calls to onStartCommand()), so no matter how many times it is started a service will be stopped once Context.stopService() or stopSelf() is called; however, services can use their stopSelf(int) method to ensure the service is not stopped until started intents have been processed.
For started services, there are two additional major modes of operation they can decide to run in, depending on the value they return from onStartCommand(): START_STICKY is used for services that are explicitly started and stopped as needed, while START_NOT_STICKY or START_REDELIVER_INTENT are used for services that should only remain running while processing any commands sent to them. See the linked documentation for more detail on the semantics.
Clients can also use Context.bindService() to obtain a persistent connection to a service. This likewise creates the service if it is not already running (calling onCreate() while doing so), but does not call onStartCommand(). The client will receive the IBinder object that the service returns from its onBind(Intent) method, allowing the client to then make calls back to the service. The service will remain running as long as the connection is established (whether or not the client retains a reference on the service's IBinder). Usually the IBinder returned is for a complex interface that has been written in Android Interface Definition Language (AIDL).
A service can be both started and have connections bound to it. In such a case, the system will keep the service running as long as either it is started or there are one or more connections to it with the Context.BIND_AUTO_CREATE flag. Once neither of these situations hold, the service's onDestroy() method is called and the service is effectively terminated. All cleanup (stopping threads, unregistering receivers) should be complete upon returning from onDestroy().
The activity starts the service. A broadcast is sent from the
activity to tell the service to shut itself down (e.g., stopSelf());
that is, the activity sends an intent to all
interested BroadcastReceivers with stop command. In our example, the
service is listening on this broadcast and implements a BroadcastReceiver
On the activity side, a
Service is started using startService with an Intent specifying the context and name of the
service class (e.g., NotifyService::class.java).
val intent = Intent(this, NotifyService::class.java)
startService(intent)
To stop the service, the
activity sends a broadcast message using sendBroadcast(). In the following example, the NotifyService.STOP_SERVICE_ACTION
is a string
tag we created to specify our intention of action. In real-world
scenarios, the Service may receive many different broadcast messages,
we use the string tag to identify the desired ones.
val intent = Intent()
intent.action = NotifyService.STOP_SERVICE_ACTION
sendBroadcast(intent)
Inside the Service, we create a custom BroadcastReceiver class and override the onReceive method, in which we stop the service,
remove the notification, and unregister the BroadcastReceiver. The notification ID is an Int we create
to uniquely identify this specific notification.
inner class MyBroadcastReceiver : BroadcastReceiver() {
    override fun onReceive(context: Context, intent: Intent) {
        stopSelf()
        notificationManager.cancel(NOTIFY_ID)
        unregisterReceiver(myBroadcastReceiver)
    }
}
As shown in the following
code snippet, to set up to receive the broadcast, we need to create an
instance of our custom BroadcastReceiver class, tell the system what
action tag is expected, and use them as arguments to register the
receiver.
override fun onCreate() {
    super.onCreate()
    ....
    myBroadcastReceiver = MyBroadcastReceiver()
    val intentFilter = IntentFilter()
    intentFilter.addAction(STOP_SERVICE_ACTION)
    registerReceiver(myBroadcastReceiver, intentFilter)
}
To create a notification
with different titles, contents, or icons, we use NotificationCompat.Builder. Note that for SDK version greater than
26, you need to allow the user to customize the visual and auditory
behavior of your notification. This can be done using NotificationChannel. Since the notification channel is not
the focus of this lesson, I will let leave it up to you to read more
about it. Here is the
link from the Android Developers site. To show the notification,
you call the notify() on a NotificationManager. Here we specify the notification ID as
an argument, which is used later to cancel this notification (see
MyBroadcastReceiver).
fun showNotification() {
    val webpageIntent = Intent(Intent.ACTION_VIEW, Uri.parse(xdWeb))
    val pendingIntent = PendingIntent.getActivity(
        this, PENDINGINTENT_REQUEST_CODE,
        webpageIntent, PendingIntent.FLAG_ONE_SHOT
    )
    val notificationBuilder: NotificationCompat.Builder = NotificationCompat.Builder(this, CHANNEL_ID)
    notificationBuilder.setContentTitle("title")
    notificationBuilder.setContentText("content")
    notificationBuilder.setContentIntent(pendingIntent)
    notificationBuilder.setSmallIcon(R.drawable.icon)
    notificationBuilder.setAutoCancel(true)
    val notification = notificationBuilder.build()

    if (Build.VERSION.SDK_INT > 26) {
        val notificationChannel = NotificationChannel(CHANNEL_ID, "channel name", NotificationManager.IMPORTANCE_DEFAULT)
        notificationManager.createNotificationChannel(notificationChannel)
    }
    notificationManager.notify(NOTIFY_ID, notification)
}
A service needs to be defined in the manifest as shown below.
<service android:name=".NotifyService"/>In this application, the fragment binds to the service and creates a ServiceConnection that is used to gain access to custom Service properties and functions. The UI allows the user to start and stop the service and allows the client to bind and unbind to the service using buttons. Upon the start of the Service, an Int counter increases its value by 1 for every second. After the fragment binds to the service, the current value of the counter variable is shown on the UI. Unbinding the service stop showing the number on the screen but the counter remains increasing in the background.
bindService()
method on an application context. It is important to not use the
hosting activity as the context for binding because activities get
destroyed upon configuration change. If it happens your app loses the
reference to the bound service. In contrast, using the application
context does not have this problem as the application won't be
destroyed during a configuration change. bContext.BIND_AUTO_CREATE is a Flag for the system to automatically create the service if one does not exist when bindService() is called. The second argument is a ServiceConnection object (more on this later). In this app, we implement the ServiceConnection as a part of our custom ViewModel class. This is why we can use myViewModel in bindService().appContext = requireActivity().applicationContext
appContext.bindService(intent, myViewModel, Context.BIND_AUTO_CREATE)
To unbind the service, we call unbindService().
appContext.unbindService(myViewModel)Note, when the client calls bindService()the onbind() method in the
service returns the IBinder object. Since our ViewModel implements ServiceConnection, the IBinder is returned to the ViewModel's onServiceConnected(). This interaction is not obvious when
reading the code. Using that IBinder
object, we send the reference of a Hander to the Service. This way the
Service can use it to send the current counter value to the ViewModel.
Inside our custom Handler class (e.g., MyMessageHandler), we override the handleMessage() method,
to handle the incoming message. We use LiveData to store the counter
value, which allows the fragment to automatically update the UI upon
the arrival of a new message.
class MyViewModel : ViewModel(), ServiceConnection {
    private lateinit var myMessageHandler: MyMessageHandler
    init {
        myMessageHandler = MyMessageHandler(Looper.getMainLooper())
    }

    private val _counter = MutableLiveData<Int>()
    val counter: LiveData<Int>
        get() = _counter

    override fun onServiceConnected(name: ComponentName, iBinder: IBinder) {
        val tempBinder = iBinder as CounterService.MyBinder
        tempBinder.setmsgHandler(myMessageHandler)
    }

    ....
    ....

    inner class MyMessageHandler(looper: Looper) : Handler(looper) {
        override fun handleMessage(msg: Message) {
            if (msg.what == CounterService.MSG_INT_VALUE) {
                val bundle = msg.data
                _counter.value = bundle.getInt(CounterService.INT_KEY)
            }
        }
    }

}
inner class MyBinder : Binder() {
    fun setmsgHandler(msgHandler: Handler) {
        this@CounterService.msgHandler = msgHandler
    }
}