
Before we can run a simple Google App Engine (GAE) application, we need to setup local GAE development environment. We will run GAE applications locally. You can also deploy your applications to GAE to provide services to users all over the world. Check out how to do this in the next lecture. GAE provides a general platform for cloud sides services where native Android apps such as MyRuns can build out the app framework to, for example, store runs in the cloud and allow other users to share data or allow the user to view the data through the web; for example, using a laptop based browser for better viewing and visualization. Getting to know how to use, GAE or App Engine for short, is the final tool for your Android toolkit -- note, there are many other components to Android that we have not have time to cover in detail. What we have done in the class is to focus on a core set of components and skill development that makes your new skills very marketable, or your money back.
The problem with Google App Engine for teaching is that it's fluid. The course book has no information on the App Engine. The best up to date information is Google App Engine on the developers site. Much of the information we have gathered for these notes comes from the developers site and other related documentation -- cited by links in our notes.
A short tutorial on App Engine.
Two demo projects are given out:
The first demo code: first App Engine project allows you to submit a string to web server; the server echo's the string back.
In the second demo code: google app engine project, ancestor queries are used for strong consistency. Data operations are defined in edu.dartmouth.cs.gae_sample.data.ContactDatastore. QueryServlet is used for displaying query results. QueryServlet uses get the result list from the request object, then generate the result Web page. Data operation servlets(add, delete, update) will redirect browser to QueryServlet so that user can see the operation result immediately.
The code demoed in the class can be found here.
Don't worry that you don't understand the technical text in the demo description -- come back to it once you have read the notes and thought about the lecture.
Mobile apps require cloud services for many different things: maintain a social network, gaming services, storage services, etc. Many mobile clients interact with these backend services (aka the cloud) through a set of APIs. Whenever you write server code and deploy a server there are a number of infrastructure and configuration issues that you need to take care of such as scaling, access, deploying server side code, protocol interaction between the clients and server.
Google App Engine is a Platform as a Service (PaaS) that manages many of these server side issues. It provides a number of APIs to allow you to deploy servers on the Google cloud and not worry about scaling and other server side issues. It offers different types of storage (e.g., Data Store -- which we will use in MyRuns6) and task management.
The App Engine allows you to interact with services via a web browser (as the demo code in these notes do) or via a native Android app such as MyRuns.
So the App Engine takes away many of the problems of hosting servers on the Internet and provides a set of tools to build scalable services. While the PR is that you just upload your application and your are ready to go -- it is not as simple as that. In these notes we discuss how to set up your Android Studio and set up a simple web application that uses a http based servlet that the client interacts.
Google App Engine also includes a simulation environment where you can deploy your application to a local cloud (that looks and feels like you have actually deployed to Google infrastructure). The local deployment is a good place to start to debug your client and server side of the application.
While the notes below are targeted to a thin slice through the App Engine you can find more out from the Google App Engine developers site.
There is little of no information in the course book. This is because the App Engine environment is still fluid. We have updated these notes from last year and we have checked they are current and work.
Take a look through the key features of the App Engine APIs and environment. We will use a limited set of these features in the class:
Others not included but important if you wanted to manage a scalable service are:
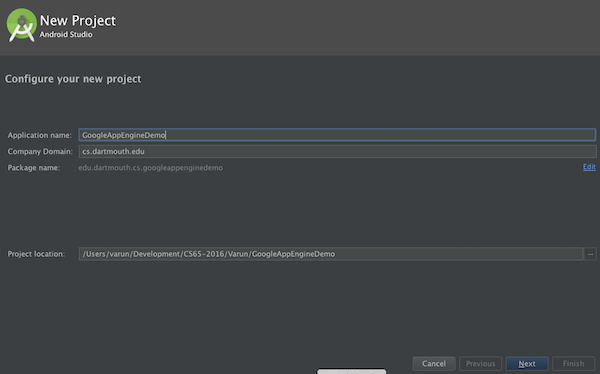
To get started, you just need to create a new project in Android Studio, like you normally do for any other app. Enter the app name, in this case, it is GoogleAppEngineDemo
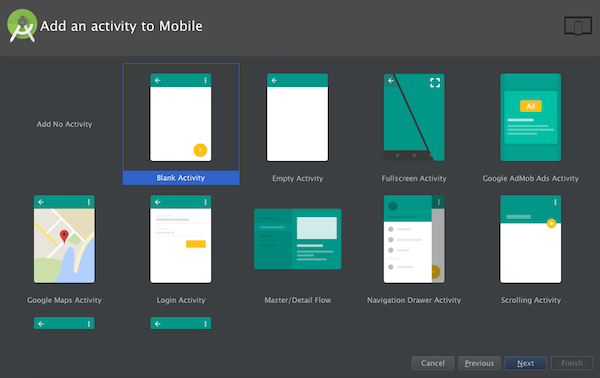
Select a blank activity
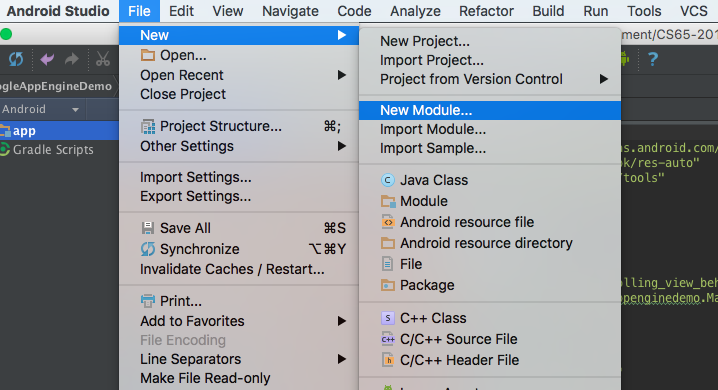
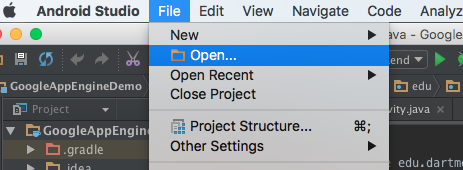
Once the project is created, goto File-> New-> New Module
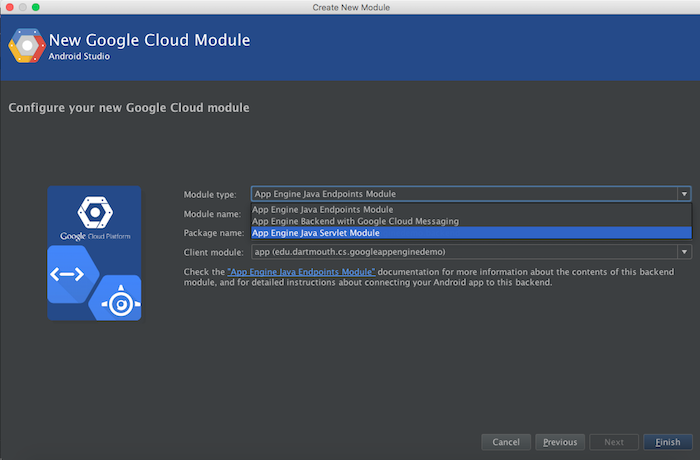
Select Google Cloud Module
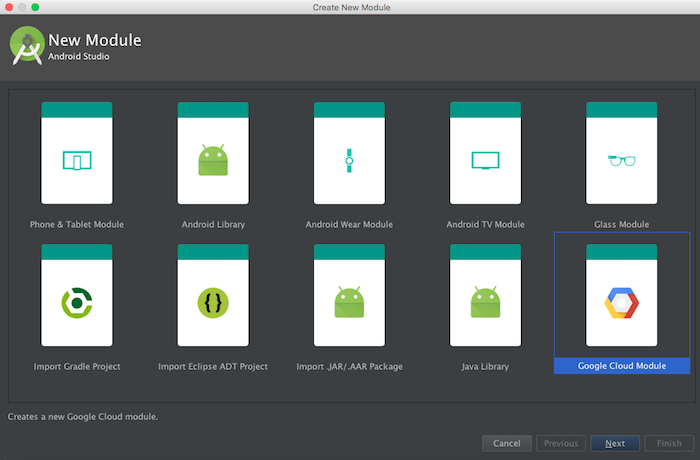
Select ‘Module Type’ as ‘App Engine Java Servlet Module’ Enter the package name for this module, in this case, it is edu.dartmouth.cs.googleappenginedemo.backend.
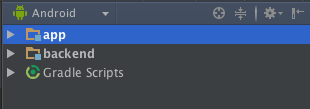
Once this module gets loaded, you will see you a module named ‘backend’ in your project viewer.
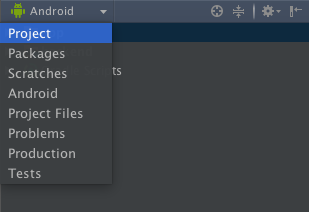
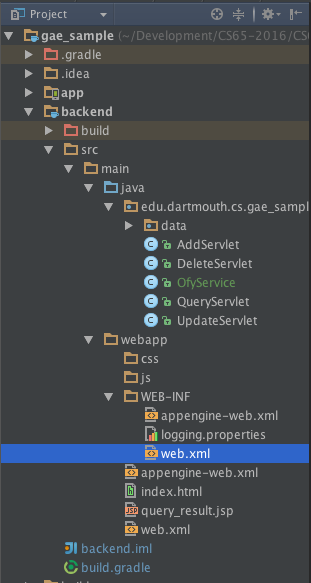
Change the viewer from Android to Project, as shown here-
Goto ‘backend’ and expand. You should be able to see the project structure of your backend module something like this-
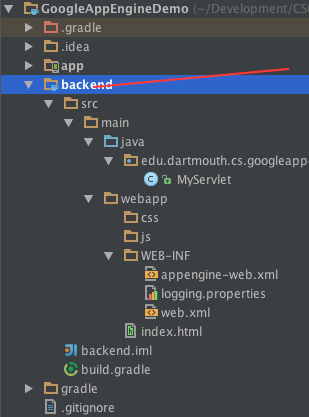
It also creates index.html in webapp folder, which is web page which users open when they visit the website. It is defined in
The content of web.xml is shown below.
<?xml version="1.0" encoding="utf-8"?>
<web-app xmlns="http://java.sun.com/xml/ns/javaee" version="2.5">
    <servlet>
        <servlet-name>MyServlet</servlet-name>
        <servlet-class>edu.dartmouth.cs.googleappenginedemo.backend.MyServlet</servlet-class>
    </servlet>
    <servlet-mapping>
        <servlet-name>MyServlet</servlet-name>
        <url-pattern>/hello</url-pattern>
    </servlet-mapping>
    <welcome-file-list>
        <welcome-file>index.html</welcome-file>
    </welcome-file-list>
</web-app>
Before we run this on the browser, let us have a look at the run
configurations for this module. Click on the Edit Configurations as
shown below- 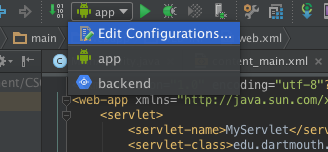
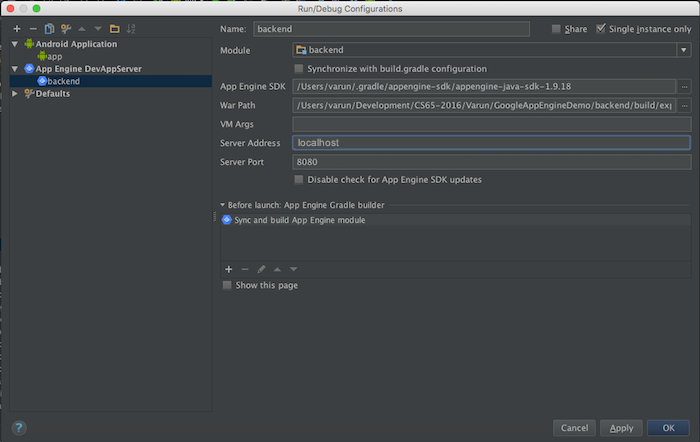
To setup the configutations for the first time, you can uncheck the option of- Synchronise with build.gradle configuration to enable editing. The App Engine SDK locates in ".gradle\appengine-sdk\appengine-java-sdk-1.9.28" and the War Path is the path of your "\backend\build\exploded-app" folder. You can leave the Server Address as localhost and Server Port as 8080.
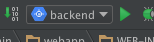
Finally lets select the module - ‘backend’ and run it. By clicking on the green arrow.
After all the cradle build has happened, in the run window below, it will show something like this.
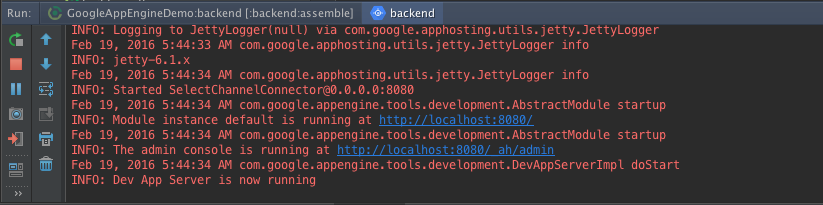
This means that your project has started running, and you can go to http://localhost:8080/ on your browser to view your servlet. To stop your servlet, you will have to click on the small red square button on the left of the image shown above. Please note: You can run only one servlet on a particular port. So, if you have a servlet already running, and you want to start a new one, then either close the previous one, or change the port for the new one (by default it is 8080) in the Edit Configurations options as discussed earlier.
The project structure is shown as follows:
The src folder holds the source code.
There are a number of important files under the webapp directory. The web app folder contains a collection of JavaServer Pages, Java Servlets, Java classes, XML files, tag libraries, static web pages (HTML and related files) and other resources that together constitute a web application. This is a bundle that contains all the files to run your web application.
There is a couple of important files and in the war directory, in particular the WEB-INF directory includes: appengine-web.xml and web.xml
The web.xml defines the structure of the web application for example
declares servlets and servlet mappings (URLs to servlet), filters,
If the web application uses servlets
(ours does), then the servlet container uses web.xml to ascertain to
which servlet a URL request will be routed". This is the case in our
simple demo. "The web.xml is also used to define context variables
which can be referenced within the servlets and it is used to define
environmental dependencies which the deployer is expected to set up".
web.xml declares servlets, servlet mappings(URLs to servlet), filters, etc.
Download the code for a simple demo called first App Engine project
Just open the project from Android Studio, like you would open another project.
Now run the backend module like we discussed above for the demo app.
You will see a lot of log showing in the console window. When it says "Module instance default is running at http://localhost:8888/“, you can open "127.0.0.1:8888" from your web browser to view the web application. Note, "http://localhost:8888" is the same as "http://127.0.0.1:8888" -- either will work to start your service. Also, make sure that you stop the executing servlet when done.
Also please note, that here the port is 8888 because I specify so in my Edit Configurations window like it was shown before. If you do not change the port, it will run in the default port, i.e. 8080.
In this a simple web app that allows you to submit a string to web server; the server echo's the string back, as shown below.
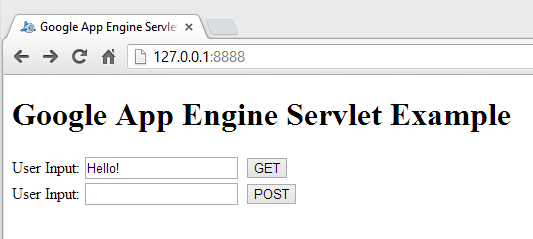
After you type 'Hello!' into the text box (below) and clicked button "GET" you will see:
When you click the "GET" and "POST" buttons your browser will submit the text in the text box (to the left of the button) to the web server in either "GET" method or "POST" method. GET and POST are two commonly used methods for a request-response between a client and server. GET requests data from a specified resource -- read server. POST submits data to be processed to a specified resource -- read server. GET and POST are part of the HTTP protocol that make the web tick -- HTTP was invented, yes!, by and English man -- see HTTP Methods: GET vs. POST for more info.
The AppEngServlet.html file uses forms to set up the input buttons in the webpage, get user input and submit the form for processing by the servlet -- the server side form handler (i.e., AppEngServletDemo) as shown below. We look at the html and resulting URL below.
<!doctype html>

<html>
  <head>
    <title>Google App Engine Servlet Example</title>
  </head>
  <body>

    <h1>Google App Engine Servlet Example</h1>

    <form name="input" action="AppEngServletDemo" method="get">
        User Input: <input type="text" name="user_input">
        <input type="submit" value="GET">
    </form>

    <form name="input" action="AppEngServletDemo" method="post">
        User Input: <input type="text" name="user_input">
        <input type="submit" value="POST">
    </form>

  </body>
</html>
So for example, the first form corresponds to the GET button. It displays User Input: and expects text input associated with the variable name "user_input".
Once submitted when the user enters some text and clicks GET then the action is taken to do a HTTP GET on the servlet defined in the action (i.e., AppEngServletDemo). The “action” field of the form defines where to issue the POST/GET request:
<form name="input" action=""AppEngServletDemo" method="get">
This code tells the browser when the form is submitted, it should issue a GET request, defined by the method="get", to "AppEngServletDemo". It uses relative path in this case. If the web page locates at http://127.0.0.1/index.html, then it issues the request to http://127.0.0.1/AppEngServletDemo
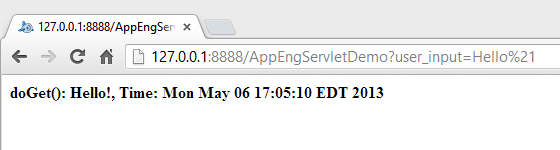
If you enter the text "Hello" and click GET then the URL captures the complete user input and the servlet name that services the GET as shown below in the URL.
Java Servlet technology provides Web developers with a simple, consistent mechanism for extending the functionality of a Web server. A servlet can almost be thought of as an applet that runs on the server side. A servlet is a Java class in Java EE that conforms to the Java servlet API, a protocol by which a Java class may respond to requests. Servlets could in principle communicate over any client–server protocol, but more often they are used with the HTTP protocol. Checkout Java Servlet Technology Overview and Java Servlet for more information on servlets.
A servlet needs to extend javax.servlet.http.HttpServlet, and override doGet() and doPost() methods which will handle GET requests and POST requests, respectively.
User requests can be retrieved from HttpServletRequest object. It contains anything that comes from the (user) client (i.e., browser, applications). You can add an intermediate result to it, then redirect the request to other servlets. You can use the getParameter(String paramName) method to get parameters, and use setAttribute(String attrName, Object val) and getAttribute(String attrName) to set and get attributes from request object, respectively.
This project contains a static web page AppEngServlet.html and a servlet mapped to url /AppEngServletDemo. When the user visits the website, the server sends back AppEngServlet.html because it is the default welcome file defined in web.xml. The user can issue POST or GET request to /AppEngServletDemo through the webpage. The work flow is shown below.
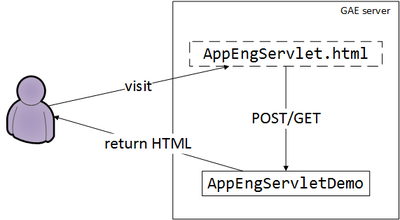
To summarize the workflow:
Let's look at the implementation of a simple servlet:
public class AppEngServletDemo extends HttpServlet {
    private static final long serialVersionUID = 7224390555085474606L;

    //GET method
    @Override
    protected void doGet(HttpServletRequest req, HttpServletResponse resp)
        throws IOException, ServletException {
        String str = req.getParameter("user_input");

        PrintWriter writer = resp.getWriter();
        writer.write("<html>\n");
        writer.write("<b>");
        writer.write("doGet(): " + str + ", Time: " + Calendar.getInstance().getTime().toString());
        writer.write("</b>");
        writer.write("</html>");
    }

    //POST method
    @Override
    protected void doPost(HttpServletRequest req, HttpServletResponse resp)
        throws IOException, ServletException {
        String str = req.getParameter("user_input");

        PrintWriter writer = resp.getWriter();
        writer.write("<html>\n");
        writer.write("<b>");
        writer.write("doPost(): " + str + ", Time: " + Calendar.getInstance().getTime().toString());
        writer.write("</b>");
        writer.write("</html>");
    }
}
If you want to forward the request to another servlet:
//url is the dest servlet's url
getServletContext().getRequestDispatcher(url).forward(req, resp);
If you want to tell the browser to redirect to another url:
resp.sendRedirect(url);Servlets need to be declared in web.xml, as follows:
<!-- declare servlet -->
  <servlet>
    <servlet-name>AppEngServletDemo</servlet-name>
    <servlet-class>edu.dartmouth.cs.appengineserver.backend.AppEngServletDemo</servlet-class>
  </servlet>
<!-- map servlet to urls-->
  <servlet-mapping>
    <servlet-name>AppEngServletDemo</servlet-name>
    <url-pattern>/AppEngServletDemo</url-pattern>
</servlet-mapping>The demo code: google app engine project allows the client to store data using the App Engine datastore services. The App Engine Datastore provides a NoSQL schemaless object Datastore, with a query engine and atomic transactions. In the demo code, data operations are defined in edu.dartmouth.cs.gae_sample.data. QueryServlet is used for displaying query results. Data operation servlets (add, delete, update) will redirect browser to QueryServlet so that user can see the operation result immediately.
Data objects in the App Engine Datastore are known as entities. An entity has one or more named properties, each of which can have one or more values. Entities of the same kind need not have the same properties, and an entity's values for a given property need not all be of the same data type. Each entity in the Datastore has a key that uniquely identifies it. The key consists of the following components:
When you import the project you will see the following files and directories:
Consider the following example:
//get datastore object from DatastoreServiceFactory
DatastoreService datastore = DatastoreServiceFactory.getDatastoreService();

//declare an entity with Kind "Employee" and KeyName "asalieri"
Entity employee = new Entity("Employee", "asalieri");

//set entity's properties
employee.setProperty("firstName", "Antonio");
employee.setProperty("lastName", "Salieri");
Date hireDate = new Date();
employee.setProperty("hireDate", hireDate);
employee.setProperty("attendedHrTraining", true);

//put this entity to datastore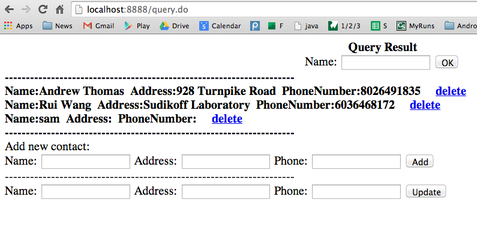
datastore.put(employee);The webpage allows the user to add, delete, update and query entities. If the user clicks on Query Result OK without entering a name then all records will be returned. The user can update an entry already saved in the datastore or delete it, as shown in the example below.
Let's think about the workflow of the browser and the servlets -- recall there are 4 servlets, one for each query type. If you inspect the code then the query workflow is as follows:
Note, that the* welcome file* (web.xml) in the first demo is a html file and in the second demo is a servlet. When a user visits the website without specifying which type of file (html or servlet), the server uses the welcome file to fulfill the request. So in the second demo, when a user visits localhost:8888, the server knows it should use query.do to respond the request.
<welcome-file-list>
       <welcome-file>query.do</welcome-file>
</welcome-file-list>The design uses a number of servlets that handle each function. The basic mechanism is that each servlet updates the datastore and sets the results in the request (req.setAttribute("result", result)) before forwarding the request to the QueryServlet. QueryServlet then displays the data by generating the HTML code as shown below.
public void doGet(HttpServletRequest req, HttpServletResponse resp)
throws IOException, ServletException {
String name = req.getParameter("name");
ArrayList<Contact> result = ContactDatastore.query(name);
resp.setContentType("text/html");
PrintWriter out = resp.getWriter();
out.write("<html>\n" +
"<head>\n" +
"<meta http-equiv=\"Content-Type\" content=\"text/html; charset=ISO-8859-1\">\n" +
"<title>Query Result</title>\n" +
"</head>\n" +
"<body>\n");
String retStr = (String) req.getAttribute("_retStr");
if (retStr != null) {
out.write(retStr+"<br>");
}
out.write("<center>\n" +
"\t\t<b>Query Result</b>\n" +
"\t\t<form name=\"input\" action=\"/query.do\" method=\"get\">\n" +
"\t\t\tName: <input type=\"text\" name=\"name\"> <input type=\"submit\"\n" +
"\t\t\t\tvalue=\"OK\">\n" +
"\t\t</form>\n" +
"\t</center>");
if (result != null) {
for (Contact contact : result) {
out.write("Name:" + contact.mName + " Address:" + contact.mAddress + " " +
"PhoneNumber:" + contact.mPhoneNumber + " <input type=\"button\" onclick=\"location.href='/delete.do?name="+contact.mName+"'\" value=\"Delete\"><br>");
}
}
out.write("</b> Add new contact:\n" +
"\t<br>\n" +
"\t<form name=\"input\" action=\"/add.do\" method=\"post\">\n" +
"\t\tName: <input type=\"text\" name=\"name\"> Address: <input\n" +
"\t\t\ttype=\"text\" name=\"addr\"> Phone: <input type=\"text\"\n" +
"\t\t\tname=\"phone\"> <input type=\"submit\" value=\"Add\">\n" +
"\t</form>\n" +
"\t---------------------------------------------------------------------\n" +
"\t<br>\n" +
"\t<form name=\"input\" action=\"/update.do\" method=\"post\">\n" +
"\t\tName: <input type=\"text\" name=\"name\">\n" +
"\t\tAddress: <input type=\"text\" name=\"addr\">\n" +
"\t\tPhone: <input type=\"text\" name=\"phone\">\n" +
"\t\t<input type=\"submit\" value=\"Update\">\n" +
"\t</form>\n" +
"</body>\n" +
"</html>");
}Note, the first time the welcome file will invoke query with null entered in the query. This will get all previously saved entries in the datastore and create the dynamic html using the method above. The html page will be returned to the user who will see something like as follows:
The user can then select any of the forms that were presented (add, update, query -- and delete, which is a special case because it is presented as a hyperlink in the page.
When the user visit the website first: since query.do is the welcome file, QueryServlet is invoked, where HTML is generated and returned to the user. So the main interface is generated by QueryServlet.
When the user is viewing the dynamic html created by QueryServlet: QueryServlet defines three forms to handle add, update and query. Each form submits the form to the corresponding servlet; that is, when user clicks the add form, it issues a POST request to the servlet add.do. It’s the same with update.
Delete is different. When QueryServlet is generating html, it generates a delete button for each record. When the user click such button, it issues a GET request to the delete servlet.
All servlet eventually redirect to QueryServlet to show the same interface as a result.
Again, the port is 8888 only because I use port 8888 in my Edit Configurations dialog. If you do not want to edit that, then the port will remain default at 8080.
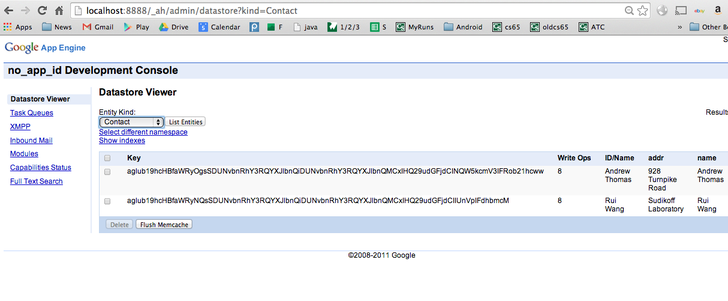
The App Engine environment supports an admin console where you can inspect what is happening when your web app is running in the cloud. To get access to the console simply set the URL of your browser to http://localhost:8888/_ah/admin (i.e., open a different tab to your running app http://localhost:8888 and enter http://localhost:8888/_ah/admin). An example of the console for this demo code is shown below.
Like log.d() you can use logging to write various status messages to the console (not the CatLog) for code running on the cloud as shown in the snippet of code. Look for the printed lined log statement in the console:
May 05, 2014 8:57:37 AM edu.dartmouth.cs.gae_sample.data.ContactDatastore add
INFO: contact exists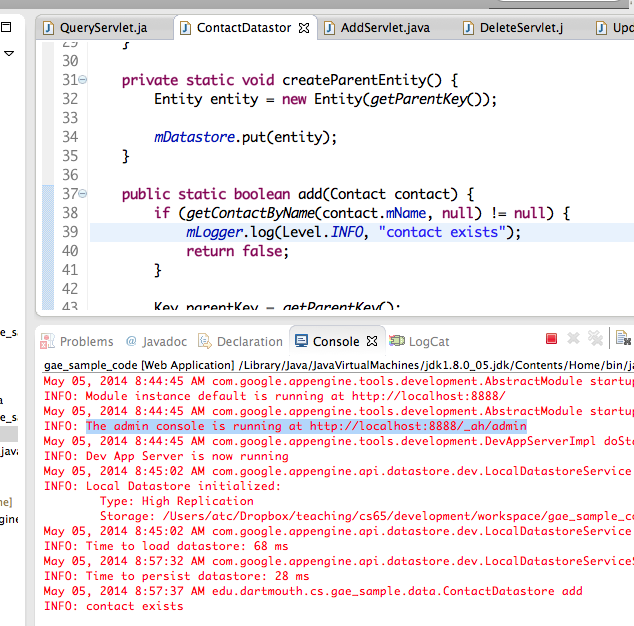
The relevant code snippet found in the ContactDatastore java file is shown below:
    \\ get the logger
        private static final Logger mLogger = Logger
            .getLogger(ContactDatastore.class.getName());

        .......
    public static boolean add(Contact contact) {
        if (getContactByName(contact.mName, null) != null) {

                       \\ write to the log file
            mLogger.log(Level.INFO, "contact exists");
            return false;
}The following are the basic operations:
  //declare an entity with Kind "Employee" and KeyName "asalieri"
  Entity employee = new Entity("Employee", "asalieri");
  //set a property
  employee.setProperty("lastName", "Salieri");
  //put this entity to datastore
datastore.put(employee); //declare the key for the entity you are trying to retrieve
Key employeeKey = KeyFactory.createKey(“Employee”, “asalieri”);
//get the entity using the key
Entity employee = datastore.get(employeeKey); //declare the key for the entity you are trying to modify
Key employeeKey = KeyFactory.createKey(“Employee”, “asalieri”);
//modify employee’s properties in here
employee.setProperty("lastName", "Sal");
//if employeeKey exits in the datastore, put() will update that entity
datastore.put(employee); //declare the key for the entity you are trying to modify
Key employeeKey = KeyFactory.createKey(“Employee”, “asalieri”);
datastore.delete(employee);Entities in the Datastore form a hierarchically structured space similar to the directory structure of a file system. When you create an entity, you can optionally designate another entity as its parent; the new entity is a child of the parent entity. An entity without a parent is a root entity. The association between an entity and its parent is permanent and cannot be changed once the entity is created. The Datastore will never assign the same numeric ID to two entities with the same parent, or to two root entities (those without a parent).
  //parent entity
  Entity employee = new Entity("Employee");
  datastore.put(employee);

  //use employee.getKey() as address' parent key
  Entity address = new Entity("Address", "addr1", employee.getKey());
datastore.put(address);A Datastore query retrieves entities from the App Engine Datastore that meet a specified set of conditions:
Consider the following example:
  //declare a query for kind "Person"
  Query q = new Query("Person");
  //set filter for property "height"
  q.setFilter("height",
    Query.FilterOperator.GREATER_THAN_OR_EQUAL,
    minHeight);
  //use PreparedQuery to execute query
  PreparedQuery pq = mDatastore.prepare(q);
  //get query results as a list of entity
  List<Entity> results = pq.asList(FetchOptions.Builder.withDefaults());
A query with an ancestor filter limits its results to the specified entity and its descendants:
  //set employeeKey as addrQuery's ancestor
  Query addrQuery = new Query(“Address").setAncestor(employeeKey);
Datastore queries have the following limitations:
Datastore queries can deliver results at two consistency levels: