Dartmouth CS 65/165
Smartphone Programming
Professor Xing-Dong Yang
Course materials developed by
Professor Andrew T. Campbell
The MyRuns Project
Created
03/30/14
Updated 04/03/14 Added the icons
for the project.
Updated 04/20/14 Added
Database Implementation -> Implement Database Operations -> Hints
Updated 02/20/16 Add APKs to
include the new crop and camera code.
Updated 02/20/16 Updated the
app/backend diagram to refelect GCM APIs.
Overview
The
Big Picture
The MyRuns app that you will build over the next 6 weeks as a set of thematic programming assignments is a simple fitness app for Android. It allows you to capture your runs and walks and view the stats on Google Maps. It uses sensors (viz. GPS, accelerometers) in the phone to infer your activity (e.g., running) in an automatic manner. We start by building out the UI then add GPS, Google maps, the inference model and database components. The app comprises a client that runs on the phone and a backend cloud component using Google App Engine. So you get first hand knowledge on implementing a native app on the phone and a cloud component. That's very cool.
This is a fun and challenging set of assignments that let's you get experience with many of the common programming challenges when building an Android app. You can use this experience as a foundation for creating and programming your own ideas as part of the group project at the end of the class. We will also publish the apps from the project phase of the class on Google Play. We will therefore experience design, programming, testing and publishing an app -- the complete lifecycle.
What is the idea of this document? It presents a lot of details on the MyRuns app. Think of it as a high-level specification and
some pointers on design. BTW, you are free to design your app as you like or
follow the guidelines layout here.
The
Small Picture
The class assignments break down into 6 thematic labs that allow you to incrementally and systematically build a complex app. While this document does not attempt to answer all the questions -- and in places it gives quite a lot of detail and is vague in other parts -- you can download the following APKs for each lab assignment to your phone and play with it. By doing this you will best understand what the app is doing. Your job is to replicate the UI (or modify it) and functionality. The labs area as follows:
- Lab 1 -- The User Profile -- Demo MyRuns-Android-chk1.apk
- Lab 2 -- The User Interface (UI) -- Demo MyRuns-Android-chk2.apk
- Lab 3 -- The Database -- Demo MyRuns-Android-chk3.apk
- Lab 4 -- Google Maps -- Demo MyRuns-Android-chk4.apk
- Lab 5 -- Activity Recognition -- Demo MyRuns-Android-chk5.apk
- Lab 6 -- App Engine -- demo video
Note, as part of the development of the app you will need a set of icons.
You can see where to use them by demoing the apks
(above). Feel free to use your own icons if you wish.
This
Document
There is a lot of information in this document -- do not panic.
The document contains information for the complete MyRuns app. Again, do not feel overwhelmed by all the details. What you should do is read the complete document and then focus on what needs to be design and programmed for each lab. You start with lab 1 and finish with lab 6. So this week focus on lab 1 not the others labs. The reason we give out the complete design is so you can keep the complete project in mind as you develop each lab each week. The idea is that you can reuse common components as you move through the piecemeal programming of each successive lab.
Once more: this document contains a lot of material, but we need to know what the app does in the first place to help you digest it while keeping the big picture in mind. Each lab includes an example APK for you to download and run on your phone. This gives you a good idea of what is expect at the UI level and in terms of the new features each lab adds to the cumulative app.
In summary, read the spec. Each week read the lab description (which is more pointers into the document than a detailed lab description) and run the APK. Then start designing and programming the lab. Once you are done testing your code works you should submit the lab on the Canvas.
Tip: once you have read the complete document then read it again.
Sections
The document has the following sections:
Labs section describes what you need to accomplish for each lab. There are 6 labs
Submission of labs explains what to submit and how.
User Interface section discusses the user interfaces and functionality.
User Interface Implementation section specifies how to implement the user interface.
Database Implementation section describes how to design and implement the database.
Service
Implementation discusses the design considerations for service
implementation.
Lab
Assignments
The following labs make up the MyRuns app -- we just list the labs here and discuss them in more detail later.
- Lab
1: Complete the profile activity. Save profile on the SD card and
retrieve it later. You can download the apk from
here.
- Lab
2: Complete the user interface, including all the activities, main
activity's Action Tabs. You should be able to navigate between all
activities. You can download the apk from here
- Lab
3: Design and implement the database. You need to define database
table schema as well as data entry object used in the App. Your database
design should be able to store each exercise entry's basic information as
well as GPS trace. You should implement the database CRUD (Create, read,
update and delete) operations. You should be able to add new entries
manually in that start tab, and see the list of all entries in the history
tab. You should be able to click on one particular entry to view or delete
its information. The history tab should be able to update the list
according to your modifications. You can download the apk
from here
- Lab
4: Design and implement the tracking service. Draw the real-time GPS
trace on Google Maps using the continuous location updates. Save the
traces in the database and visualize the GPS trace history on Google Maps.
You should also be able to view the history trace from the history tab.
You can download the apk from here
- Lab
5: Implement activity recognition. You should train an activity
classifier by collecting accelerometer data, then use the classifier in
your app. You can download the apk from here
- Lab
6: Synchronize exercise history to the real Google AppEngine
hosted cloud using Google Cloud Messaging.
Submission
of programming assignments
Submit
your work through Canvas. You need to put your files (Android Studio project, AssignmentName.apk, README.txt if needed) into a folder and
name your folder FirstName_LastName_AssignmentName
(e.g. Jun_Gong_MyRuns1). Finally you need to zip your folder and use the same
name to name your zip file. Please leave a note on Canvas to specify the name
of the other student if you do pair programming. Note that the same information
should also show up in README.txt, which is usually used if you want to tell
your graders that you are using your free 24 hour pass.
User Interface
This section discusses the user interface (UI) and main functionality.
User
Interface Walk-through
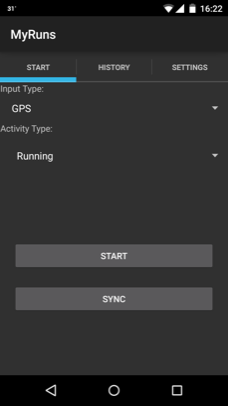
When you launch the app you are bought to the main interface as shown in the figures below. The main UI consists of three tabs (from left to right): start, history and settings. When the app starts, it focusses on the start tab. The app offers a number of modes to record workouts -- for example, manual input which is a bit tedious and the GPS mode as shown in the figures. You can view your workout history by tapping on the history tab. In the setting tab, you can set your personal information, e.g., name, email, etc. We are going to introduce each of these three tabs in the following section.
Start
Tab
You can record your work out in three ways: manual input, GPS or
automatic modes. This section describes how each method works.
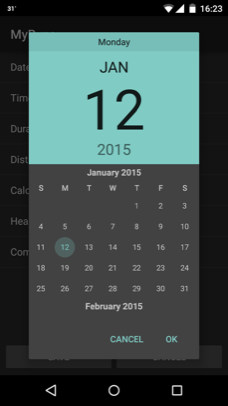
Manual
Entry Mode
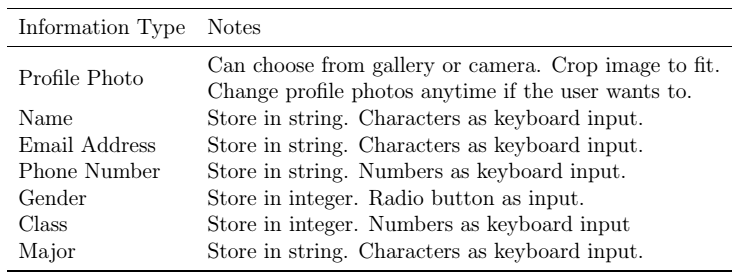
Manual entry is activated when you select “Manual Entry” for the “Input Type” using the start tab. You can specify the type of activity in “Activity Type” spinner. When you click “Start”, you will be brought to the manual input interface, where you can input the details of your workout. The table below shows the information type (e.g., heart rate), the type of widget used for data entry (e.g., TimePickerDialog) and short note on how the data could be stored (e.g., Store the timestamp in long) for data associated with a workout that the use can manually enter.
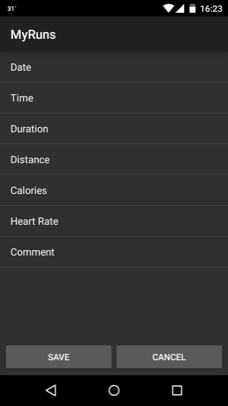
The corresponding details of exercise are listed in the following table.

When the user clicks on any exercise/workout entry, the app should show a
data entry dialog. When user taps save, the entry should be saved to the
database. More on the database later.
GPS
Mode
The GPS entry mode is when the user selects “GPS” for the “Input Type” on the start tab. You can specify the type of activity using the “Activity Type” spinner. When you click (it's more tapping and not clicking on a smartphone but you get my drift) “Start”, you will be brought to a map interface, where you can see your location trace and some information about your current activity. Also, a notification icon is shown in the notification area, indicating the app is tracking your location.

Automatic
Mode
The automatic entry mode is when the user selects “Automatic” for the “Input
Type” using the start tab. It is similar to the “GPS” mode except the activity
type (i.e., walking, running) is automatically inferred using a classifier and
features computed from the accelerometer data. The real time activity inference
will be shown in the status area. The final activity type is determined as the
activity label (e.g., walking) that has been inferred more times than other
activity label over a defined period of time.
Sync
When “Sync” button is clicked, the workouts/exercise records should be send
to remote server and stored in the cloud.
History
Tab
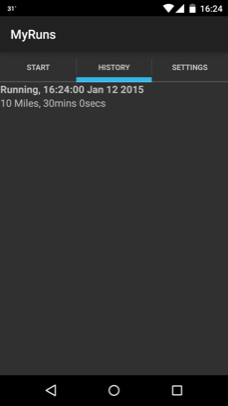
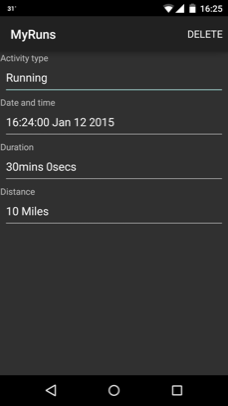
The History tab shows the list of all recorded workout entries. Each entry consists two lines: title and text. The title includes the activity type and time of the activity while text captures distance and activity duration.
When the user clicks on an entry, assuming the entry was input manually, then the app shows an interface containing the status, as shown in the screen shot below. Otherwise the app opens the map interface to show the trace. When user clicks “DELETE” in the action bar, the entry should be removed from the history tab.
Settings
Tab
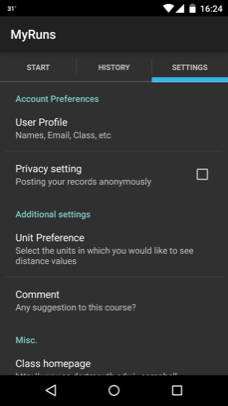
As discussed in the User Interface Walk-through section, you can set up the user profile (open a new activity), privacy setting (check box), unit preference (pop-up dialog with radio boxes) and comment (pop-up dialog with text box) in the "Settings Tab". All setting modifications should be saved automatically.
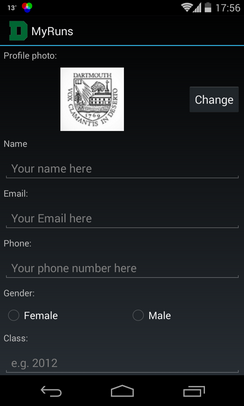


When the user clicks the “User Profile” a new view is presented, as shown in the screenshots above. The user should be able to input their photo, name, email, phone number, etc. When the user click the "Change" button, they can choose to take a picture using the camera or select one from the gallery (as shown in the middle figure). The interface should allow the user to take or get a picture and crop it, as shown in the picture on the right). The following table shows detailed definitions of the user profile.
System
Design Principles
This section provides an overview of MyRuns'
system design principles. We use MVC as the architectural design pattern.
Model–view–controller (MVC) is one of many software design patterns, which has
been widely adopted to develop software architecture for user interfaces. The design
consideration of MVC is to separate business logic from user interfaces. In
what follows, the design of profile management and tracking are illustrated.
Profile
Management
The design of the profile management is shown in the diagram below. As you can see from the previous section, the user can input, view, and change their profiles. The user profile contains items such as name, gender, photo, phone, gender, and class. Therefore,we can define a class to represent this data structure. This profile class also handles where to save the profile data and how to retrieve the profile data, which is transparent to other module. The profile definition is the model component in MVC.
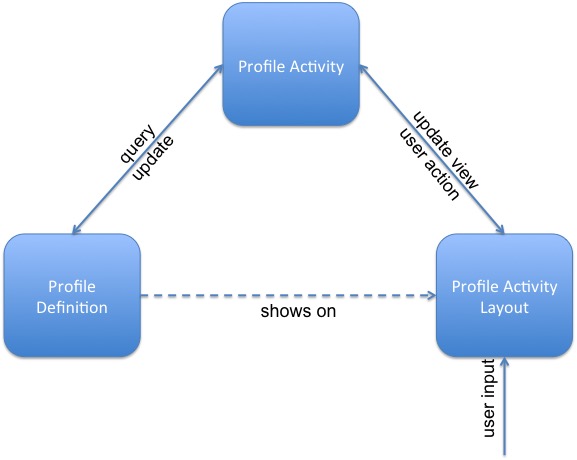
We design the user interface in the profile activity layout. It defines how the profile data will be presented to the user and how the user update the profile in term of where they input the information and how they signal the system to save the profile. The profile activity layout is the view component in MVC.
The profile activity glues the profile definition and the user interface
together: it get data from the profile definition then push the data to the
profile activity layout to show the profile to the user; when the user click
the Save button, the activity is signaled. It retrieve the
updated data from the view and push it to the profile definition to save.
Tracking
Tracking is the most complex module on MyRuns, which is shown below.
![]()
As you can see from the diagram, the model has three sub-modules: tracking service, trace data structure, and trace database. The trace data structure defines what data is in a trace (e.g., GPS coordinates, time, duration, etc). All traces are saved in the trace database. The tracking service collect GPS coordinates as well as other trace related information.
The MapView layout defines how the trace data will be presented to the user. It shows the live location trace, as well as location traces from the history.
The MapView activity glues the user interface and the underline data structure, database, and tracking service together. If the user is tracking, the activity starts the tracking service, which creates an instance of the trace data structure. The service insert GPS coordinates to the trace instance, and notifies the activity, which, in turn, updates the MapView layout to show the latest location trace. After the user finished tracking, the activity stops the service, then save the trace instance to the database.
If the user want to view a trace from history, the MapView activity retrieve the record from the database, then updates the MapView layout to show the trace.
The implementation detail is described in later sections.
User
Interface Implementation
This section provides an overview (read hints without details) of the design
and implementation of the user interfaces.
Main
Activity
The main activity is a navigation interface to access different interfaces
by clicking different tabs on the top of the screen. The tabs use an ActionBar to add multiple Tabs to one activity.
Start
Fragment
Main
Interface
The start tab allows the user to enter exercise information manually as discussed earlier. The root layout could be LinearLayout. You can also use other layout types if you wish. You will need spinner widgets for the layout to create a drop-down list for both the input type and activity type options.
You
also need to implement the setOnClickListener for the
"Start" and "Sync" buttons. Once the "Start" button
is clicked, the app should fire the different activities according to the
"Input Type". If the input type is "Manual Entry", then the
ManualInputActivity allows the user to enter exercise
stats; when "GPS" or "Automatic" is selected, the MapDisplayActivity should be shown to the user. The
interfaces for both activities are discussed in Start
Tab section. The "Activity Type" should be passed to the new
activities by putting the value to the intent’s extras. Activity types may
include Running, Walking, Standing, Cycling, Hiking,
Downhill Skiing, Cross-Country Skiing, Snowboarding, Skating, Swimming,
Mountain Biking, Wheelchair, Elliptical and Other.
ManualInputActivity
The user enters exercise information using dialogs driven by the ManualInputActivity. Therefore, you need to implement all the related dialogs in a DialogFragment, say MyRunsDialogFragment, or implement a DialogFragment for each dialog. After the user is done with inputting information using dialogs, the ManualInputActivity will store the input temporarily in an ExerciseEntry object. When the user clicks the "Save" button, the app saves the temporary data associated with the exercise stats in the database – so an insert in the database is going to occur when an exercise object representing all the information associated with a manually input single exercise is inserted as a new row in to the database. That was a torturous sentence class ;-) In dialog fragment's onCreateDialog(), you should set which activity's method should be called when the user clicks the OK button.
Please
read Android API documents for details on DialogFragment.
MapDisplayActivity
The MapDisplayActivity layout has three part: map view, status and buttons. In order to overlay the status on the map, you can use FrameLayout and put both mapfragment and a LinearLayout which contains the textviews needed to show the status. Buttons can be put in another LinearLayout. The following layout skeleton shows such design.
<FrameLayout> <fragment android:id="@+id/map" class="com.google.android.gms.maps.MapFragment" > </fragment> <LinearLayout> <TextView android:id="@+id/type_stats" android:text=" " /> .... </LinearLayout> <LinearLayout android:layout_gravity="bottom" > <Button android:id="@+id/btnSave" android:onClick="onSaveClicked" /> <Button android:id="@+id/btnCancel" android:onClick="onCancelClicked" android:text="@string/ui_button_cancel_title" /> </LinearLayout> </FrameLayout>In order to show the map properly, you need to get a Google MAP API key for your app. You can check Android developers to find out how to do that.
The location trace needs to be updated once a location update is available and processed. You need to create a starting marker marking the start position, ending marker marking your current location and al line showing your trace. The starting marker needs to be place at the first location coordinate. Draw a single polyline along all the collected location coordinate. Place the ending marker at the last location coordinate.
Exercise status include activity type, average speed, current speed, climb, calories and distance. Please refer to the demo apk for details.
MapDisplay has two modes: displaying history entry and
showing the live location trace. To display a history entry, you need to
figure out a way to retrieve the data from the database. To show the live
location trace, you need to receive an update notification from the TrackingService and update the map accordingly. Please
refer to History
Fragment and Service
Implementation for more details.
History
Fragment
Main
Interface
The History Fragment loads all exercise entries from the database then displays the entries as a ListView. As mentioned in class, a ListView uses an adapter to show data. You can implement an custom adapter class, for example, ActivityEntriesAdapter, which extends ArrayAdapter<ExerciseEntry> that exposes data from an array to the widget. You need to implement how the ListView displays each record. This can be done by using the override of the getView() method in ActivityEntriesAdapter. There should be two rows for each record. The format of the first row is as follows: <Activity Type> <Date>. The second row's format is: <Distance> <Duration>. One such example is showing in User Interface Walk-through (middle picture). You need to handle user's unit preference as well. You need to show the distance in user's selected unit (metric or imperial units, see Settings Fragment)
ListView’s onListItemClick should be implemented when the user clicks on history entries. When the selected entry’s input type is manual entry, the app opens DisplayEntryActivity to show the details. Otherwise it opens MapDisplayActivity to show the trace along with the status. You need to pass exercise entry’s unique database id to next activity, so that they can retrieve the entry from the database.
History
list also needs to respond to history entry updates. When the user delete an
entry through the web interface (see later), the cloud will send a message to
the app and the app needs to update the database. When the user is viewing a
history fragment, the app should be able to update the view to reflect any
changes.
DisplayEntryActivity
The DisplayEntryActivity has two jobs: 1) retrieve and display all the columns of a specific exercise entry to the list of TextView; and 2) setup a click listener for the option menu to call the deleteEntryInDB function in the ExerciseEntryHelper (see database section).
The user can view a summarized list of all exercises using the tab history fragment. If the user clicks on one of the summaries on the list view then detailed information associated with the single exercise is displayed by DisplayEntryActivity.
Importantly,
the user can delete the whole exercise entry by clicking on the
"DELETE" button in the upper right hand corner of the UI layout –
take a look at the app once you click on an summarized entry in the list view.
Settings
Fragment
Main
Interface
The Settings Fragment is quite different from the Start Fragment and History Fragment classes. Because the Settings Fragment sets up various application preferences settings, it inherits from PreferenceFragment. We only need to call addPreferencesFromResource in the onCreate() method to load the preferences UI from an XML resource. This XML file is called preference.xml in directory: res/xml. The preference UI is displayed when the "settings" Tab is clicked.
Most of the elements in the Settings Fragment are common widgets, e.g., CheckBoxPreference, ListPreference. There are two other elements in the design: user profile and class homepage. When clicking these two elements a new activity should pop-up. This is achieved using the PreferenceScreen XML tag – see PreferenceFragment for more details.
Clicking on class homepage should invoke and open a browser and go to our class webpage. This is a nice example of one of your components using other apps on your phone; that is the browser.
Hint:
you can directly set android:action
and android:data for an intent inside XML file.
Clicking on the user profile will open the profile activity.
Profile
Activity
The UI in Android is controlled by an XML file in the res/layout folder; in this case you need to specify the layout, for example, in the profile.xml. The profile.xml layout should consist of a linear hierarchical of widgets and layouts. Android provides a “drag and drop” method as part of the graphical layout – so you can either directly edit the xml file or use the graphical tool to design your layout, or both: you can easily switch between both modes as shown in class.
The layout should be a ScrollView element. Inside the ScrollView use a vertical LinearLayout. You need to program all elements contained the layout. The titles for all elements (e.g. Name, Email, Phone etc.) are TextView widgets. The editable boxes are EditText widgets. And the buttons for gender element are RadioButtons grouped as a RadioGroup. You will assign IDs to your widgets in the XML code, which you will refer later in your Java code. It’s not necessary to give every item an ID. For example the TextViews item, you won’t use them in the future, so their ID fields are not important. The grey hints in each EditText are specified by property “android:hint”. Please set different keyboard layout for numerical and text input box using android:inputType property of EditText. By doing this, when you first interact with the text box, the keyboard layout is optimized for your type of input: for phone number field, the keyboard will be all numbers with larger buttons, etc. For email, the keyboard will be a Qwerty keyboard. Note that all properties specified in the XML file can also be specified and modified in the Java code. But use XML as much as possible rather than programming the UI. If the appearance of the UI changes as the program executes, you will need to do some UI work in the Java code.
In profile.xml, specify event handlers or callbacks for the two buttons. The callback logic for the save button captures the current information in the EditText and RadioButton elements and stores the user data; in the case of cancel button nothing is done other than to exit the activity. Here is an example of how you setup event handler for save button.
You should implement two private helper function methods in the activity to help load user data that has already been saved - called loadProfile() - and one to save the user data – called saveProifle(). Consider saveProifle(): this function saves the user input data using a SharedPreference object, as discussed in class. After calling the helper function the activity simply displays some toast to the screen letting the user know that the data is saved. Similarly, when the application is started (either for the first time or restarted) the activity needs to load the user data using the loadProfile() helper. Your helper function calls loadProfile() method in onCreate() and uses the same SharedPreference object to load the data and display it to the screen. Think about the edge case the first time that the app runs when no previous data is saved. You will need to make sure some default data (e.g., empty string elements) are displayed.
You will need to add a ImageView for displaying the photo and a button to trigger a Dialog, which will ask the user to either use camera or existing photos as shown above (central image). The selected photo needs to be cropped to fit the size of the ImageView. Also, you need to handle screen rotations. Recall in the class, a screen rotation will trigger onCreate(), which will remove the unsaved pictures in this case. You can utilize onSaveInstanceState() to save the temporary profile picture and reload it in onCreate().
Note, the triggered dialog invokes MyRunsDialogFragment that inherits DialogFragment. We will reuse the MyRunsDialogFragment class in future labs to handle all customized dialog boxes for the MyRuns app. In MyRunsDialogFragment, you can differentiate various dialog fragments by supplying distinctive dialog IDs in the onCreateDialog method.
Setting
the profile image is challenging. When user clicks the "Change"
change button, the activity shows a dialog asking if the user wants to take a
picture or select one from the gallery as discussed above. Based on the users
input the activity starts the camera or galley apps. You need to use startActivityForResult() to get results back from the camera or galley app, as
discussed in class. Consider the following workflow: start an activity to get
an image (either by camera or gallery), the activity returns the results to the
profile activity, the profile activity then start another activity to crop the
image. Finally, the profile activity gets the cropped image back from the
cropping activity and displays it in the image view. You can use MediaStore.ACTION_IMAGE_CAPTURE to open the camera, Intent.ACTION_PICK to open the gallery.
Database
Implementation
This
section discusses the design and implementation of the database.
Data
structure
ExerciseEntry is the core data structure of the app. It defines what information a workout entry should have -- we use the term workout and exercise interchangeably in this document. It can be defined as below.
public class ExerciseEntry { private Long id; private int mInputType; // Manual, GPS or automatic private int mActivityType; // Running, cycling etc. private Calendar mDateTime; // When does this entry happen private int mDuration; // Exercise duration in seconds private double mDistance; // Distance traveled. Either in meters or feet. private double mAvgPace; // Average pace private double mAvgSpeed; // Average speed private int mCalorie; // Calories burnt private double mClimb; // Climb. Either in meters or feet. private int mHeartRate; // Heart rate private String mComment; // Comments private ArrayList<LatLng> mLocationList; // Location list }You
need to implement methods to set/get these attributes. For example, you need to
implement methods to convert mLocationList to byte array
to save in the database and convert byte array to array list when retrieving
the location list.
Database
Table Schema
There is only one table needed. It can be defined as follow:
CREATE TABLE IF NOT EXISTS ENTRIES ( _id INTEGER PRIMARY KEY AUTOINCREMENT, input_type INTEGER NOT NULL, activity_type INTEGER NOT NULL, date_time DATETIME NOT NULL, duration INTEGER NOT NULL, distance FLOAT, avg_pace FLOAT, avg_speed FLOAT, calories INTEGER, climb FLOAT, heartrate INTEGER, comment TEXT, privacy INTEGER, gps_data BLOB );The
_id is the primary key. In database, the primary key uniquely
identifies a record. "AUTOINCREMENT" indicates that the value will be
set automatically and incrementally. The field gps_data
stores all the GPS coordinates. We use BLOB to save all the coordinates. A BLOB
value is a blob of data, stored exactly as it was input. (see
here) As mentioned in Data
structure, you should store the location list in gps_data.
Implement
Database Operations
The design principle of the database operations is to hide database operation details from app's other modules. That is, other modules, e.g. history tab, do not need to operate the database directly to get data entries from or save data entries to the database. There is concept called Object-relational mapping which converts relational database operations to object-oriented operations. Hibernate is such platform. We will implement this concept in the simplest form. We define a helper class to encapsulate all the database operations. You can use SQLiteOpenHelper to implement your helper class. All necessary methods are defined as follows.
// Constructor public ExerciseEntryDbHelper(Context context) { // DATABASE_NAME is, of course the name of the database, which is defined as a tring constant // DATABASE_VERSION is the version of database, which is defined as an integer constant super(context, DATABASE_NAME, null, DATABASE_VERSION); } // Create table schema if not exists @Override public void onCreate(SQLiteDatabase db) { db.execSQL(CREATE_TABLE_ENTRIES); } // Insert a item given each column value public long insertEntry(ExerciseEntry entry) { } // Remove an entry by giving its index public void removeEntry(long rowIndex) { } // Query a specific entry by its index. public ExerciseEntry fetchEntryByIndex(long rowId) { } // Query the entire table, return all rows public ArrayList<ExerciseEntry> fetchEntries() { }In each method defined above, you need to get a database object using getReadableDatabase() or getWritableDatabase(), then do the reads/writes. Remember to close database cursors and database object after you are done.
As you can see from the class interface definitions, the input or output of these methods are all ExerciseEntry objects. When the history tab is loaded, it uses fetchEntries() to get the list of all entries. Then the list can be bound to an adapter so that the list view can show the entries. When the user selects an entry in the history tab, the app can use the fetchEntryByIndex() to get the entry’s details and display them either in a display activity (if it is a manual entry) or in the map (if it is not a manual entry). If an entry is generated, you can use insertEntry() to insert it to the database.
Hint:
- Use Sqlite3, which is natively supported by Android
- Implement the helper class by extending SQLiteOpenHelper
- You would save the location trace in either a Location
list or a LatLng list. In order to save the
trace to the gps_data blob field, you need to
convert the list to a byte array when you save the record, and convert the
byte array to the list when you read it from the database.
Use
Database Helper in Activities
To implement the database in the activities, you should create a database helper object. For example, if you define your helper class as ExerciseEntryDbHelper, you should create the helper object like this:
ExerciseEntryDbHelper exerciseEntryDbHelper = new ExerciseEntryDbHelper(this);After this, you can use this object to operate the database. For example, if you want to remove an entry from the database:
exerciseEntryDbHelper.removeEntry(entryID);Service
Implementation
This
section discusses the design considerations for service implementation.
Tracking
Service Design
There are two tracking mode. When the user clicks the start button in start tab, the onStartBtnClick handler passes the parameters (i.e., input type (GPS/automatic) and activity type) to MapDisplayActivity. MapDisplayActivity is also used to display the history entry, so it needs to determine if it should display a history entry or start a new entry. If it needs to display an entry, then StartTabFragment should pass the row id to it so that it can retrieve the entry from the database.
If MapDisplayActivity needs to record a new workout, it starts the tracking service, get the exercise entry from the service, then update the map when it receives an update from the tracking service. The following flow chart shows the work flow of tracking service.
![]()
You need to start the service explicitly instead of using the bind the service only (you can try to figure out why yourself). Also, you need to make sure the activity will not leak bound services. You can check this by inspecting logcat output. The key idea is that TrackingService creates an exercise entry and updates it when a new location update or activity inference update is available. The TrackingService sends a message to the MapDisplayActivity, so that the activity can update the map in a timely fashion. MapDisplayActivity gets the exercise entry when it is bound to the service, and saves the entry in the database once the tracking is completed.
Hints:
- Put parameters in intent’s extras. The intent is used
to start activity/service;
- Use Play Service API to implement collecting location
coordinates;
- All data update should be done in TrackingService,
display the route should be done in MapDisplayActivity;
- Only use one polyline to draw the trace;
- Center the map when necessary;
- Manage the notification in TrackingService,
e.g., display the icon in onBind(), remove it in onDestroy().
Activity
Recognition
In the automatic mode, the app continually infers the activity type using accelerometer data. The activity classifier is built using Weka. The following figure shows the activity classification process. TrackingService should implement onSensorChanged() interface to receive accelerometer updates. Once it received an update, it put the accelerometer reading into a data queue. A working thread continuously gets readings from the queue.

Once the app has 64 readings, a feature vector is generated which will be the input of Weka classifier. The classifier generates a label that indicates user’s current activity (e.g., walking). The label is then updated in the ExcerciseEntry. A basic counting approach determines the overall activity based on the ratios of each label; that is if walking and running are measured the activity with the most labels become the overall label for the period.
The feature vector is generated as follows:
max = max(accBlock); // Compute the re and im: // setting values of re and im by reference. fft.fft(re, im); for (int i = 0; i < re.length; i++) { // Compute each coefficient double mag = Math.sqrt(re[i] * re[i] + im[i]* im[i]); // Adding the computed FFT coefficient to the // featVect featVect.add(Double.valueOf(mag)); // Clear the field im[i] = .0; } // Finally, append max after frequency components featVect.add(Double.valueOf(max));To
collect the training data, import the myrunsdatacollector.zip
to Android Studio, build it and install it on your phone. This is the data
collector app that you will use to collect training data to create
classification model in Weka. The collector allows you to label different
activities. The output of the collector is a single file called feature.arff, which is input to Weka to create the
classifier.
Google
App Engine
When the user clicks “Sync”, all local history entries will be uploaded to Google App Engine. Users can view the entry from browser. When the user clicks one entry’s “DELETE” button, the entry should be deleted both remotely on the cloud and locally on the phone. Make sure that you are deploying the server to the cloud. An example web interface is shown below.

The following figure shows how the system works. The app registers Google Cloud Messaging (GCM) in the MainActivity to receive entry deletion updates from the server. When the app is registered with GCM, it sends its device id to the server. The GcmRegistrationAsyncTask in the MainActivity, sends the device id to the server. In the server, it is handled by the RegistrationEndPoint, which then saves the device id into the datastore. When the user clicks on the ’Sync’ button, the StartTabFragment retrieves all the entries from the database, and then converts them into JSON format. ServerUtilities then posts the JSON format data to server’s PostDataServlet which in turn save the data to the datastore. In the server, the MyRunsAppEngineServlet fetches all the entries from the datastore and displays them on the web interface as a HTML table. When the user clicks the delete button, it passes through SendDeleteMessageServlet, which deletes the particular entry from the datastore and redirects to MyRunsAppEngineServlet. In the meantime the SendDeleteMessageServlet also sends a GCM message using MessagingEndPoint to the device, which contains the ID of the field to be deleted. This message is received by the GCMBroadcastReceiver, and the GCMIntentReceiver is invoked, which in turn deletes the entry from the local database.
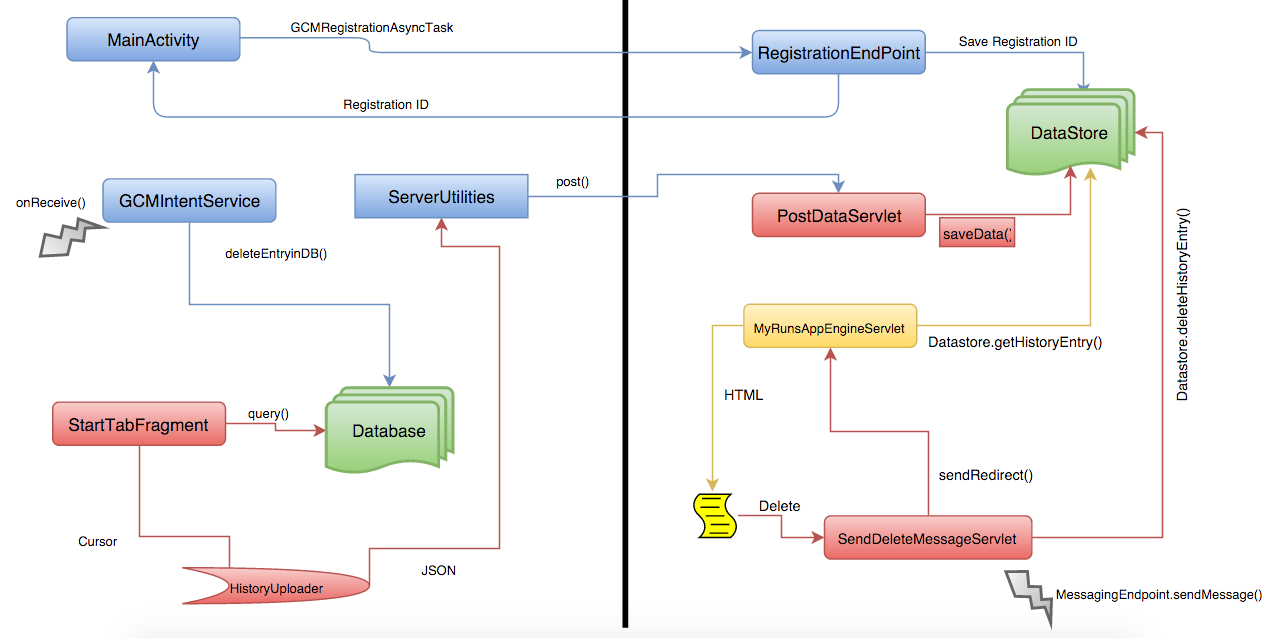
MyRuns_Lab6_AppEngineServlet provides user the list of all entries (as shown in the first picture). When user clicks the “Delete” button, the request will be posted to SendDeleteMessageServlet where a message will be sent to the app and the selected entry will be deleted from the datastore. When the deletion is done, it should redirect to MyRuns_Lab6_AppEngineServlet to show the entry list. The entry should has been remove.
Hint:
- You should know how Google Cloud Messaging works
- You should know the concept of Java Servlet
- You should know Google Datastore
is not a database
The MyRuns Labs
The
6 labs serve as checkpoints along the way to build the complete lab. Follow
each lab after reading the complete documentation. We provide the APK for each
lab and the pointers beflow as well as the detailed
spec (above). In what follows, we discuss each lab.
Lab 1
-- The User Profile
Demo the lab: You can download MyRuns-Android-chk1.apk and run the app to see how it operates. Use that knowledge to fill in the gaps in the above document.
Complete the profile activity. Save profile to the SD/flash card and reload when needed.
This is the first in a series of labs that allow you to develop the MyRuns App to capture and display your physical activities using your Android phone. This lab focuses on developing a simple UI for setting up your profile: i.e. name, email, phone number, gender and major. It works as follows: the app presents the user with an activity that allows them to input and save their profile. When the app is opened again, the saved profile information should be reloaded and displayed, allowing the user to review their data and make further changes if needed.
In this lab there is a single activity. The UI design for the activity is specified in Settings Tab section, and the implementation design is specified in Settings Fragment section. The application is defined in the AndroidManifest.xml file. You specify all of these files in XML and Java code. Recall the manifest captures the key information about the application to the Android system, information the system needs before it can run any of the application's code -- for example, the activity name, etc. Typically you will update the manifest for example if you have an application with more than one activity.
Note: since DialogFragment has not been taught at this point, you do not have to implement the selection of the profile image through "select from gallery". When the "Change" button is clicked, you only need to take a picture using the camera but you have to be able to crop the picture.
You
cannot use println or printf
for logging purpose with Android -- for control flow or looking at programming
state such as variables. As discussed in the notes Android supports a logging
capability that you can add to your code. Take a look at the class notes that
uses Log.d(TAG,
..). Setup your on TAG and add Log.d()s to all your methods -- also checkout Log. If your
program crashed, don’t be panic. Look into the system log in the LogCat window, it will print out the function call stack
upon crash. If you see logs with red font then that is associated with the
exception. Most of the time you will find what causes your crash. We will
discuss debugging techniques in more detail next week in class.
Lab 2
-- The User Interface (UI)
Demo the lab: You can download MyRuns-Android-chk2.apk and run the app to see how it operates. Use that knowledge to fill in the gaps in the above document.
In this lab, you need to complete all the user interfaces, including all the activities, main activity's Action Tabs. You should be able to navigate between all of the activities.
You need to continue implementing the profile activity. In Lab 1, you have implemented setting profile picture by taking a photo. As described in Settings Tab section, user should also be able to select a picture from the gallery as their profile image. To make your life easier, we provide you the code to convert image URI to real file path.
private String getRealPathFromURI(Uri contentUri) { String[] proj = new String[] { android.provider.MediaStore.Images.ImageColumns.DATA }; Cursor cursor = getContentResolver().query(contentUri, proj, null, null, null); int column_index = cursor .getColumnIndexOrThrow(MediaStore.Images.Media.DATA); cursor.moveToFirst(); String filename = cursor.getString(column_index); cursor.close(); return filename; }It is possible that the Android Gallery app would show pictures from your Picasa, but you can't access these pictures directly. Again, to make your life easier, we do not require you to handle this situation.
You need to implement all the activities shown in User Interface. To be specific, you need to implement the main activity containing three fragments: start, history and settings. You should be able to switch to different tab. When you rotate the screen, the tab that is open should stay opened. Switching to default tab is not acceptable when the screen rotated. You need to figure out how to save selected tab as discussed in Main Activity section.
You
don't need to show the map in MapDisplayActivity.
Lab 3
-- The Database
Demo the lab: You can download MyRuns-Android-chk3.apk and run the app to see how it operates. Use that knowledge to fill in the gaps in the above document.
Complete the database design and implementation following the Database Implementation section. You should be able to add an exercise entry manually from the start tab at the main activity, view the entries in the history tab, and delete the entry from DisplayEntryActivity. You need to use AsyncTaskLoader for reading data from the database (see an example here).
You
need to show the data in correct format. For example, if the user set their
unit preference to Metric (Kilometers), all distance related data should be
shown in kilometers. If you save the data in miles, you need to convert it to
kilometers before showing it. You need to think of a good way to convert the
raw exercise entry data to human readable format. You also need to display some
data in the map in Lab 4. Try to come up with a good design to avoid duplicate
code.
Lab 4
-- Google Maps
Demo the lab: You can download MyRuns-Android-chk4.apk and run the app to see how it operates. Use that knowledge to fill in the gaps in the above document.
Design and implement the tracking services. Draw the real-time GPS trace on Google Maps using the continuous location updates. Save the traces in the database and visualize the GPS trace history on Google Maps. You should also be able to view the history trace from the history tab.
To
be specific, you need to finish implementing the MapViewActivity and tracking
service.
Lab 5
-- Activity Recognition
Demo the lab: You can download MyRuns-Android-chk5.apk and run the app to see how it operates. Use that knowledge to fill in the gaps in the above document.
Implement activity recognition. You should train an activity classifier by collecting accelerometer data, then apply the classifier in your app.
To
be specific, you need to finish implementing activity
classifier. This is a three-part problem: collecting training data using
the data collector, train the classifier and implement the classifier.
Lab 6
-- App Engine
We do not provide demo apk for this lab because it requires setting up app engine and modifying the configuration for each individual programmer, which is not feasible. However, here is a demo video, which can give you a brief idea of what you need to develop. The video only shows that the backend works on your local machine but you need to deploy it to the cloud.
You should finish the whole app engine side, which includes displaying history entries, delete an entry, receive uploaded history list and managing datastore. You need to publish your server to the cloud instead of running it locally. On the app side, your app should be able to upload the history list to the server, receive delete messages from app engine and delete any corresponding entries from the database. If the user is using history tab, the app should update the history list when an entry is deleted from the app engine by the user.