This
section discusses the design considerations for service implementation.
There are two tracking mode. When the user clicks the start button in start tab, the onStartBtnClick handler passes the parameters (i.e., input type (GPS/automatic) and activity type) to MapDisplayActivity. MapDisplayActivity is also used to display the history entry, so it needs to determine if it should display a history entry or start a new entry. If it needs to display an entry, then HostoryTabFragment should pass the row id to it so that it can retrieve the entry from the database.
If
MapDisplayActivity needs to record a new
workout, it
starts the tracking service, get the exercise entry from the service,
then
update the map when it receives an update from the tracking service.
Remember that you should consider using the MVVM architecture and LiveData in your
implementation.
You need to start the service explicitly instead of using the bind the service only (you can try to figure out why yourself). Also, you need to make sure the activity will not leak bound services. You can check this by inspecting logcat output. The key idea is that TrackingService creates an exercise entry and updates it when a new location update or activity inference update is available. The TrackingService sends a message to the MapDisplayActivity, so that the activity can update the map in a timely fashion. MapDisplayActivity gets the exercise entry when it is bound to the service, and saves the entry in the database once the tracking is completed.
Hints:
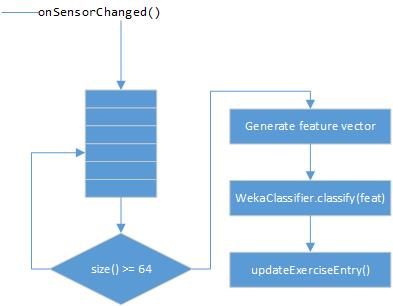
In the automatic mode, the app continually infers the activity type using accelerometer data. The activity classifier is built using Weka. The following figure shows the activity classification process. TrackingService should implement onSensorChanged() interface to receive accelerometer updates. Once it received an update, it put the accelerometer reading into a data queue. A working thread continuously gets readings from the queue.
Once the app has 64 readings, a feature vector is generated which will be the input of Weka classifier. The classifier generates a label that indicates user’s current activity (e.g., walking). The label is then updated in the ExcerciseEntry. A basic counting approach determines the overall activity based on the ratios of each label; that is if walking and running are measured the activity with the most labels become the overall label for the period.
The feature vector is generated as follows (the code we gave to you was implemented using JAVA):
max = max(accBlock); // Compute the re and im: // setting values of re and im by reference. fft.fft(re, im); for (int i = 0; i < re.length; i++) { // Compute each coefficient double mag = Math.sqrt(re[i] * re[i] + im[i]* im[i]); // Adding the computed FFT coefficient to the // featVect featVect.add(Double.valueOf(mag)); // Clear the field im[i] = .0; } // Finally, append max after frequency components featVect.add(Double.valueOf(max));To
collect the training data, import the myrunsdatacollector.zip
to Android Studio, build it and install it on your phone. This is the data
collector app that you will use to collect training data to create
classification model in Weka. The collector allows you to label different
activities. The output of the collector is a single file called feature.arff, which is input to Weka to create the
classifier.
When the user clicks “Sync”, all local history entries will be uploaded to Firebase. Users can view the entry from browser. When the user delete an entry, the entry should be deleted both remotely on the cloud and locally on the phone.
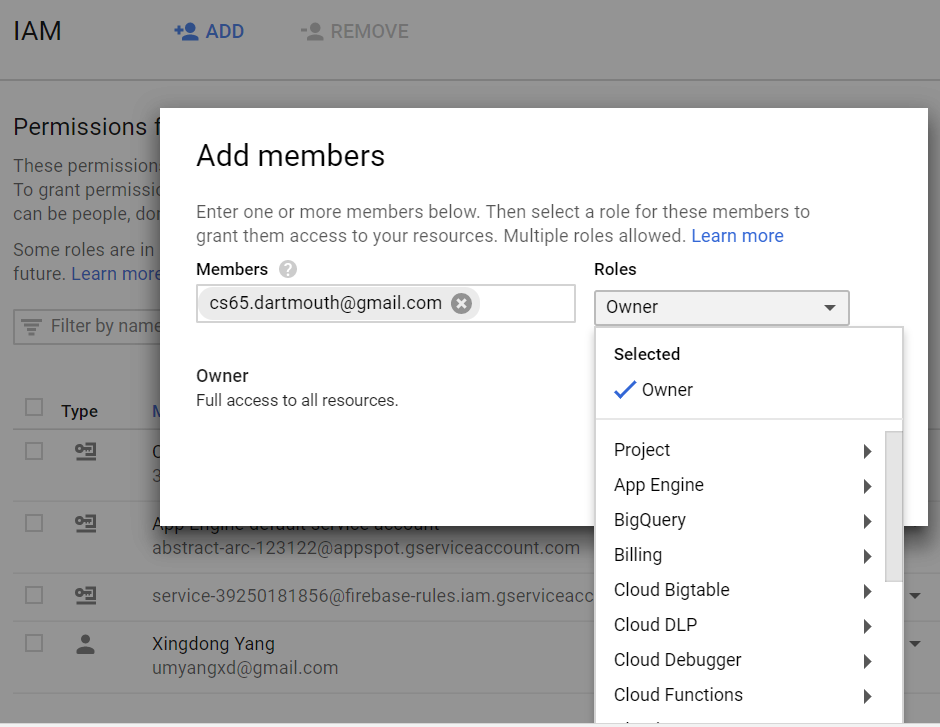
Your implement should allow a user to login/sign up your Firebase backend using email and password. You should also implement a menu item in the Profile page to allow the user to logout. When the user clicks on the ’Sync’ button, the StartTabFragment retrieves all the entries from the database, and save them in Firebase. When the user deletes an item in Firebase, it should delete the entry from the local database and update the history list. Finally, you need to give graders access to your MyRuns6 Firebase project. To do so, you first nevigate to your MyRuns6 project, and click "Project Overview" -> "Users and permissions"

In the following page, you select "ADD".

A dialog will show up. You add cs65.dartmouth@gmail.com to the "Members" textbox and choose "Project"->"Owner" under "Roles". Finally, you click the"ADD" button.