Image processing
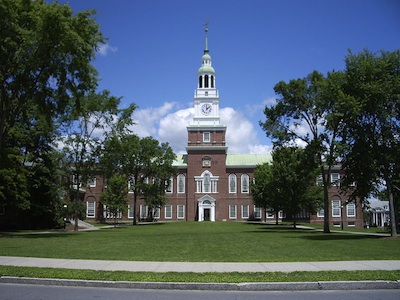
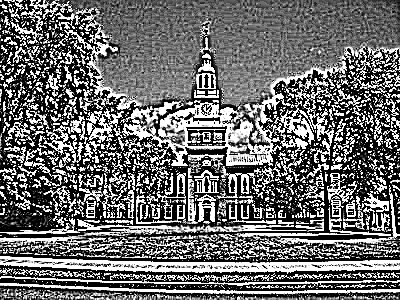
Our problem today is to process images in the kind of manner that we could with software like Photoshop, except writing our own code to do it directly. So the underlying data type is a representation of an image, and the main operations are getting and setting the colors in the image. For example, we could take an image of Baker and produce a kind of charcoal engraved looking version.
Outline
All the code files for today: ImageProcessingGUI.java; ImageProcessingGUI0.java; ImageProcessor.java; ImageProcessor0.java; Puzzle.java; PuzzleGUI.java
The code uses the Baker image from last time.
Core code
Let's start with some basic skeletal code: ImageProcessor0.java and ImageProcessingGUI0.java. The processor stores (and will later manipulate) an image, while the GUI load and handles the interaction with it. The code should be pretty comfortable, with the GUI basically the same as the SmileyGUI (plus a key press handler) and the processor nothing but a holder of the image. Note that the 's' key says to save a snapshot; it won't appear in Eclipse unless you right-click the "pictures" folder and "refresh" it. We'll be including a lot more functionality in this skeleton, ultimately producing ImageProcessor.java and ImageProcessingGUI.java.
Manipulating individual pixels
We saw last time how to get a pixel value. The primary colors for computer screens are red, green, and blue; any color can be specified as a combination of them. For 8-bit color, the color value ranges from 0 (none of that color) to 255 (full on). Thus:
| red | green | blue | result |
|---|---|---|---|
| 255 | 255 | 255 | white |
| 0 | 0 | 0 | black |
| 255 | 0 | 0 | bright red |
| 0 | 255 | 0 | bright green |
| 0 | 0 | 255 | bright blue |
| 128 | 0 | 0 | not-as-bright red |
| 0 | 128 | 0 | not-as-bright green |
| 0 | 0 | 128 | not-as-bright blue |
Other colors are given as combinations of red, green, and blue, as illustrated in this simple color table. (A web search will return many such tools for determining color compositions.) Note that RGB is an additive color model (e.g., red+green=yellow), suitable for mixing light (as a computer display does), as opposed to, say, paints.
To conveniently access the red, green, and blue components, we create a Color object with the returned value; it then provides getRed, getGreen, and getBlue methods. There are corresponding setters, and a constructor that takes the 3 values. The color can be converted to an RGB to store in an image.
Color color = new Color(image.getRGB(x, y));
int red = color.getRed() / 2;
int green = color.getGreen() / 2;
int blue = color.getBlue() / 2;
Color newColor = new Color(red, green, blue);
image.setRGB(x, y, newColor.getRGB());
This divides each color channel by 2, dimming that pixel. We can do that for all pixels with nested for-loops looking at each (x,y).
for (int y = 0; y < image.getHeight(); y++) {
  for (int x = 0; x < image.getWidth(); x++) {
    // Get current color; scale each channel; put new color
    Color color = new Color(image.getRGB(x, y));
    int red = color.getRed() / 2;
    int green = color.getGreen() / 2;
    int blue = color.getBlue() / 2;
    Color newColor = new Color(red, green, blue);
    image.setRGB(x, y, newColor.getRGB());
  }
}
In our doubly-nested loop, we loop over each row / y coordinate in the image; for each of those, we loop over each column / x coordinate. We use a common loop structure for Java (and other C-like languages), where we initialize (and declare) a loop counter variable (e.g., y), loop while some condition holds (y < image.getWidth()), and update the loop counter (y++). Note that with 0-based indexing, for 600 rows we go from 0 to 599 (as in the table above), and thus the loop continuation test is < 600 (or ≤ 599, though the < version is conventional). If you forget and do ≤ 600 or in some other context try to index the pixel at 600, you'll get a nice error message.
We wrap up that nested loop in the dim method. Note that since this is a method of the ImageProcessor class, it has access to the image instance variable of the object.
How about brighten — should be just the opposite, right? Same basic structure. But there's a problem: we can't exceed 255. So we take the mininum of 255 and the scaled up value.
And for fun (by some definition of "fun") I included a method does some different scaling on different color channels. Note that the double precision (floating point) number has to be cast to an int for putting in our image.
Another example adds random noise to each pixel. Same nested loop structure, but now we set the pixel value by adding in a random number to the original. Recall that Math.random returns a number between 0 and 1, so we multiply it by 2 and subtract 1 to have it be between -1 and +1. We can then further scale to increase the noise: noise = scale * (2*Math.random() - 1). Here we have to make sure not only that we don't go above 255 but also that we don't go below 0. This is a common enough issue that I separated out a function constrain to return a value if it's within a range, or the appropriate boundary value if it's outside the range.
private static double constrain(double val, double min, double max) {
  if (val < min) {
   return min;
  }
  else if (val > max) {
   return max;
  }
  return val;
}
The static tag here indicates that the function is not a method of an object, but rather just a standalone function (of the class). So we invoke it without an object and a dot before its name, and it doesn't have access to an object's state (e.g., image). That's the same thing with the main method that we've always used — it exists outside any object, and in fact is where we start creating objects.
A method to convert to grayscale has the same structure, and uses a different helper function to compute the luminosity (a weighted average of the red, green, and blue values). That same value is stuffed into each color channel.
What other such filters can you think of?
Accounting for geometry
So far we've treated each pixel the same, regardless of where in the image it is. It would be easy enough to use x and y in any of the formulas, e.g., dimming more toward the bottom. But let's go beyond that, and actually make one pixel's value depend on those of others. To do so, we'll need to create a new image to hold the result, so that our processing of one pixel doesn't mess up our processing of another that depends on it (unless that were our intention).
For example, to flip an image, just get the pixel and 0 and put it at 599, 1 at 598, ..., 599 at 0. Note the we have to be careful with the indexing! The new row is the number of rows minus 1 (i.e., the last actual row) minus the old row. I found it convenient here (and required in some upcoming examples), to create a new image into which we'll save the result, rather than directly modifying the current image. Then at the end of the method, we update the image instance variable to refer to this new image. Since the Java code to create a new image is a bit ugly, I wrote a new helper method createBlankImage to handle that, along with one createCopyResult that fills the new image with the pixels from the current image.
We can also scramble an image a bit, by taking a pixel's value from some other nearby pixel. We pick a random neighbor in some radius around the current position, but constrain it not to be outside the image:
int nx = (int) constrain(x + radius * (2*Math.random() - 1), 0, current.getWidth() - 1);Finally we come to operations on a whole neighborhood around a pixel. The neighborhood is often defined as those pixels immediately adjacent to the pixel (N, NE, E, ..., NW).
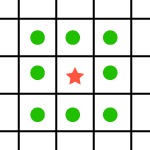
Let's consider the values in the neigbhorhood around one pixel.
| 10 | 12 | 13 |
| 12 | 34 | 11 |
| 10 | 13 | 11 |
The one pixel's value is quite a bit higher than the others; this might be just an artifact that should be smoothed out. To do so (blurring/smoothing out differences), we can replace the value in the center with the average of all the values in its neighborhood (including itself). Thus instead of 34 we'd have (10+12+13+12+34+11+10+13+11)/9 = 14, which is much more like its neighbors.
The average method does just that, with two additional nested loops over the 3x3 grid of the center pixel and its neighbors. Note that again we have to be careful not to go outside the image boundaries; Math.min and Math.max help with that, with much the same logic that we used for constrain. I wrote this code to have a generic radius parameter (the example is 1) to go to a larger neighborhood (and blur even more), but your computer will grind to a halt if you make it too big.
We can do other interesting effects with much the same neighborhood approach. For example, to sharpen an image, we subtract out the neighbors from the center.
| -1 | -1 | -1 |
| -1 | 9 | -1 |
| -1 | -1 | -1 |
The code is again parameterized by a radius, so the center is computed based on the number of neighbors, which could go further out.
This approach of summing up values after multiplying by weights in some kind of mask is known as convolution (with the verb "to convolve"), and is a powerful image and signal processing technique.
Interaction
Now let's bring in the mouse. Key presses toggle the action to be performed upon mouse press (stored in instance variable action), so that the press invokes one effect or the other. They also modify the instance variable radius that controls the size of the effect.
Let's first draw squares. With action "p", a mouse press grabs the color at the location of the press, and holds onto it in an instance variable. Then with action "q", that color is painted in a square at the location of the mouse press. That's just the usual nested loops (checking for boundaries!) packaged up in drawSquare of ImageProcessor.
For something a bit fancier, I included another image processing method, lens, that kind of magnifies the image around a point. We use the mouse press location as the point. The lens method itself has our usual nested loops, but only does something if the distance from the current (x,y) to the one passed in (cx,cy) [from the mouse event] is small enough. If so, the value at (x,y) is taken from a point toward the center.
Since we have modified the image in responding to the mouse event, we need to let Java know to update the window, via repaint at the end, once everything is in place to be repainted.
Puzzle
We can make a puzzle by splitting a single image up into pieces that get shuffled up and then put back in place by the user. See Puzzle.java.
We store the pieces in a list, laid out like this (for a 3 row * 4 column setup):
| piece 0 | piece 1 | piece 2 | piece 3 |
| piece 4 | piece 5 | piece 6 | piece 7 |
| piece 8 | piece 9 | piece 10 | piece 11 |
A little helper method getPiece maps from a row and column to an index — the row * the number of columns + the column.
To create the pieces, we have nested loops over the pieces per row and per column, creating a new image for each as an appropriately-placed subimage of the original. If each piece is pieceWidth pixels wide, then the cth piece starts c*pieceWidth pixels over.
For illustrative purposes, we ignore the Java method to extract a subimage and set up our own getSubimage. (As with constrain above, this is a static function, as it doesn't belong to / need a Puzzle, but just the parameters passed to it.) We create a new empty image, fill in its pixels, and return it.
To make it a puzzle, we need to shuffle up the pieces. A simple way to do that is to march through the array, for each (row, column) swapping the piece with some other randomly-chosen (row2, column2). Since swapping is a useful method, I separated it out. It uses the common technique of a local temporary variable to hold one member of the swapped pair.
Finally, the GUI, PuzzleGUI.java. We specify the number of rows and columns in the puzzle as "constant variables" (rather than magic numbers), using the Java static final tag. We listen to the mouse press, and see which piece it was, by dividing the coordinates by the piece size. If it is the first piece selected, we just note that; if it is the second, we swap; if it is a repeat, we deselect. The instance variables selectedR and selectedC support that by keeping track of which piece (if any) has been selected.
To draw the puzzle, we simply loop over the pieces, drawing the pieces images at the appropriate places. The method also puts borders around them, with black borders for all the pieces other than the selected one. This is one of those unfortunate times where we have to do a typecast: from Graphics to Graphics2D, which is what we know we're getting, and which has the setStroke method.
Java notes
- static
- A
staticvariable or method "lives" outside of any particular object. A static method does not need (and is not called upon) any object.